Dog Broken Nail First Aid: 7 Essential Home Care Steps
Learn how to provide immediate care for your dog's broken nail and when to seek veterinary attention

Image: HearthJunction Design Team
First Aid for Dog Broken Nails: Complete Home Care Guide
If you’ve ever heard your dog yelp suddenly during a walk or play session, followed by limping or holding up a paw, there’s a good chance they’ve broken a nail. Broken nails are common injuries in dogs that can range from minor splits to painful complete tears that expose the quick (the sensitive inner portion of the nail). While this injury might seem minor, broken nails can be extremely painful for dogs and may lead to infections if not properly treated.
This comprehensive guide will walk you through everything you need to know about handling a broken nail emergency, from immediate first aid steps to follow-up care and prevention strategies.
Understanding Dog Nail Injuries
A dog’s nail consists of a hard outer shell (the actual nail) and an inner quick that contains blood vessels and nerves. When a nail breaks, especially if the quick is exposed or damaged, it can be quite painful and may bleed significantly. Dogs can break their nails in various ways, including:
- Catching their nail on carpet, furniture, or rough terrain
- Jumping off elevated surfaces
- Running on rough surfaces like concrete or gravel
- Having naturally brittle nails due to nutrition issues or health conditions
- Trauma from another animal stepping on their paw
The severity of nail injuries can vary widely, from minor cracks that don’t reach the quick to complete tears where the nail is partially or completely ripped from the nail bed. Recognizing the type of injury will help you determine the appropriate response.
Signs Your Dog Has Broken a Nail
Dogs typically display clear signs when they’ve injured a nail. Look for these common indicators:
- Sudden yelping or crying
- Limping or refusing to put weight on a paw
- Holding the affected paw up
- Licking or chewing at the paw excessively
- Visible bleeding from the nail or paw
- Visible damage to the nail (cracking, splitting, or complete tearing)
- Swelling around the nail bed
If you notice any of these signs, it’s important to check your dog’s paws immediately for a possible nail injury.
Step-by-Step First Aid for a Broken Dog Nail
When you discover your dog has broken a nail, follow these essential steps to provide immediate care:
1. Safely Restrain Your Dog
Even the gentlest dogs may snap or bite when in pain. Have someone help hold your pet while you examine and treat the nail. Consider using a muzzle if your dog is particularly anxious or in severe pain. A gentle “hug” restraint that immobilizes your dog while making them feel secure can be effective. Remember to speak soothingly and reassuringly throughout the process.
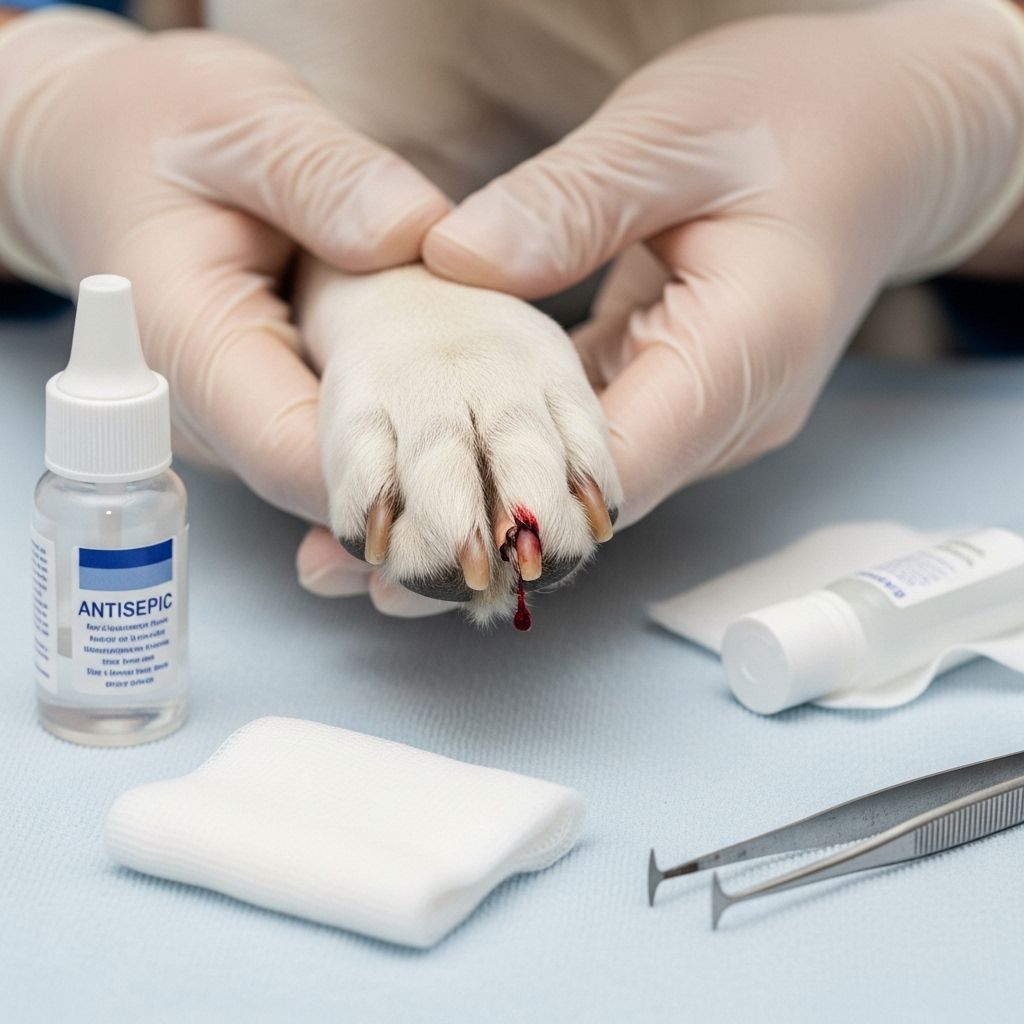
2. Control the Bleeding
If the nail is bleeding, your first priority is to stop the blood flow:
- Wrap the foot in clean gauze or a towel and apply gentle pressure to the injured toe for 5-10 minutes
- If bleeding continues, apply a styptic powder, pencil, or silver nitrate stick to the nail
- If you don’t have styptic products available, you can use household alternatives like cornstarch, baking powder, or flour
- Another effective trick is to press the nail tip gently into a bar of soap, which can help seal the wound
Consistent pressure is key – avoid checking the wound repeatedly as this can disrupt clot formation and restart the bleeding.
3. Remove the Damaged Portion (If Possible)
If there’s a loose piece of nail hanging, you may need to trim it to prevent further injury:
- For minor breaks where the loose portion is clearly separated, you can carefully trim it using pet nail clippers
- If the broken nail is still attached at the base but damaged, trim it just short enough so it doesn’t touch the ground when your dog walks
- Never attempt to pull off a partially attached nail as this can cause extreme pain and additional damage
- If you’re uncertain or if your dog is in too much pain to allow handling, leave this step to your veterinarian
Important: If the break is near or exposes the quick, or if you’re unsure how to proceed, it’s best to leave the trimming to a professional.
4. Clean the Injured Area
Once bleeding is controlled, gentle cleaning is essential to prevent infection:
- Gently rinse the paw with warm (not hot) water
- You can use a diluted antiseptic solution recommended for pets, but plain water is often sufficient
- Carefully pat the area dry with a clean towel
- Avoid harsh cleaners like hydrogen peroxide or alcohol as these can damage tissue and delay healing
5. Apply Antibiotic Ointment
After cleaning, apply a thin layer of pet-safe antibiotic ointment to help prevent infection. Medical-grade honey can also be used as a natural antimicrobial option. Ensure whatever product you use is safe if ingested, as dogs will likely lick their paws.
6. Bandage the Paw (If Necessary)
For more severe injuries, you may need to bandage the paw:
- Place a non-stick gauze pad over the injured nail
- Wrap the foot loosely with a self-adhesive bandage or gauze
- Ensure the bandage isn’t too tight – you should be able to slip a finger under it
- Use medical tape to secure the bandage, avoiding contact with fur
- Consider using a clean sock or dog bootie to protect the bandage from dirt and moisture
Change the bandage daily and monitor for signs of infection. Many minor nail injuries don’t require bandaging if kept clean and your dog doesn’t excessively lick the area.
7. Prevent Your Dog From Licking the Injury
Dogs naturally lick their wounds, but this can introduce bacteria and slow healing:
- Use an Elizabethan collar (cone) if your dog won’t leave the injury alone
- Consider alternatives like inflatable collars or recovery suits if your dog struggles with a traditional cone
- Closely supervise your dog, especially outdoors, until the nail has healed
When to Seek Veterinary Care
While many broken nails can be managed at home, certain situations require professional veterinary attention. Seek immediate veterinary care if:
- Bleeding cannot be controlled within 15 minutes
- The nail is completely torn off or severely damaged
- Your dog is in extreme pain or won’t let you examine the paw
- The quick is significantly exposed or damaged
- You notice signs of infection (swelling, discharge, warmth, or worsening pain)
- The injury affects multiple nails or is accompanied by other injuries
- Your dog has underlying health conditions that might complicate healing
Remember, when in doubt, it’s always safer to consult with a veterinarian. They can properly clean the wound, trim the nail correctly, prescribe appropriate pain medication and antibiotics if needed, and ensure there are no additional complications.
Veterinary Treatment for Broken Nails
If your dog requires veterinary care for a broken nail, here’s what you can expect:
- Pain management: Your vet may administer pain medication or even sedation for severely painful injuries
- Professional nail trimming: Veterinarians have the tools and expertise to safely remove damaged portions of the nail
- Thorough cleaning: They’ll clean the area with appropriate antiseptic solutions
- Examination of the nail bed: To check for deeper injury or infection
- Bandaging: Professional bandaging if required
- Medication: Prescription of antibiotics if infection is present or likely, and pain medication as needed
- Follow-up care instructions: Detailed guidance on home care and when to return for check-ups
The cost of veterinary treatment for a broken nail typically ranges from $100 to $300, depending on the severity of the injury and whether sedation or additional treatments are required.
Aftercare and Recovery
Proper aftercare is crucial for complete healing and preventing complications:
Daily Care
- Keep the area clean and dry
- Change bandages daily if used
- Administer any prescribed medications as directed
- Limit activity to prevent re-injury – leash walks only, no running or jumping
- Use booties or protective covers when going outside, especially in wet or dirty conditions
Monitoring for Complications
Watch for these signs of infection or complications:
- Increased pain, swelling, or redness
- Discharge (especially yellow or green)
- Foul odor
- Increased warmth around the affected toe
- Lethargy or fever
- Worsening limping or complete unwillingness to bear weight
Contact your veterinarian immediately if you notice any of these symptoms.
Preventing Future Nail Injuries
Once your dog has recovered, take these preventative measures to avoid future nail injuries:
Regular Nail Maintenance
- Trim your dog’s nails regularly (typically every 3-4 weeks)
- Use proper dog nail clippers and learn the correct trimming technique
- If you’re uncomfortable trimming nails, schedule regular professional grooming
- Consider using a nail grinder for smoother edges
Environmental Management
- Provide surfaces that naturally wear down nails, like concrete areas for play
- Check your yard for nail-catching hazards like wire fencing or gaps in decking
- Use ramps instead of having your dog jump in/out of vehicles
- Consider protective booties for hiking or rough terrain
Nutrition and Health
- Ensure your dog receives proper nutrition to maintain nail strength
- Consider supplements containing biotin, which promotes nail health
- Address any underlying health conditions that might affect nail integrity
- Keep your dog at a healthy weight to reduce stress on nails and paws
Frequently Asked Questions (FAQs)
Q: How long does it take for a dog’s broken nail to heal?
A: Most minor nail injuries heal within 1-2 weeks. More severe injuries where the quick was exposed or damaged may take 3-4 weeks for complete healing. The nail will gradually grow back over several months.
Q: Can a broken dog nail heal on its own?
A: Minor cracks or splits above the quick may heal on their own with basic first aid and monitoring. However, any break that reaches the quick or causes bleeding should receive proper treatment to prevent infection and relieve pain.
Q: Should I let my dog lick his broken nail?
A: No, you should prevent your dog from licking the injured nail. While dogs instinctively lick wounds, this can introduce bacteria, delay healing, and potentially cause infection. Use an E-collar or alternative if necessary.
Q: Will a broken nail grow back normally?
A: In most cases, yes. However, if the nail bed or matrix (where the nail grows from) is severely damaged, the new nail might grow in irregularly. Regular, proper nail trims can help guide the new growth.
Q: How can I tell if my dog’s nail injury is infected?
A: Signs of infection include increased swelling, redness, warmth, discharge (especially yellow or green pus), foul odor, increased pain, or your dog becoming more reluctant to put weight on the paw. If you suspect infection, contact your veterinarian immediately.
Conclusion
Broken nails are a common but painful injury for dogs. With proper first aid knowledge and quick action, most nail injuries can be successfully managed at home or with minimal veterinary intervention. Remember that prevention through regular nail maintenance is the best strategy for avoiding these painful injuries altogether.
By following the steps outlined in this guide, you’ll be well-prepared to handle a broken nail emergency and provide your furry friend with the care they need to heal comfortably and quickly. Always err on the side of caution and seek veterinary care when in doubt – your dog’s comfort and health are worth the extra precaution.
References
- https://www.petmd.com/dog/general-health/dog-wound-care-how-to-clean-treat-dog-wounds-at-home
- https://vcahospitals.com/know-your-pet/first-aid-for-broken-nails-in-dogs
- https://wms.org/magazine/magazine/1082/Animal-Practice-Canine-Paw-Injuries-2/default.aspx
- https://www.rover.com/blog/dog-broken-nail/
- https://www.pumpkin.care/blog/broken-dog-nail/
Read full bio of Srija Burman


