How to Make a DIY Souvenir Snow Globe Costume for Halloween
Craft ordinary materials into a wearable piece that brings miniature landmarks to life.
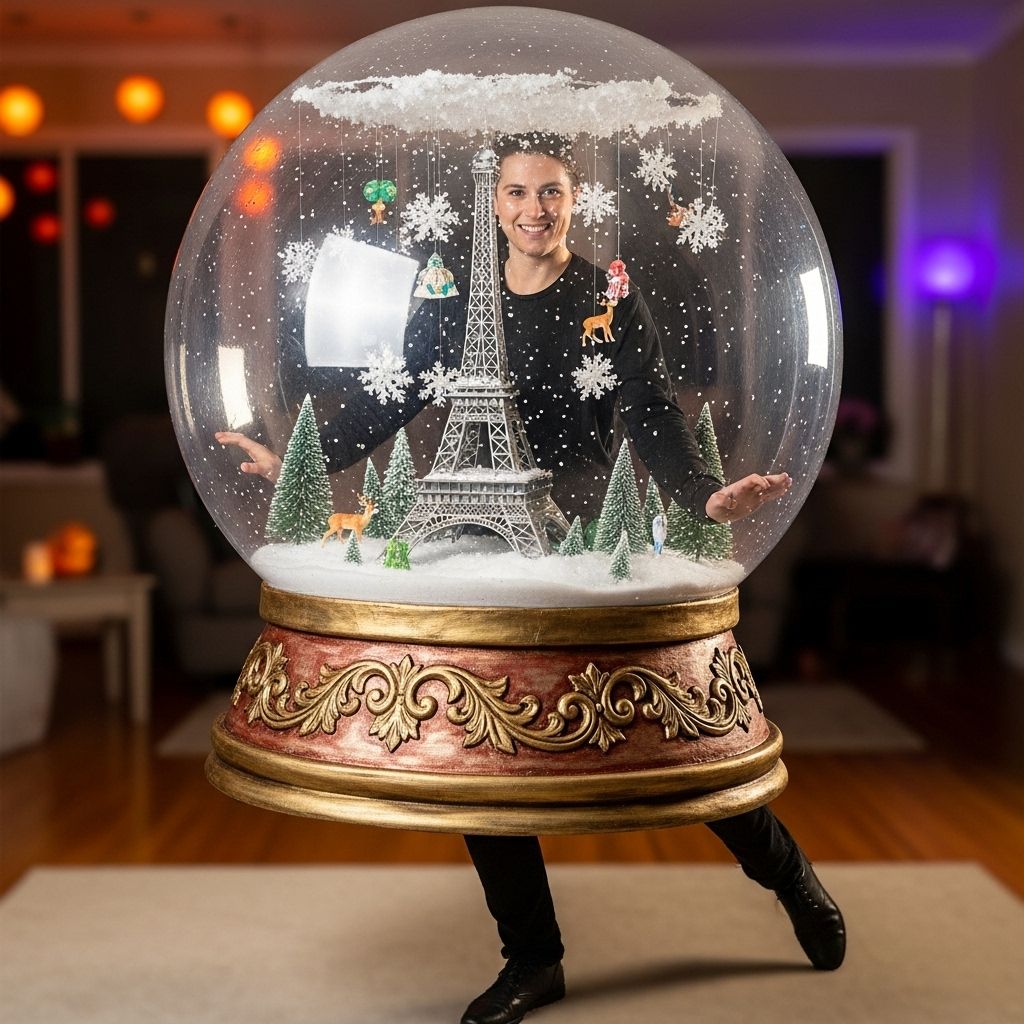
Turn your love for souvenirs and creative crafting into a show-stopping Halloween or costume party ensemble! This detailed guide walks you step by step through crafting your own DIY snow globe costume—complete with iconic landmarks, playful snow, and delightful country-inspired styling. Whether for yourself, a child, or a playful group, this costume is sure to grab attention and spark nostalgia wherever you go.
Why Make a DIY Snow Globe Costume?
Halloween is the perfect occasion for imaginative costumes, and what better way to showcase regional pride or favorite destinations than as a wearable, whimsical snow globe? This design balances creative flair, personal touches, and crafting fun, making it ideal for individuals who love to make a statement. Plus, the flexiblity to incorporate any theme—from hometown icons to holiday scenes—gives you endless ways to personalize.
- Unique Visual Impact: Stand out at parties and parades with a one-of-a-kind, handcrafted piece.
- Theme Customization: Celebrate your favorite vacation spot, state, or hometown with meaningful miniatures and decor.
- Crafting Satisfaction: Enjoy the process of transforming ordinary materials into a wearable work of art.
- Conversation Starter: Intrigue others with mini landmarks and interactive elements.
Materials and Tools Needed
You don’t need elaborate or expensive supplies to create a spectacular snow globe costume. Most elements are easy to source and may already be found around the home or at your local craft store.
- 1 sheet of 24 x 36-inch foam core board
- White fiber fill or cotton batting for snow effect
- Glue (hot glue gun and glue sticks recommended)
- Heavy cardstock for landmark printouts
- Scissors and Exacto knife
- Ribbon (for halter strap)
- Poster board (for location band)
- Printer (for printing landmark images)
- Clear umbrella (for the snow globe dome)
- Miniature accessories (plastic toys, small souvenirs, craft embellishments)
- Snowflake stickers or paper cutouts
- Cowboy boots, denim shorts or skirt, gingham top, and cowboy hat, if opting for a country or Texas theme
Step-by-Step Guide to Assembling the Costume
1. Make the Snow Globe Base
Shape the Foam Core
- Lay the 24 x 36-inch foam core board on a flat surface.
- With an Exacto knife or utility blade, round off the corners on one long end to create a smooth, globe base shape.
- On the opposite long end, cut out a large half-oval to the width that fits loosely around the wearer’s waist—this will allow it to be worn comfortably.
Add Snow Layer
- Cover the entire foam core with a generous layer of craft glue.
- Press white fiber fill or cotton batting onto the glued surface to mimic snowfall inside a snow globe.
2. Personalize with Landmarks and Miniatures
This stage brings the costume’s theme to life. Whether you choose Texas, New York, or a hometown, pick landmarks and symbols that matter to you. For Texas, for example:
- The Alamo
- Big Tex
- Texas Longhorns logo
- Mini cowboy boots, toy cowboy hats, and sports memorabilia
Instructions:
- Print images of your chosen landmarks and mount them onto heavy cardstock.
- Cut each out, leaving a 2-inch tab at the bottom for folding.
- Fold the base of each landmark at a 90-degree angle and secure with hot glue to the foam core base. Arrange creatively among the “snow.”
- Embellish further with plastic toys or souvenir miniatures. To prevent small items from getting lost, attach them to small boxes or affix to wire springs for extra elevation and playful movement.
3. Make It Wearable
- Poke two small holes near the front center edges of the base.
- Thread through a ribbon, crossing above the shoulders to create a comfortable neck halter.
- Tie sturdy knots on the underside of the board so the strap holds securely as you walk.
4. Finish the Globe’s Outer Band
- Design or print an illustrated band highlighting your location or theme (for example: the name of a city or state, drawn skyline, or iconic phrase).
- Use poster board trimmed to about 4 inches high, long enough to wrap around the sides of the base board.
- Attach the band along the outer edge of the foam core with strong craft glue.
- Note: It’s often easiest to fix this band after the wearer puts on the base for a custom fit.
5. Assemble the Snow Globe Dome
- For the clear “glass” dome effect, use a see-through umbrella held above your head while wearing the base.
- Decorate the outside of the umbrella with snowflake stickers, iridescent confetti, or hand-cut paper snowflakes.
- To complete the effect, hold the umbrella or affix it temporarily above the base to mimic the top half of a snow globe.
6. The Perfect Snow Globe Costume Outfit
Pair your craftwork with themed attire underneath. For a country or Texas-inspired snow globe:
- Red gingham shirt or blouse
- Denim skirt or shorts
- Cowboy boots
- Western-style cowboy hat
Your base and dome will sit comfortably over this outfit, and colorful clothes add to the playful spirit. For other themes, adjust clothing to match your chosen setting (e.g., Hawaiian shirts for a beach globe, cozy scarves for a winter scene).
Creative Ideas and Customization Tips
- Choose Your Souvenir Setting: State, hometown, favorite vacation spot, or whimsical fantasy land.
- Craft Miniature Props: Small foam buildings, trees, sports equipment, pets, or holiday icons bring detail.
- Add Interactive Elements: Attach toys with springs or movable parts to mimic the swirling action of shaking a snow globe.
- Play with “Snow” Materials: Try shredded mylar, glitter, pom-poms, or felt confetti for a festive flurry.
- Personal Message Banner: Add a sign or label on the globe’s base (e.g., “Greetings from Austin” or “Souvenir of NYC”).
Essential Safety & Comfort Tips
- Ensure all glued parts are secure and dry before wearing.
- If crafting for children, double-check that all edges are smooth and free from sharp points.
- Test walking, sitting, and arm movement to ensure freedom and comfort.
- Choose lightweight accessories and keep the base well-balanced.
- Consider using Velcro fastenings for adjustable straps and easy removal.
- Keep the dome umbrella removable for ease of movement indoors.
Accessory and Finishing Touches
- Themed Trick-or-Treat Bag: Create a matching bag that mimics a snow globe for carrying candy or essentials.
- Hair and Makeup: Add white glitter, temporary snowflake tattoos, or “frosted” makeup for extra magic.
- Photo Props: Bring a plastic or foam “camera” so friends and family can act as tourists admiring your wearable souvenir.
Alternate Takes and Inspiration
- Tropical Beach Globe: Blue “water,” sandy cotton, palm trees, and lei necklaces for a warm-weather twist.
- Holiday or Winter Scene: Mini sleigh, presents, faux evergreen trees, snowmen.
- Pet-Friendly Version: Consider using a lightweight foam ring as a dog or cat’s base, with minimal “snow” and soft felt props safely attached.
- Group or Family Costume Ideas: Each person as a snow globe from a different location or season.
Frequently Asked Questions (FAQs)
How long does it take to make a snow globe costume?
Depending on your level of craft experience, gathering materials, and intricacy of your scene, the DIY process may take roughly 2–4 hours for basic versions or up to a weekend for highly detailed, themed costumes. Consider dividing tasks—base assembly, decorating, and accessory creation—across multiple days for a stress-free experience.
Is this snow globe costume suitable for kids?
Yes! With proper supervision (especially during cutting and hot glue steps), this project is fun for families to tackle together. Be sure to adapt the size for your child, skip heavy embellishments, and secure all small or sharp pieces. The foam base is lightweight, and the umbrella dome is easy for most children to hold or carry.
What’s the best way to attach miniatures to the base?
Use a hot glue gun for quick, firm attachment. For extra dimension, hot glue objects to small foam blocks or boxes decorated to blend in with the “snow.” If you want moving elements, attach lightweight props to thin wire springs and then glue or tape the spring to the base.
Do you have any tips for making the costume more comfortable?
Padded fabric or felt can help cushion where the board rests on shoulders or hips. Adjustable ribbon straps allow for a custom, secure fit. Keep all protruding parts at least a few inches back from the base’s outer edge so doorways and hallways remain accessible.
Can I reuse the costume or change the scene for other events?
Absolutely! Use removable Velcro, low-tack glue dots, or temporary double-sided tape for attaching miniatures and scene props. This lets you update your snow globe for new locations, seasons, or holidays and makes storage easier between uses.
Are there alternative materials if I don’t have foam core or a clear umbrella?
You can substitute sturdy cardboard for foam core, using extra layers for strength. A large clear salad bowl, acetate sheets, or even cellophane can stand in for umbrella domes if lightly constructed.
Inspiration Gallery: More DIY Halloween Costume Ideas
- Duck Pond Costume: Craft a blue pond base with rubber ducks, attached via Velcro; wear with jeans and a yellow shirt.
- S’mores Fairy Costume: White dress, felt “graham cracker” accents, winged fairy elements, and a marshmallow fairy wand.
- Flower Pot Costume: Upcycled plant pot, faux flowers, and gardening accents for a floral look.
- Corn Dog Vendor: Painted striped box, felt food accessories, and nostalgic concession stand style.
- Golden Girls or Pop Culture Themes: Mix and match ready-made and DIY accessories for group or friend costumes.
Pro Crafter Tips for Flawless Results
- Choose images of landmarks that are high-resolution for crisp prints.
- Check fit and balance before final glue-down of major features, especially for children.
- If using spray paints or strong adhesives, work in a well-ventilated space.
- Don’t be afraid to get creative—mix textures, add whimsy, and invite family and friends to put their personal spin on the design!
Showcase Your Snow Globe Costume
Once complete, share your creation at Halloween parties, community events, or on social media.
Tag with relevant hashtags to join the crafting community—and maybe even inspire fellow DIYers for next year’s festivities!
Frequently Asked Questions (FAQs)
Q: What is the approximate cost to make a snow globe costume?
A: Most supplies are inexpensive—expect to spend under $40, especially if you repurpose clothing and use simple printouts and basic craft supplies.
Q: Can I use a store-bought dome instead of an umbrella?
A: Yes, large plastic bowls or clear acetate sheets work as lightweight alternatives but ensure you maintain comfort and visibility.
Q: What are the best themes for customizing my globe?
A: Local city landmarks, holiday scenes, travel destinations, sports teams, and family jokes all make for fun and memorable options.
Q: How do I transport the costume to an event?
A: Carry the base and dome separately if possible, then quickly assemble them onsite. Check that straps and glued pieces are secure after travel.
Final Thoughts
The DIY snow globe costume brings crafting, personality, and playful nostalgia to Halloween or any festive event. With simple materials and a bit of creativity, anyone can recreate this magical look—guaranteed to spark smiles, memories, and plenty of photo ops wherever you roam. Happy crafting!
References
- https://www.countryliving.com/life/kids-pets/a44630946/snow-globe-costume/
- https://www.hallmarkchannel.com/home-and-family/how-to/diy-snow-globe-costume
- https://caringforcamille.com/2013/10/31/happy-snowy-halloween/
- https://www.countryliving.com/diy-crafts/g1360/halloween-costumes-for-kids/
- https://www.countryliving.com/diy-crafts/g21600836/diy-funny-halloween-costumes/
- https://www.youtube.com/watch?v=jnNX1dMz-os
Read full bio of Sneha Tete

