How to Make an Adorable DIY Milkshake Costume for Kids
A homemade diner-inspired outfit that brings families together through playful crafting.
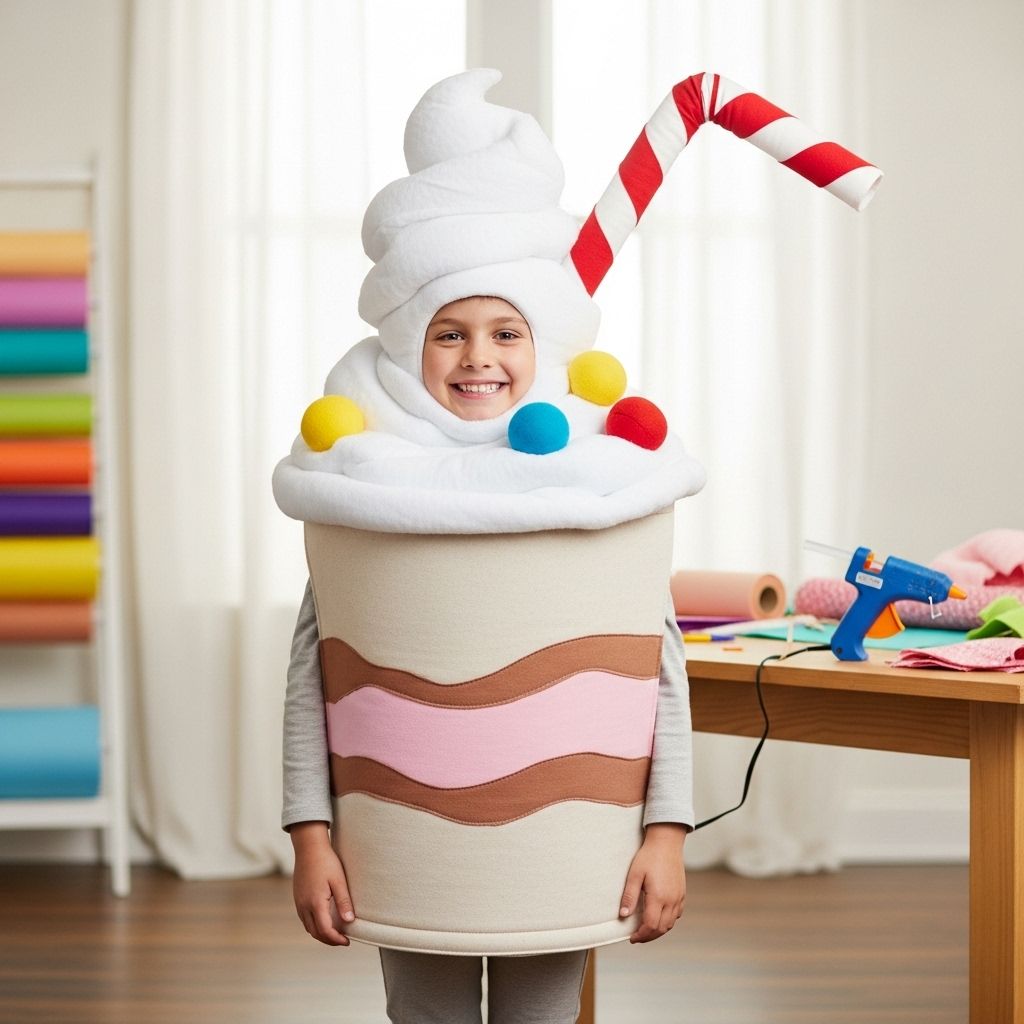
If you’re searching for the perfect blend of creativity and sweetness this Halloween, a DIY milkshake costume is the answer. This costume is a delightful homemade creation that’s both charming and surprisingly easy to craft. With just a few craft store staples and a bit of imagination, you can make a costume that looks straight out of a vintage diner—complete with whipped cream and a cherry on top.
Supplies You’ll Need
- 2 large white poster boards
- White Poly-fil or cotton batting (for whipped cream)
- Ribbon of your choice (for straps)
- Sticky-back Velcro strips
- Hot glue gun and glue sticks
- Red pool noodle
- White duct tape
- Thick cardstock (for cherry base)
- Pink felt
- Ponytail holder or hair clip
- Scissors
- White shirt, tights or leggings, and shoes
Milkshake Costume DIY Instructions
Preparing the Cup Body
1. Tape Poster Boards: Lay two white poster boards end-to-end and tape their shorter ends together. Make sure the tape is on the inside, where it will sit closest to the body for comfort and a clean exterior look.
2. Shape and Secure: Wrap the taped boards around your child’s torso to form a cylinder. Trim any excess for a comfortable fit. Use additional tape if needed to hold the boards together while sizing.
3. Add Straps: Cut two lengths of sturdy ribbon, long enough to use as shoulder straps. Secure each end of the ribbons to the top of the poster board cylinder with staples—ensure the ends are hidden on the inside to keep the exterior smooth. These straps will help suspend the milkshake ‘cup’ comfortably on your child’s shoulders.
4. Secure the Seam: Once everything fits nicely, use sticky-back Velcro to fasten the cup closed in the back, allowing for easy on-and-off transitions.
Adding the Whipped Cream
1. Hot Glue Poly-fil: Generously hot glue clumps of Poly-fil all along the top edge of the outside of the cup. Arrange the batting to create soft, swirling ‘whipped cream’ mounds for a realistic look.
2. Enhance the Texture: Layer the batting in small bunches to provide dimension. For extra fun, add a few sparkly pom-poms or iridescent craft bits to give the ‘cream’ a magical finish (optional).
Making the Straw Accessory
1. Craft the Straw: Use a red pool noodle to replicate a classic paper straw. Cut it to about two-thirds the height of your poster board cup. Wrap white duct tape around it in spiraling stripes to imitate the classic striped pattern.
2. Attach the Straw: Use hot glue or duct tape to secure the pool noodle/straw to the inside front of the costume cup. Angle it slightly outward for an authentic ‘stuck in your shake’ look.
Creating the Cherry Headpiece
1. Make the Cherry: Cut a large cherry shape from thick cardstock. Cover the entire shape by gluing pink felt over it, trimming to fit the curves smoothly.
2. Prepare for Attachment: Hot glue a ponytail holder or sturdy hair clip to the back of the cherry so it can be worn comfortably. If using a ponytail holder, simply slip it over a high ponytail; for a hair clip, slide it into place with the cherry facing forward.
Final Outfit Details
- Dress your child in a plain white shirt and matching white tights or leggings beneath the costume for a clean, sweet look.
- Choose white, pink, or metallic shoes to complement the milkshake vibe.
Creative Variations and Enhancements
This basic framework makes it easy to tailor the costume to your child’s favorite flavors or personal style. Consider the following creative twists:
- Strawberry Milkshake: Wrap the bottom half of the cup in pink cellophane or add pink felt polka dots.
- Chocolate Milkshake: Use brown felt or brown paper for accents and sprinkle on ‘chocolate chips’ made from construction paper.
- Vanilla Delight: Add iridescent confetti or pearls along the ‘whipped cream’ for sparkle.
Why Choose a DIY Milkshake Costume?
DIY milkshake costumes are both budget-friendly and unique. They offer a custom-made fit, encourage family bonding through crafting, and produce a standout look that isn’t likely to be replicated at school parties or community events. Plus, the costume can be reused or recycled for dress-up play long after Halloween has passed.
Safety and Comfort Tips
- Test all adhesives on a small patch of fabric or skin to check for any allergies before final assembly.
- Make sure hot glue is fully cooled before letting children handle the costume.
- Adjust the poster board fit so your child has full range of motion and can sit easily.
- If trick-or-treating outdoors, attach reflective tape to the back or sides of the costume for visibility at night.
Pairing Ideas for the Ultimate Group Costume
Want to assemble a diner-inspired group costume? Team up with friends or family, and choose from complementary looks for an authentically retro scene:
| Costume Idea | Key Props |
|---|---|
| Milkshake | Poster board cup, whipped cream, straw, cherry headpiece |
| Burger & Fries | Brown felt (bun), yellow felt (cheese), pillow fries, tray |
| Soda Jerk | White button-down, bow tie, apron, paper hat |
| Diner Waitress | Polka dot dress, apron, notepad, serving tray |
Substitutions and Resourceful Tweaks
- If white Poly-fil is unavailable, cotton batting, pillow stuffing, or scrunched-up tissue paper can serve as the whipped cream.
- No pool noodle? Use a rolled cardboard tube painted in stripes for an easy straw.
- Ponytail holders and hair clips can be swapped for bobby pins or elastic bands if needed.
- Customize the costume’s length and shoulder strap width for taller or younger children.
Photo Tips: Capture Your Sweet Creation
- Pose your child in front of a pastel or retro-themed background to enhance the milkshake’s vintage diner vibe.
- Add props like faux diner glasses, paper straws, or a toy tray for group shots.
- Encourage playful poses with the straw or cherry to show off the costume’s unique features.
Frequently Asked Questions (FAQs)
How long does it take to make a milkshake costume?
On average, assembling a milkshake costume will take about 2–3 hours, including time for drying glue and fitting adjustments.
Is there an alternative to hot glue?
Yes. You can use strong double-sided tape or fabric glue, but hot glue is recommended for its strength and speed. Always supervise children with these supplies.
Can the costume be resized for adults?
Absolutely—simply scale up the poster boards and use longer ribbons for the shoulder straps. The instructions remain the same.
What type of clothing should my child wear underneath?
Opt for a white or pastel shirt and leggings or tights for a seamless milkshake look. Choose comfortable shoes since the costume is worn over the outfit.
Is the costume reusable?
Yes. With careful storage, the costume can be used for future Halloweens, school plays, or costume parties. Remove any perishable decorative touches and store flat.
Bonus: Adaptations for Pets and Siblings
To include your child’s pet or younger siblings, adapt the milkshake design to a smaller scale. Use soft felt or foam and skip elements like the pool noodle for a more comfortable, safe fit. Secure straps loosely and avoid any choking hazards.
About the Crafter
This DIY was inspired by ideas featured by editors at Country Living. Amy Mitchell, a veteran magazine editor with over two decades in lifestyle journalism, is known for her expertise in home decor, garden crafts, holiday celebrations, and clever costume designs. When not creating fun features for readers, her hobbies include cooking, gardening, and treasure hunting at tag sales for vintage collectibles.
More Creative DIY Costume Ideas
If you love homemade costumes, try these other easy and imaginative favorites:
- Duck Pond: Use a blue-painted saucer, rubber ducks, and ribbon to create a playful pond look.
- S’Mores Fairy: Transform a white dress with cardboard graham crackers and brown felt for a magical treat-inspired costume.
- Flower Pot: Turn a plastic planter and faux blooms into a wearable garden masterpiece.
- Corn Dog Vendor: Repurpose a box, painter’s tape, and felt food for a show-stealing street food seller ensemble.
Ready to Make Your Costume?
With a few simple materials and a little time, you can create a DIY milkshake costume that’s as charming as it is original. Perfect for kids who crave fun and families eager for quality time, this project will add a dash of whimsy to any celebration. Happy crafting!
References
- https://www.countryliving.com/life/kids-pets/a44682938/milkshake-costume/
- https://studiodiy.com/diy-milkshake-costumes/
- https://www.countryliving.com/diy-crafts/g1360/halloween-costumes-for-kids/
- https://www.countryliving.com/diy-crafts/g62669620/cute-halloween-costumes-for-your-toddler-2024/
- https://www.countryliving.com/diy-crafts/
- https://www.goodhousekeeping.com/holidays/halloween-ideas/g3848/pun-halloween-costume-ideas/
Read full bio of medha deb

