How to Carve the Perfect Cat Pumpkin: Step-by-Step Guide for a Purr-fect Halloween
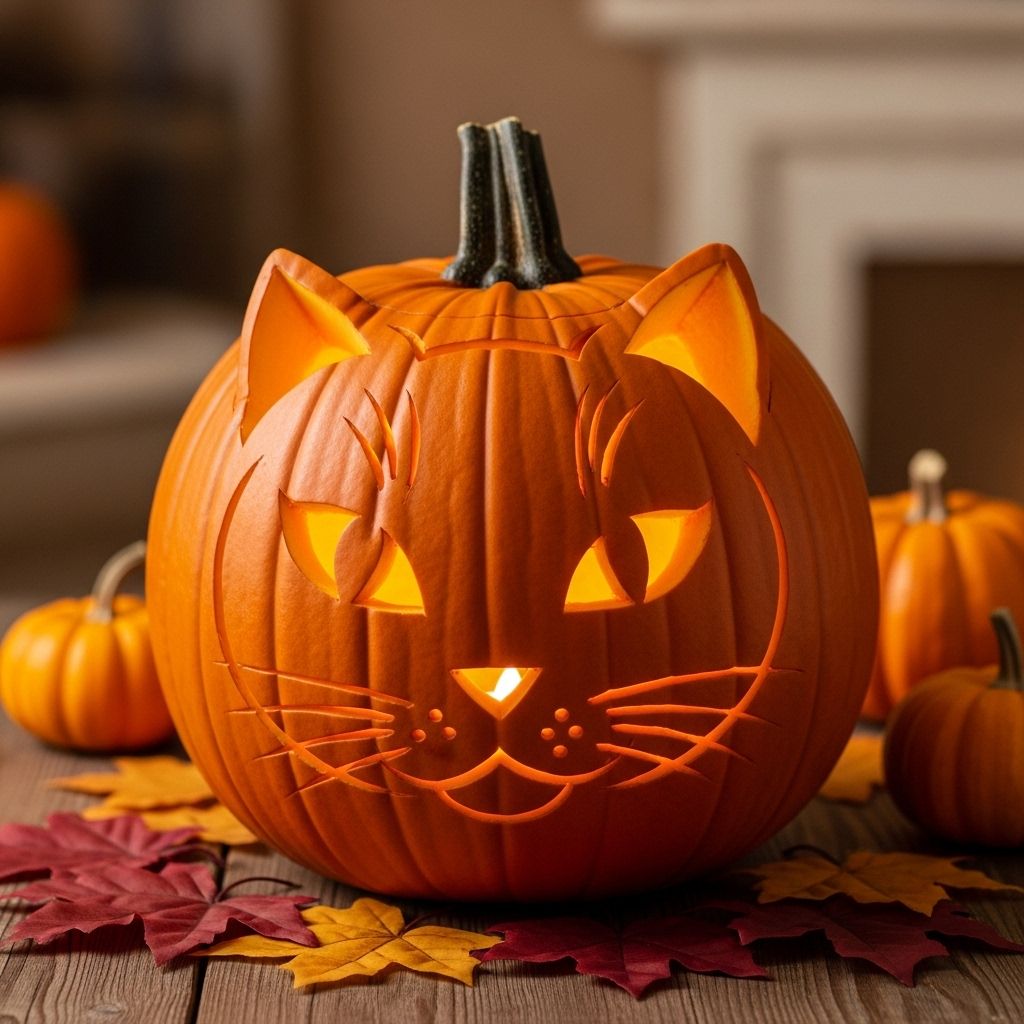
Whisker-inspired designs bring playful charm to your Halloween display.
Cat Pumpkin Carving: The Halloween Craze for Cat Lovers
Carving pumpkins is a time-honored Halloween tradition, but for cat enthusiasts, there’s an extra-special way to celebrate: carving a pumpkin inspired by your favorite feline. Whether you’re an experienced crafter or a first-time carver, turning your pumpkin into a tribute to your cat is both rewarding and fun. In this guide, we’ll walk you through every step of the process — from choosing your pumpkin and sketching a design to carving safely and showing off your masterpiece.
Why Cat Pumpkins?
Cat pumpkins aren’t just adorable — they’re a wonderful way to show off your love for your pet. Here’s why cat pumpkin carving is the purrr-fect Halloween activity:
- Personalization: Capture your cat’s unique features in pumpkin form for a one-of-a-kind decoration.
- Creative fun: Carving a cat pumpkin is satisfying and perfect for all skill levels.
- Perfect for cat lovers: Show off your feline fandom in a festive, visible way.
- Social share: Cat pumpkins are sure to win hearts on social media!
What You’ll Need
Before you begin, gather the right supplies to ensure a smooth and safe pumpkin carving experience:
- Medium to large pumpkin (look for a firm stem and no soft spots)
- Sharp, serrated knife (pumpkin carving kits work best, but a small paring knife will do)
- Large metal spoon (for scooping out seeds and pulp)
- Bowl (to collect seeds and pulp — save seeds for roasting as a treat!)
- Marker or pen (for outlining your cat design)
- Thin, sharp blade or scoring tool (for detailed work)
- Stencil or printed photo of your cat (optional but helpful)
- Tea light, LED light, or glow stick (for safely illuminating your pumpkin)
- Large tray or newspaper (to keep your work area clean)
Pumpkin Carving Safety Tips
Carving pumpkins is fun, but it’s vital to stay safe, especially when using sharp tools. Always follow these essential tips:
- Adults only: Children can help with design or scooping pumpkin guts, but leave the knife work to grownups.
- Work in a well-lit, dry area: This helps prevent accidents and slipping.
- Stabilize your pumpkin: Place it in a large bowl or on a towel to keep it from rolling while you carve.
- Always cut away from yourself: Hold the knife securely and carve with slow, controlled motions.
- Use the right tools: Pumpkin carving kits or serrated knives are much safer than kitchen knives.
- Supervise at all times: Never leave sharp tools unattended around kids or pets.
Choosing the Right Pumpkin
Selecting the best pumpkin is crucial — your feline design will shine brightest on a smooth, well-proportioned pumpkin. Here’s what to look for:
- Size: Medium to large pumpkins offer enough space for a detailed cat face.
- Shape: Go for a flatter surface to make your carving easier.
- Firmness: The pumpkin should feel heavy for its size and be free of bruises, cracks, or soft spots.
- Sturdy stem: A dark green, firm stem is a sign of freshness.
Cat Pumpkin Design Ideas
Not sure what kind of cat face to carve? Here are some fun and popular ideas:
- Classic cat face: Big triangle ears, almond-shaped eyes, whiskers, and a pointed nose.
- Your own cat: Print a photo of your feline and outline its unique markings.
- Winking cat: Add personality with a wink or mischievous look.
- Cute kittens: Make a set of smaller pumpkins representing playful kittens.
- Jack-o-lantern cat: Combine a classic pumpkin grin with feline features.
- Silhouette cat: Carve a simple outline or shadow shape for striking impact.
Stencils are an excellent option for beginners, while freehand drawing suits those feeling creative.
Step-by-Step: How to Carve a Cat Pumpkin
- Preparation
- Lay down newspaper or a tray to catch pumpkin debris.
- Wash and dry your pumpkin to remove dirt.
- Cut the Lid
- Draw a circle or hexagon around the stem with a marker.
- Use a serrated knife to cut off the lid at a slight angle (prevents the lid from falling in later).
- Remove the lid and scoop out seeds and pulp with a large spoon.
- Scrape the walls clean, especially the side you plan to carve (the thinner the wall, the easier to carve).
- Draw or Transfer Your Design
- Either sketch your cat face directly onto the pumpkin with a marker, or tape your stencil/photo and trace the outline.
- For extra detail, use a toothpick or pin to poke through key points in the design, then connect with marker.
- Carve the Design
- Start from the center of the design and work outward; this protects delicate details.
- Push your carving tool slowly along the outline, using short sawing motions.
- Do not remove cut sections until all cuts are complete to prevent breakage.
- When cutting curves (like eyes or whiskers), go slowly and keep the knife perpendicular to the pumpkin’s surface.
- For detailed areas, use a thin blade or fine saw.
- Tidy any rough edges with a paring knife or sculpting tool.
- Light the Pumpkin
- Place a tea light, battery-powered LED, or glow stick inside your pumpkin.
- For open flames, always light before placing inside (and never leave unattended).
- Replace the lid and see your cat come to life!
- Display and Share
- Put your cat pumpkin where it can be enjoyed — as a porch light, centerpiece, or in a window.
- Snap a photo and show off your creation on social media. Bonus: Pose your real cat next to it!
Pro Tips & Tricks for Cat Pumpkin Carving
- Keep it symmetrical: Mark key points (like eyes and ears) before starting to ensure a balanced look.
- Use toothpicks for repairs: If any part breaks off during carving, you can pin it back in place with toothpicks.
- Prevent shriveling: After carving, soak your pumpkin in cold water for a couple hours; this rehydrates the surface and extends life.
- Seal edges: Rubbing petroleum jelly along the cut edges helps slow down dehydration.
- Keep out of direct sunlight: Display your carved pumpkin in a cool spot to prevent rapid wilting.
- LED lights last longer: Flameless candles or glow sticks reduce fire risk and keep your pumpkin glowing for days.
- Make it last: Some carvers wrap the pumpkin in plastic and refrigerate overnight to slow decay.
Inspiration: Fun Variations for Your Cat Pumpkin
Looking for new ideas to elevate your cat pumpkin? Try these fresh takes:
- Multi-cat stack: Create several mini pumpkins, each with different cat faces, and stack them for a sculptural effect.
- Paint & carve combo: Paint your pumpkin with cat markings and then carve out just the features (eyes, nose, mouth) for extra depth.
- Accessory fun: Add felt ears, pipe cleaner whiskers, or a yarn collar for 3D charm.
- Glow-in-the-dark paint: Outline facial features for nighttime spookiness.
- Scene carving: Instead of just a face, try carving a silhouette of a full cat against a moon or fence.
Decorating Your Home: Cats, Pumpkins, and Festive Felines
Once your pumpkin is complete, bring the Halloween magic indoors:
- Arrange your cat pumpkin with autumn leaves, candles (safely), and spooky decorations for a festive vignette.
- Group several pumpkins together for an eye-catching porch display.
- If your cat is curious, introduce the pumpkin slowly. Never leave real candles burning around pets!
Pumpkin Preservation: How to Make Your Cat Pumpkin Last
Carved pumpkins tend to wilt quickly, but a little care can keep your cat pumpkin looking fresh for several days:
- Rub petroleum jelly on carved surfaces to keep them moist.
- Soak your pumpkin in cold water (with a small bit of bleach, if desired) for a couple hours after carving.
- Avoid hot spots and direct sunlight.
- Use battery-powered candles instead of real flames to minimize heat and safety hazards.
Table: Traditional Pumpkin Carving vs. Cat Pumpkin Carving
| Traditional Pumpkin Carving | Cat Pumpkin Carving |
|---|---|
| Classic faces (triangles, grins) | Custom designs inspired by pet cats, or cat silhouettes |
| Templates widely available | Opportunity for unique sketches and stencils |
| General Halloween vibe | Personal and whimsical, perfect for cat lovers |
| Standard shapes and techniques | More attention to placement of eyes, whiskers, ears |
Frequently Asked Questions (FAQs)
Q: Is it safe for cats to be around carved pumpkins?
A: Unlit pumpkins are generally safe, but avoid using real candles or chemical preservatives if your cat might chew or lick the pumpkin. Battery-operated lights are best.
Q: How long will a carved pumpkin last?
A: Typically, carved pumpkins last 3-7 days. Keeping them cool, applying petroleum jelly to cuts, and avoiding exposure to heat can help them last longer.
Q: Can I use a picture of my actual cat for the design?
A: Yes! Printing and tracing your cat’s photo makes for a truly unique pumpkin. Simply adjust features as needed for easier carving.
Q: What tools work best for detailed carving?
A: Pumpkin carving kits (with serrated saws, scraping tools, and small blades) offer the best safety and precision. Avoid large kitchen knives, which can slip.
Q: How can I enter a cat pumpkin carving contest?
A: Many pet-related brands and social media pages host carving contests. Snap a photo of your pumpkin — preferably with your cat! — and post it to Instagram or contest websites with the proper tag or entry form.
Show Off Your Purr-fect Cat Pumpkin!
Cat pumpkin carving is a creative way to put your love for your pet on display and participate in the festive spirit of Halloween. By following essential safety tips, using the right tools, and drawing inspiration from your cat’s unique features, you’re sure to impress your neighbors, friends, and fellow cat lovers alike. Don’t forget to take photos and share your creation online!
References
- https://www.katkin.com/articles/how-do-i-carve-my-own-cat-pumpkin
- https://www.consumerreports.org/home-garden/holiday-planning-preparation/how-to-carve-a-pumpkin-halloween-a1076911468/
- https://www.tiktok.com/@jeffandlaurenshow/video/7426448751482424618?lang=en
- https://kutv.com/features/fresh-living/pumpkin-carving-safety-tips-10-31-2022
- https://www.shrinerschildrens.org/en/news-and-media/news/2022/10/pumpkin-carving-safety-tips
Read full bio of Shinta

