DIY Baseball Mason Jar: Creative Craft for Sports Lovers
Transform jars into sports keepsakes with painting and stitch details for a unique touch.
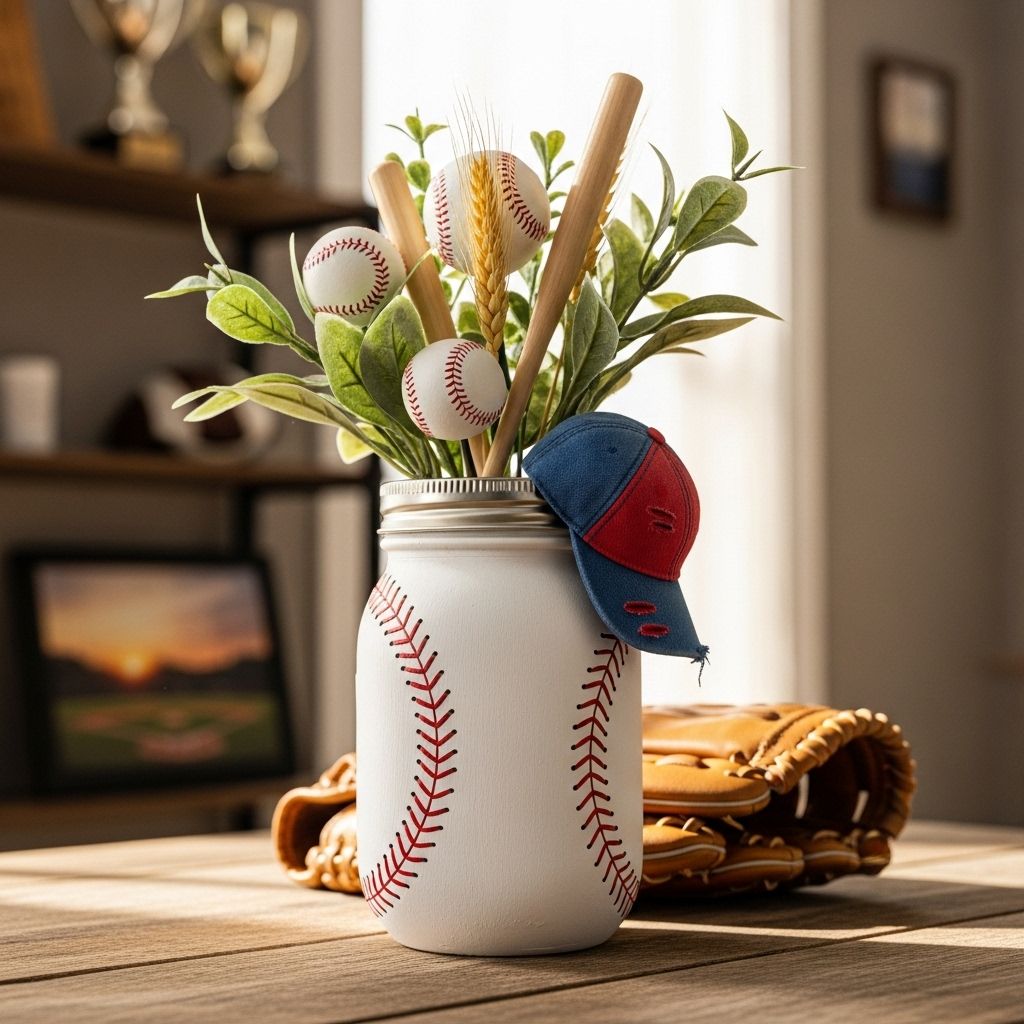
How to Make a Baseball Mason Jar
If you’re searching for a creative project that combines America’s favorite pastime with classic DIY charm, a baseball mason jar is the perfect craft. Whether you’re planning a kid’s birthday party, looking for a thoughtful coach’s gift, or wanting a fun weekend activity, this tutorial provides easy steps, material recommendations, and customization tips. Suitable for crafters of all ages, this baseball mason jar will be a treasured keepsake or cheerful sports-themed decor piece.
Why Try a Baseball Mason Jar Craft?
- Simple supplies—uses items you may already have at home.
- Quick process—ideal for busy families or group activities.
- Customizable—adapt the design for favorite teams or special occasions.
- Great gift—perfect for coaches, teammates, or baseball fans.
Supplies You’ll Need
- 16-ounce wide-mouth mason jar (quart-size jars work too)
- Flat white craft paint (acrylic recommended)
- Red acrylic paint (for baseball stitching)
- Small paintbrushes (one for painting, one for details)
- Sandpaper (optional, for distressing)
- Twine or ribbon (for decorative finishing touch)
- Craft sealer or clear spray (optional, for extra durability)
- Paper towels and water cup (for clean up)
Step-by-Step Instructions
1. Prepare Your Mason Jar
Start by ensuring your jar is clean and dry. If reusing a jar, wash it thoroughly and remove any labels or residue for a smooth painting surface.
2. Paint the Jar White
Use a flat brush to apply a thin, even coat of white paint to the outside of the mason jar. Hold the jar from the inside or the rim to avoid fingerprints and streaks. Let the first coat dry completely—this might take an hour or more—before assessing if you need a second coat for full coverage.
- Apply paint in smooth, consistent strokes.
- Avoid thick layers; thin coats dry faster and look more polished.
- Optional: Skip painting the very bottom if the jar will sit on a surface.
3. Let the Jar Dry
Patience pays off here! Allow the painted jar to dry thoroughly before handling or adding additional coats. For best results, wait at least several hours or overnight.
4. Paint a Second Coat (Optional)
If your white paint appears streaky or translucent after the first layer, add a second thin coat. Again, let it dry completely before proceeding.
5. Add Baseball Stitch Detailing
Now for the signature baseball look: Use a fine-tip brush and red acrylic paint to recreate the classic curved stitching found on baseballs.
- Look at a real baseball or a photo for reference.
- Lightly sketch curved lines on opposite sides of the jar, arcing outwards.
- Add short, angled stitching marks on both sides of each curve to mimic the authentic pattern.
- Let the detail paint dry thoroughly.
6. Optional: Distress for a Vintage Look
If you like the shabby-chic, vintage effect, gently rub sandpaper over raised areas or where you’d like a bit of paint to be removed. Focus especially on edges, embossed details, or wherever you want a timeworn touch. Wipe away dust with a dry cloth or paper towel.
7. Protect Your Design
If you plan to use the jar as a vase, pencil holder, or for gifting, consider sealing the paint with a spray or brush-on craft sealer. This will help the design last, especially if the jar will be handled often.
8. Add Final Touches
- Tie twine, ribbon, or team-colored cord around the rim for a playful accent.
- Attach a tag with the recipient’s name or a team slogan.
Creative Uses for Your Baseball Mason Jar
- Pencil or pen holder for a child’s desk.
- Vase for fresh or artificial flowers—white daisies or classic roses add a pop of color.
- Gift container—fill with baseball cards, snacks, or gum for a coach or teammate.
- Party centerpiece for a baseball-themed event or birthday.
- Coin bank, treat jar, or keepsake container.
Personalization and Team Spirit Ideas
- Incorporate team colors for the ribbon or stitching.
- Use paint pens to write a player’s name, jersey number, or season year.
- Stencil or hand-paint a small team logo on the back or side of the jar.
- For group crafts, let each child or participant decorate their jar to represent their favorite team.
Tips for Crafting Success
- Let each paint coat dry thoroughly to prevent smudges or fingerprints.
- Work on a protected surface and wear an apron or old clothes to avoid paint stains.
- Use masking tape to mark off sections for even painting, if desired.
- For a shiny look, choose gloss-finish paints; for farmhouse style, go with matte.
- Supervise kids while using sandpaper and sealer sprays.
Project Table: Materials & Notes
| Material | Purpose | Tips |
|---|---|---|
| 16-oz Mason Jar | Main base | Wide-mouth easiest for painting inside |
| Flat White Paint | Background color | Matte for classic look, gloss for shine |
| Red Paint | Stitch detail | Fine brush for precision |
| Sandpaper (optional) | Distressing | Start light and build effect |
| Twine, Ribbon | Decoration | Try team colors or natural twine |
Educational Angle: Baseball History Meets Crafting
Turning a mason jar into a baseball-inspired accessory is a fun opportunity to introduce kids (or curious adults) to aspects of America’s pastime:
- Discuss why baseball stitching is red and its evolution.
- Talk about the significance of mason jars in American kitchen history.
- Encourage kids to research their favorite teams or famous players as inspiration for their design.
FAQs About Baseball Mason Jar Crafts
Q: Does the paint go inside or outside of the jar?
A: The paint should be applied to the outside. Painting inside may not adhere well and could affect storing items or add unwanted chemicals if used as a drink container.
Q: Can you wash the jar after painting?
A: Handwashing gently is best. Painted jars aren’t dishwasher safe unless you use a special glass paint and heat-cure it. A clear sealant adds some protection.
Q: What if I don’t have acrylic paint?
A: Any craft or chalk paint works, but acrylic is durable and has strong color. Tempera can be used for short-term projects but may flake.
Q: Ideal age for this craft?
A: Kids age 6+ can participate with supervision on small parts. Teens and adults will find this project relaxing and rewarding as well.
Q: Can this be made in large batches for a party or team event?
A: Absolutely! Lay out materials, pre-paint jars with the white coat, and let each participant add red stitches and decorations at the event.
Related Crafts and Next Steps
- Other Sports Jars: Paint jars to resemble softballs, basketballs, or footballs using similar techniques and colors.
- Team Spirit Centerpieces: Group several sporty mason jars for a festive banquet table or tailgate party decoration.
- Name Tag Holders: Fill the jar with sand or beans and insert name cards for party guests or team schedules.
- Gift Packaging: Add a small bag of sunflower seeds or wrapped candy for a simple coach or teacher present.
Inspiration Gallery: Creative Mason Jar Uses
- Flower vases with a sports twist.
- Coin banks for teaching savings goals to sports fans.
- Snack jars at concession stands or movie nights.
- Guest favors at sports-themed celebrations or end-of-season parties.
Frequently Asked Questions (FAQs)
Q: Are these jars food safe after painting?
A: Only if you use food-safe paints and never paint the inside rim or interior. Use painted jars for decorative or storage purposes unless sealed properly with food-safe sealant.
Q: How can you fix mistakes on the painted jar?
A: Wait for the paint to dry, lightly sand the mistake, and repaint as needed. For minor smudges in the stitching, use a tiny brush and white paint to cover errors, then once dry, redraw the stitches.
Q: Can I use these jars outdoors?
A: Yes, but finish with a clear outdoor sealer to help the paint withstand rain and sun. Place under covered porches or for short-term outdoor events for best longevity.
Q: What if my jar feels sticky after painting?
A: The paint may not be fully dry or too thick. Allow more time to dry and avoid using humid conditions. A clear spray topcoat also helps reduce stickiness.
Conclusion: Create, Gift, and Celebrate with Baseball Mason Jars
Whether you’re honoring a favorite team, creating memorable party favors, or simply bringing sports-inspired charm into your home, making a baseball mason jar is both rewarding and enjoyable. With just a few materials and a little imagination, you can personalize your craft for any age or occasion. Try customizing the details or experimenting with new colors for unique results every time!
References
- https://www.youtube.com/watch?v=DmOYQyGyijk
- https://littlewoodenpenguin.com/blogs/news/105631622-how-to-make-distressed-mason-jars
- https://www.countryliving.com/life/kids-pets/a60953432/baseball-mason-jar/
- https://www.ballmasonjars.com/make-your-own-ball-jar-cross-stitch-embroidery.html
- https://www.countryliving.com/diy-crafts/g1821/mason-jars/
- https://adirondackgirlatheart.com/in-vintage-news-country-living-canning-jars/
- https://www.countryliving.com/diy-crafts/g1916/mason-jar-fall-crafts/
- https://www.countryliving.com/mason-jars/
Read full bio of Sneha Tete


