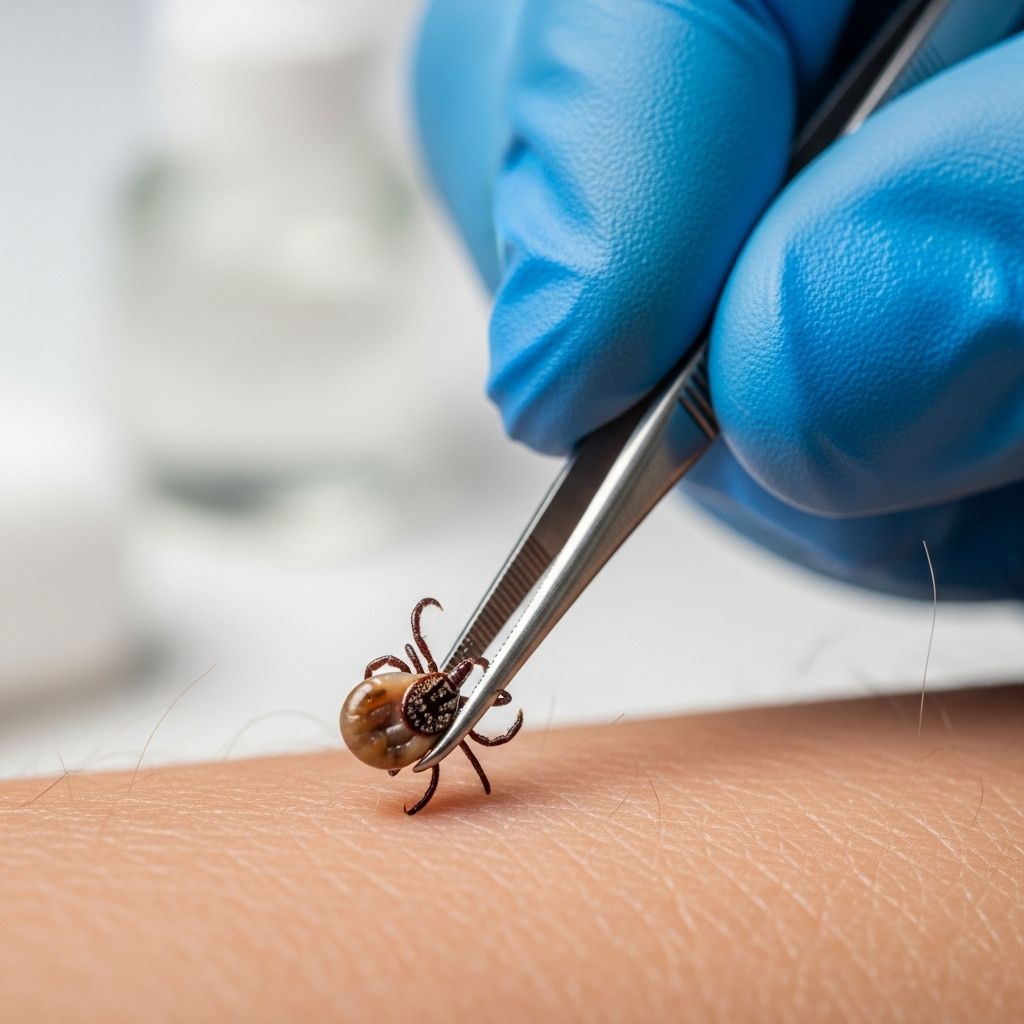
The Right Way to Remove Ticks: Step-by-Step Medical Guide
Prompt action and correct technique cut infection risk and help wounds heal smoothly.

How to Safely Remove a Tick: Doctor-Approved Methods and Best Practices
Ticks are small arachnids that can latch onto humans and animals, feeding on blood and sometimes transmitting serious diseases such as Lyme disease. Encountering a tick can be unsettling, but knowing exactly how to respond reduces risks and ensures fast, safe recovery. In this guide, you’ll learn the most effective and medically-approved ways for spotting, removing, and monitoring tick bites, as well as what to avoid according to top health sources and experts.
Understanding Ticks and Why Safe Removal Is Crucial
Ticks are found in grassy, wooded areas and attach themselves to skin with specialized mouthparts, sometimes staying for days. The longer a tick is attached, the greater the risk of disease transmission. That’s why timely removal using correct techniques is vital. Incorrect removal methods can increase infection risk or leave tick parts embedded in your skin, causing further irritation or illness.
How to Spot a Tick Bite
- Painless Attachment: Tick bites are often painless and easy to miss. You might only notice a tick by visual inspection or from feeling a small bump.
- Common Signs: Look for a small red lump with a dark dot attached (the tick), typically on exposed skin areas after outdoor activities.
- Best Practice: Experts recommend taking a photo of the bite and tick to track changes and condition over time, which can help your healthcare provider if symptoms develop.
Step-By-Step Guide to Removing a Tick
Medical authorities including the CDC, NHS, and seasoned doctors agree: tweezers are the safest tool for removing ticks. Follow these steps:
- Stay Calm: Take a deep breath. Panicking can distress children or pets and make removal more difficult. Imagine it’s just lint—approach the process calmly.
- Prepare: Wash your hands and put on rubber or latex gloves if available to avoid direct skin contact with pathogens.
- Get the Right Tool: Use fine-tipped or blunt-edged tweezers, or a tick removal tool from the local pharmacy. Avoid standard blunt or slanted tweezers that may crush the tick.
- Grasp the Tick Correctly: Position your tweezers as close to the skin’s surface as possible, grabbing the tick by its head, not the engorged body.
Tip: Squeezing or squashing the tick can force infectious material into your body. - Pull Upwards: Pull straight up, steadily and evenly, without twisting or jerking. Twisting increases the chance of mouthparts breaking off in the skin.
For pets, press gently on the skin on either side of the tick to minimize pinching and provide reassurance. - If Parts Remain: If the tick’s mouthparts break off and can be easily removed with tweezers, do so. Otherwise, leave them be—most remnants work their way out naturally and cause only mild irritation.
- Disposal: Never touch a tick with bare fingers. Dispose of the tick by one of these methods:
- Seal in a container or plastic bag
- Submerge in rubbing alcohol
- Wrap tightly in tape
- Flush down the toilet
Keeping the tick for a few weeks is helpful; if symptoms or redness occur later, bring the tick to your doctor for evaluation.
- Clean Up: Thoroughly clean the bite area with rubbing alcohol, iodine scrub, or soap and water. Wash your hands carefully after the procedure.
- Monitor: Keep an eye on the bite location for up to several weeks. Take photographs for comparison and diagnosis if needed. Watch for expanding rash, redness, or other symptoms (see below).
What Not to Do When Removing a Tick
- Avoid Folk Remedies: Never use nail polish, petroleum jelly (Vaseline), or heat to try to force the tick out. These methods delay removal and increase risk of infection.
“Anything that delays removing a tick is a bad idea.” – Robert B. Kimsey, PhD - Don’t Dig: If part of the tick remains under the skin, don’t dig it out forcefully. Most remnants will work their way out on their own.
Burning a tick can lead to burns or further complications. - No Bare Hands: Always use gloves or tweezers – tick saliva and bodily fluids can transfer pathogens even through minor skin abrasions.
Why Fast, Proper Removal Matters
Ticks can transmit diseases like Lyme disease, Rocky Mountain spotted fever, and other infections. Disease transmission risk increases with time; most pathogens need at least 24 to 48 hours to be transmitted, but some can occur faster. Immediate removal dramatically lowers risk.
Post-Removal Care and Bite Monitoring
- Clean the Area: Sterilize the bite with rubbing alcohol or antiseptic and wash thoroughly.
- Apply Antiseptic: After cleaning, a dab of antiseptic or antibiotic cream can help prevent infection.
- Record the Event: Take a photo of the site and note the date of the tick bite for future reference.
- Monitor for Symptoms: Watch closely for several weeks. Seek medical attention if you experience:
- Expanding rash (especially a bull’s-eye pattern)
- Fever, chills, or malaise
- Joint pain, headache, or neurological symptoms
- Redness, inflammation, or persistent discomfort at the site
- Consult Your Physician: If symptoms develop, bring a photo of the bite and, if you kept it, the tick itself for evaluation and possible testing for tick-borne diseases.
Tick Removal for Pets: Key Differences and Similarities
Removing ticks from animals follows the same core principles as for humans, with some pet-specific nuances:
- Get Help: If your pet is anxious, enlist help to steady them for proper tick removal.
- Tick Removal Tool: Pet shops and veterinarians stock specialized tick removal tools for safe extraction.
- Avoid Crushing: When grasping the tick, use fine tweezers, and avoid squeezing the body or pulling sideways.
- Disposal: Store the tick in a sealed container with alcohol if your pet becomes ill or develops a rash. Your vet may want to examine it.
- Cleanliness: Use antiseptic or a mild pet-safe cleanser to sterilize the bite site.
- Vet Consultation: If your pet shows signs of illness (lethargy, joint pain, or fever), consult your veterinarian and bring both pet and tick for assessment.
Table: Quick Comparison of Tick Removal Methods
| Method | Effectiveness | Risks | Medical Recommendation |
|---|---|---|---|
| Fine-tipped tweezers | High | Low if used correctly | Strongly Recommended |
| Tick removal tool | High | Low | Recommended |
| Hands/fingers | Low | High (pathogen transfer) | Not Recommended |
| Nail polish/Vaseline | Low | Delays removal; increases risk | Not Recommended |
| Burning tick | Low | Skin burns, incomplete removal | Not Recommended |
Tick Bite Prevention Strategies
- Wear Protective Clothing: Long sleeves and pants when in wooded/grassy areas.
- Use Insect Repellent: Choose one recommended for ticks, such as those containing DEET or permethrin.
- Perform Tick Checks: After outdoor activities, thoroughly inspect your skin—and your pets—for ticks.
- Shower Soon After Exposure: Rinse off any ticks that haven’t yet attached.
- Keep Lawns Maintained: Trim grasses and shrubs to reduce tick habitat near your home.
Frequently Asked Questions (FAQs)
Q: What should I do if a tick’s head remains in my skin?
A: Try to remove it with clean tweezers. If you cannot, leave it alone; the skin will shed the mouthparts naturally, usually causing only minor irritation.
Q: Is it dangerous to use petroleum jelly or nail polish?
A: Yes. These slow removal, do not reliably suffocate ticks, and increase the risk of infection.
Q: How soon should I remove a tick?
A: As quickly as possible—within hours is best. The longer the tick remains, the higher the risk of disease transmission.
Q: Is it safe to flush ticks down the toilet?
A: Yes, flushing is a safe and approved disposal method. Alternatives include sealing in tape or alcohol.
Q: Should I see a doctor after every tick bite?
A: Not usually, unless you experience symptoms like fever, rash, or persistent redness. However, keep the tick and a photo of the bite for reference.
Q: Are all ticks dangerous?
A: Most ticks do not carry disease, but some can transmit pathogens. Immediate removal is the best defense.
Key Takeaways: Effective Tick Removal and Aftercare
- Use fine-tipped tweezers or a tick removal tool. Grasp as close to the skin as possible, pull straight up with steady pressure, and avoid folk remedies.
- Do not crush, twist, or burn the tick.
- Clean the area thoroughly and monitor for symptoms several weeks.
- Seek medical advice if rashes, fever, or other concerning symptoms develop.
- Prevention—protective clothing, regular checks, and landscaping—minimizes future tick encounters.
Being prepared and informed is key to tackling tick bites safely. With prompt action and proper care, you can greatly reduce risks and protect health—whether at home, outdoors, or tending to pets.
References
- https://petcareclinicofkokomo.com/2016/04/19/step-by-step-tick-removal-instructions/
- https://www.consumerreports.org/health/outdoor-safety/how-to-remove-a-tick-a4363157183/
- https://www.goodhousekeeping.com/health/wellness/news/a44272/tick-removal/
- https://www.goodhousekeeping.com/uk/lifestyle/a65361992/how-to-remove-tick-bite/
- https://lebanonanimalhospital.com/a-step-by-step-guide-to-removing-a-tick-from-your-pet/
- https://www.healthvermont.gov/disease-control/tick-bite-illnesses/prevent-tick-bites-tickborne-diseases
Read full bio of Sneha Tete


