How To Transplant Hydrangeas: 9 Steps For Thriving Blooms
Master the art of moving hydrangeas successfully, minimizing shock and ensuring vigorous blooms next season.

Image: HearthJunction Design Team
Transplanting Hydrangeas: A Step-By-Step Guide for Healthy, Thriving Blooms
Hydrangeas are beloved in gardens worldwide for their lush foliage and stunning blooms, but sometimes you may need to move them. Whether you’re redesigning your landscape, your hydrangea outgrew its spot, or you simply want to refresh your garden’s look, transplanting hydrangeas is a manageable task with a high success rate—if timed and executed correctly. This guide covers everything you need to know about transplanting hydrangeas, from ideal timing and preparation to troubleshooting transplant shock and maximizing garden health for years of beauty.
Why and When Should You Transplant Hydrangeas?
There are several reasons to move a hydrangea shrub:
- The plant has outgrown its current space and is encroaching on other plants or walkways.
- Poor sunlight or excessive shade is impacting flowering.
- Soil conditions like drainage or pH are less than ideal.
- Garden renovations or landscaping plans require reorganization.
Knowing when to transplant is just as important as knowing why. Moving hydrangeas at the wrong time can result in poor establishment, stress, or even loss of blooms for the following season.
Best Time of Year to Transplant Hydrangeas
- Fall (after flowering, during dormancy): In most regions, mid- to late fall is ideal. This is after the leaves have dropped and the plant is entering or in a dormant state, which minimizes shock.
- Winter (in very mild climates): If you live in a region with mild winters where the ground doesn’t freeze, winter can still be a good time to move dormant plants.
- Spring (before bud break): In very cold climates or for tender varieties, wait until early spring before new growth emerges.
- Avoid summer: Transplanting in hot weather causes extra stress due to heat and water loss, making establishment difficult.
Planning and Preparation Before Transplanting
A successful hydrangea move starts long before you dig. Follow these important steps:
Prepare the New Location
- Choose an area with morning sun and afternoon shade or dappled light for most hydrangea varieties.
- Hydrangeas thrive in fertile, well-draining soil. Amend with compost or organic matter for improved moisture retention and root health.
- Test the soil pH if you wish to influence bloom color (blue for acidic, pink for alkaline); this is easiest to adjust before planting.
- Dig the new hole ahead of time—make it at least twice as wide as the expected root ball, and as deep, so you can move the hydrangea straight over without delay.
Prepare the Hydrangea
- Water the shrub deeply a day or two before digging to hydrate the roots and soften the soil.
- Lightly prune the plant: Remove dead, damaged, or weak branches, but keep most branches intact, especially those with next season’s buds.
- If the plant is large, consider root pruning a few weeks in advance (cutting a circle around the shrub’s drip line to encourage new feeder root growth inside).
How to Transplant a Hydrangea: Step-by-Step
- Water Thoroughly: A well-hydrated plant reduces shock and makes digging easier.
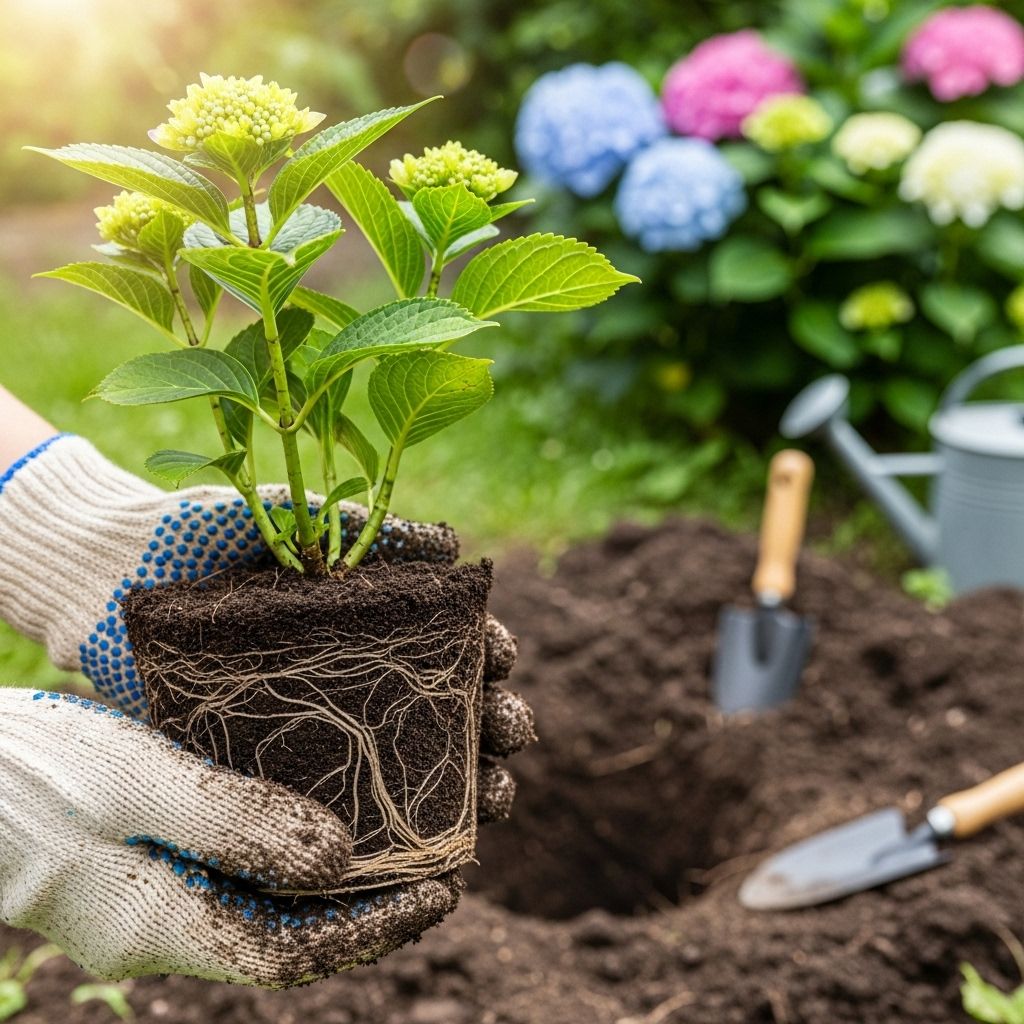
- Dig Out the Root Ball: Use a sharp spade to create a wide circle (at least 12–18 inches from the main stem of a mature plant). Dig around and beneath the roots to lift the entire root ball in one piece. For large hydrangeas, get help to avoid breaking the ball or the branches.
- Keep Soil Intact: Take as much native soil as possible with the roots to maintain their network and beneficial microbes.
- Wrap or Move Immediately: Move the plant right away to its new location. If you have to wait, cover the roots with damp burlap or a tarp to prevent drying.
- Place in New Hole: Settle the root ball so the top is level with the surrounding soil—don’t plant deeper than it was growing before, as this can stress or rot the plant.
- Backfill and Settle: Fill in with the excavated native soil, amended with compost if needed. Gently firm the soil around the roots, but don’t pack too tightly (leave small gaps for air and water).
- Water Deeply: Water thoroughly to settle soil and eliminate air pockets. This is crucial for good root contact and early establishment.
- Mulch: Apply a 2–3 inch layer of organic mulch (like bark or shredded leaves) around the root zone to retain moisture and regulate temperature.
- Provide Shade (if needed): If there’s an unexpected hot or sunny period, temporarily shade the plant for a few weeks to prevent wilting.
Aftercare: Helping Transplanted Hydrangeas Thrive
The weeks following transplanting are critical. Here’s how to give your shrub the best start:
- Water consistently: Keep the soil evenly moist (not soggy) for the first season. Deep watering encourages downward root growth, supporting drought tolerance later.
- Check soil drainage: Hydrangeas dislike waterlogged soil. If you see standing water or the roots stay saturated, improve drainage with additional compost or sand.
- Mulch maintenance: Mulch conserves moisture and suppresses weeds; replenish as needed, but avoid piling against the stem.
- Hold fertilizer: Avoid fertilizing until you see new growth in spring—early feeding can stress newly transplanted roots.
- Monitor for pests/disease: Weakened plants are more susceptible to problems. Watch for wilting, leaf spots, or powdery mildew, and address quickly.
- Pruning: Delay major pruning until after the plant is established—only remove dead wood in the first year.
Understanding and Managing Transplant Shock
Even with perfect timing and technique, some hydrangeas may show signs of distress post-transplant. This is called transplant shock, a natural reaction to root disturbance and environmental change. Typical symptoms include drooping leaves, slowed growth, or yellowing foliage.
How to Minimize Transplant Shock
- Prepare the planting hole before digging up your plant to reduce root drying time.
- Ensure proper planting depth; the crown should sit at the same level as before.
- Remove air pockets by watering well during and after transplanting.
- Install a temporary shade cloth if the sun is harsh.
- Mulch and maintain steady soil moisture—neither too wet nor too dry.
Most healthy hydrangeas will bounce back with these approaches. Severe symptoms can indicate issues like root rot from overwatering, so always check your soil’s drainage first.
Choosing the Best Location for Your Transplanted Hydrangea
Your hydrangea’s long-term health depends on choosing the right planting spot. Here’s what to look for:
- Sunlight: Most hydrangeas prefer morning sun and afternoon shade or dappled light all day. Too much sun leads to wilting; too little reduces blooms.
- Soil: Rich, organic, and well-draining. Amend clay or sandy soils with organic matter before planting.
- Protection: Plant away from strong winter winds or extreme heat. Near buildings or fences can offer helpful protection.
Pro Tip: Plan for mature size! Hydrangeas can grow several feet wide and tall. Leave enough space from walls, fences, or other shrubs to allow full development.
Common Mistakes to Avoid When Transplanting Hydrangeas
- Transplanting during full summer heat or when the plant is actively flowering.
- Planting too deeply, which can suffocate roots and cause rot.
- Underwatering (or overwatering) after transplant; both can cause stress and root problems.
- Failing to prepare the new hole in advance, leaving roots exposed to air and sun.
- Forgetting to mulch or skipping shade in hot weather.
Table: Quick Reference for Transplanting Hydrangeas
| Step | Key Tips |
|---|---|
| Timing | Fall or spring when dormant |
| Site Prep | Morning sun, rich and well-draining soil, amend with compost |
| Digging | Wide and deep to keep roots whole |
| Planting | Same depth as before, fill with amended soil, water well |
| Aftercare | Mulch, steady moisture, avoid fertilizer until new growth |
Frequently Asked Questions (FAQs)
Q: Can hydrangeas be transplanted in summer?
A: It is not recommended to transplant hydrangeas in summer because the heat and active growth place extra stress on the plant. Stick to fall or early spring for the smoothest transition.
Q: Will a transplanted hydrangea flower the same year?
A: Transplanting can reduce or delay blooms in the same season, especially for varieties that bloom on old wood. The plant usually rebounds by the following year with proper care.
Q: How much should I prune before moving?
A: Only lightly prune to remove damaged or crossing branches. Avoid heavy pruning, as hydrangeas often set next year’s blooms on old wood. After transplanting, wait until the plant is established before major pruning.
Q: My hydrangea looks wilted after transplanting. What should I do?
A: This is a common sign of transplant shock. Ensure the soil is moist (not soggy), apply mulch, and shade if sunny. Most plants recover within a few weeks as roots become established.
Q: Do I have to fertilize immediately after moving the plant?
A: Do not fertilize until you see new growth. Early fertilization can burn or stress delicate, recovering roots.
Expert Hydrangea Care Tips
- Deep, infrequent watering is better than light, frequent watering—encourage deep roots!
- If you live in a very cold climate, mulch extra thick in winter to protect roots in the first year.
- Drip irrigation helps maintain steady moisture and reduces disease risk from wet foliage.
- Track your plant’s progress for a season. Adjust sunlight or watering if needed to see optimal growth.
Conclusion: Move Your Hydrangea with Confidence
Relocating a hydrangea is a straightforward task with the right preparation and timing. By moving your shrub during the dormant season, preparing both plant and soil, and providing careful aftercare, you’ll ensure a lush, healthy plant ready to provide vibrant blooms for years to come. Remember, patience is key: Allow your hydrangea a full season to settle in—a small investment for seasons of abundant beauty ahead.
References
Transplant Hydrangeas Easily in Four Simple Steps
Watch our video guide to transplant hydrangeas! Learn timing, soil prep, digging tips, and watering advice. Get confident with step-by-step care—click to watch now!
Read full bio of medha deb


