How and When to Transplant Clematis Plants Successfully
Moving a garden vine with care paves the way for stronger roots and more abundant blooms.

Clematis, revered for its vigorous vines and brilliant blooms, is a garden favorite that occasionally requires transplanting. Whether you need to rescue a struggling specimen or simply reimagine your garden’s layout, learning to transplant clematis with care is crucial to maintaining plant health and ensuring vibrant future growth. This detailed guide walks you through every essential step—from timing and preparation to hands-on techniques and aftercare strategies—so your clematis can thrive in its new home.
Why Transplant Clematis?
Gardeners may need to relocate a clematis for several reasons:
- Improving sunlight exposure—some sites may be too shady or too exposed.
- Providing better soil drainage—essential for clematis health.
- Accommodating other landscape changes, like new structures or plantings.
- Correcting spacing errors from previous plantings.
When Is the Best Time to Transplant Clematis?
Timing is critical for minimizing plant stress and maximizing transplant success.
- Early Spring (before new growth emerges)
- Early Fall (after flowering, as the plant begins dormancy)
Transplanting during dormancy allows clematis to recover and establish roots before the demands of flowering and active growth. Avoid moving plants during hot summer or when actively blooming, as this can cause severe stress and reduce chances of survival.
Fall is especially popular: after the last blooms die back, the plant can redirect energy to root establishment over winter.
Step-by-Step: How to Transplant Clematis
Though clematis is hardy, it can be sensitive to root disturbance. Careful preparation and handling are essential at every stage.
Step 1: Choose the Right Location
- Sunlight: Most clematis varieties thrive in at least 6 hours of direct sunlight. Some types tolerate light afternoon shade; however, abundant sun promotes stronger blooms.
- Soil: Clematis require fertile, well-draining soil. Avoid areas where water collects. Amending with compost or well-rotted manure boosts nutrition and drainage.
- Space: Ensure enough room for the mature vine’s spread—both vertically and horizontally. Install a trellis, fence, or arbor as appropriate for support. Plan for at least 18 to 24 inches between plants.
- Accessibility: Pick a location that allows easy access for pruning and care.
Step 2: Prepare the Planting Site
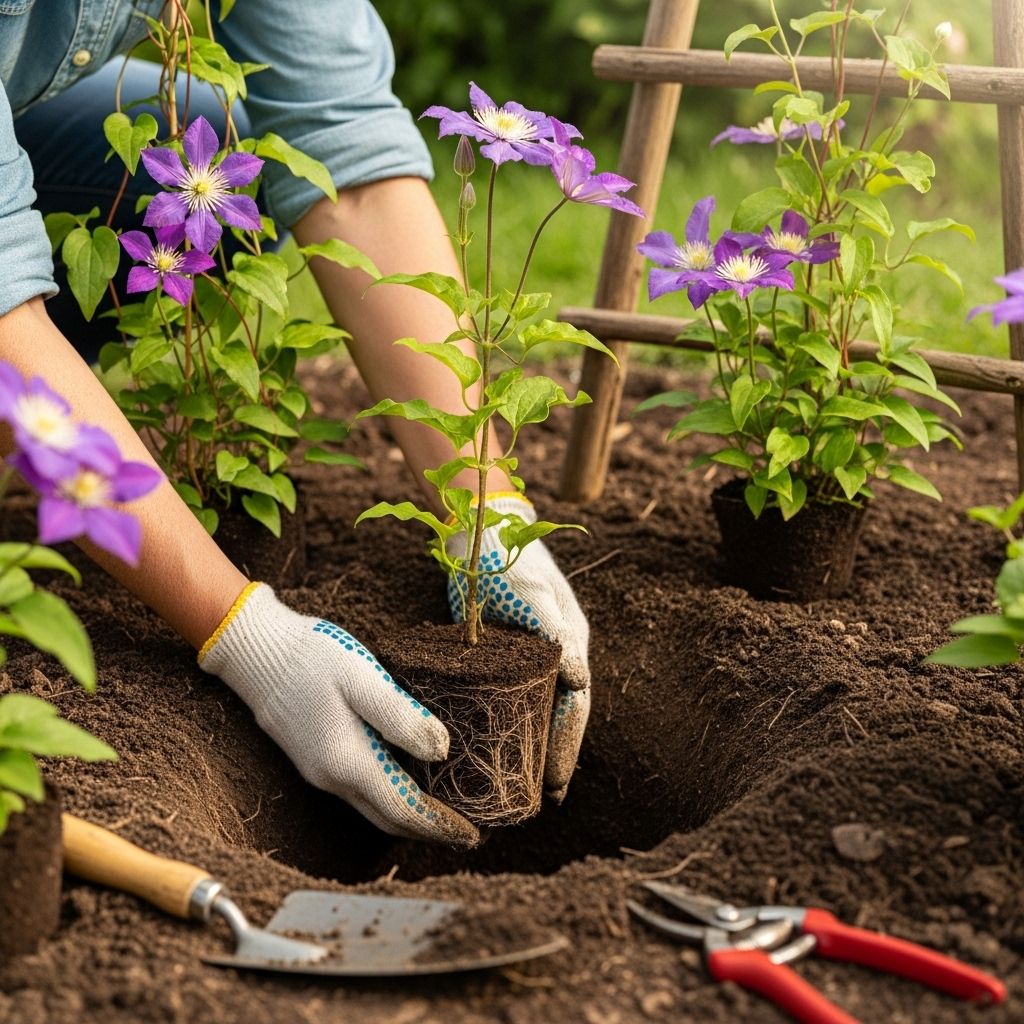
- Dig a hole twice as wide and slightly deeper than the clematis root ball will be. Loosen the soil well to encourage root penetration.
- Add organic material (like compost) and mix with native soil to enrich structure and moisture retention.
- If your soil is heavy clay, work in coarse sand or perlite for drainage improvement.
- Place the trellis or support structure before planting; avoid damaging roots later by driving stakes afterward.
Step 3: Prepare the Clematis Plant
- Water thoroughly the day before moving. Moist soil reduces root breakage and eases removal.
- Prune lightly to reduce stress: Remove dead stems and spent flowers. For large, mature plants, cut back vigorous growth to 6–12 inches above the soil. Leave a few healthy nodes (the point where leaves join stems) intact for regrowth.
- Removing excess foliage limits water loss via transpiration and helps the plant recover after transplantation.
Step 4: Digging and Lifting the Plant
- Carefully dig around the root mass using a spade or shovel. Start at least 12 inches from the stem, working in a broad circle to preserve roots.
- Dig deep—clematis roots can penetrate far below the surface. Go as deep as possible to capture the entire root system, minimizing trauma.
- Gently pry the root ball from the ground, keeping as much soil attached as possible. Avoid breaking the main roots.
- If roots are exposed, cover them with damp burlap or place the plant in a bucket of water to prevent drying during transport.
Step 5: Transplanting Into the New Hole
- Position the plant so the crown (where stems meet roots) is slightly below or level with the soil surface (about 1–2 inches below recommended).
- Spread roots gently to fill the hole evenly.
- Backfill with the amended soil, pressing gently to remove air pockets but not compacting tightly.
- Water thoroughly to settle soil around the roots. Water helps eliminate air gaps and encourages new root growth.
- Mulch around the base (2–3 inches deep) with compost, bark, or leaves to regulate moisture and suppress weeds. Keep mulch away from direct contact with stems to avoid rot.
Aftercare: Helping Your Clematis Recover
Post-transplant care is vital for survival and new growth:
- Watering: Keep soil consistently moist (but not waterlogged) for several weeks. Clematis roots are sensitive to drought, especially after disturbance.
- Monitoring: Check regularly for wilting or leaf drop. A small setback is normal; persistent decline may mean roots are struggling.
- Feeding: Hold off on strong fertilizers for 4–6 weeks. Once new growth appears, begin feeding diluted, balanced fertilizer or compost tea.
- Support: As stems regrow, gently tie new shoots to the trellis or support to guide vertical growth.
- Protection: Apply extra mulch for winter protection in cold climates, especially if transplanting in fall.
Common Transplanting Mistakes to Avoid
- Transplanting at the wrong time—hot summer sun and active growth phases stress plants.
- Breaking main roots—always dig deep and wide.
- Improper planting depth—crown must be slightly below soil level for stability and protection.
- Forgetting to water—regular moisture is essential after disturbance.
- Neglecting to amend soil—clematis need fertile, well-prepared beds for optimal regrowth.
Transplanting Clematis From Pots
Moving clematis from a container to open ground—or a larger pot—requires slightly different attention:
- Check for root-bound conditions: Loosen curled roots before planting.
- Cut back top growth by half to reduce stress.
- Follow similar planting and aftercare as for in-ground plants.
Table: Clematis Transplant Checklist
| Stage | Key Actions | Tips |
|---|---|---|
| Timing | Early spring or early fall | Avoid during full bloom or summer heat |
| Preparation | Water thoroughly, prune, prep site | Amend soil with compost for best results |
| Digging | Wide, deep root ball extraction | Preserve as many roots as possible |
| Transplanting | Position crown slightly below soil | Mulch and water immediately |
| Aftercare | Monitor, water, shelter from harsh conditions | Feed only after new growth |
Frequently Asked Questions (FAQs)
Q: Can mature clematis be transplanted?
Yes, mature clematis can be moved, but extra care is needed due to larger, more delicate root systems. Always dig as far and wide as possible to preserve the root ball. Cut back top growth to lessen stress and water thoroughly before and after.
Q: What is the risk of transplant shock for clematis?
Transplant shock is a risk any time roots are disturbed, often leading to wilting or slowed growth. Careful handling, quick replanting, and attentive watering greatly reduce this risk.
Q: How long does it take for a transplanted clematis to establish?
Roots can take several weeks to months to fully acclimate, depending on age, season, and post-transplant care. Most clematis will show signs of new growth the next spring after a fall transplant.
Q: Should I fertilize immediately after transplanting?
No. Wait until you see active new growth before resuming fertilization. Too much fertilizer too soon can burn the roots.
Q: Can I transplant clematis in bloom?
It is better to wait until after blooming finishes and the plant enters dormancy for best recovery. Moving a blooming plant is stressful and may cause significant flower and foliage loss.
Tips for Clematis Relocation Success
- Always water well before and after moving.
- Transplant on a cool, overcast day if possible.
- Protect from strong sun and wind for a few weeks after transplant.
- Label old and new sites if moving multiple plants.
- Never let exposed roots dry out during the process.
Summary
Transplanting clematis is a careful process but not difficult for those who plan and execute each step with attention. By choosing the right season, prepping both soil and plant thoughtfully, digging and replanting cautiously, and providing steadfast aftercare, gardeners can help clematis adapt smoothly to its new home, rewarding them with vigorous vines and a bounty of blooms for seasons to come.
References
Read full bio of Shinta


