Starting Seeds for Hydroponics: A Step-by-Step Beginner’s Guide
Creating the right germination setup prevents shock and encourages vigorous growth.
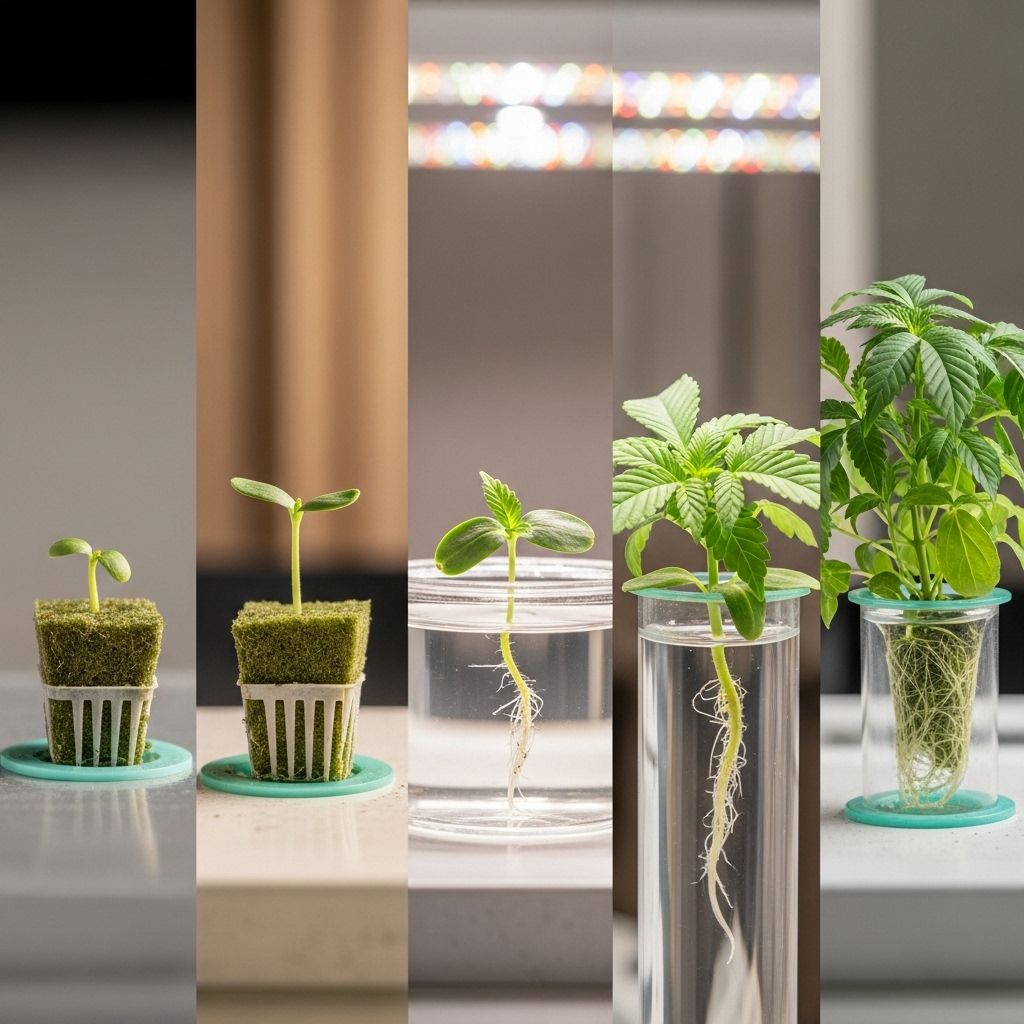
Jumpstarting healthy hydroponic plants starts with proper seed germination. Unlike traditional soil-based gardening, hydroponic growing puts you in complete control from the very first root—no mess, no transplant shock, and accelerated seedling growth. This guide breaks down the step-by-step process of starting seeds for hydroponic systems, popular methods, best practices, troubleshooting, and frequently asked questions to help beginners succeed from the start.
Table of Contents
- Why Start Seeds Directly for Hydroponics?
- Materials Needed for Hydroponic Seed Starting
- Step-by-Step Guide: Starting Seeds for Hydroponics
- Choosing Seeds for Hydroponic Growing
- Hydroponic Starter Plug Options
- Best Germination Environment
- Caring for Hydroponic Seedlings
- Common Mistakes and Troubleshooting
- Frequently Asked Questions (FAQs)
Why Start Seeds Directly for Hydroponics?
One of the biggest advantages of hydroponic gardening is precise control over the entire growing environment. When you start seeds in soil and later transplant to a hydroponic system, you risk introducing pathogens, pests, or dirt. By germinating seeds directly in hydroponic-friendly media, you avoid contamination, reduce transplant shock, and ensure a seamless transition for vigorous, healthy plants.
Key benefits include:
- Cleaner start — Avoids introducing soil and pests into your hydroponic system
- Faster growth — Seedlings turn to active growth quickly as soon as the taproot emerges
- No rootbound risk — Seedlings have uninterrupted root growth, avoiding constraints of soil pots
Materials Needed for Hydroponic Seed Starting
Gathering the right materials streamlines the process and increases success rates. Here’s what you’ll need to start hydroponic seeds:
- Seeds (vegetable, herb, or fruit varieties suitable for hydroponics)
- Starter plugs or growing medium (see options below)
- Net pots (to hold plugs in hydroponic systems)
- Water (filtered recommended for initial soaking)
- Tray or humidity dome (to create a moist, warm environment)
- Grow lights (for consistent light if natural sunlight isn’t abundant)
- Nutrient solution (not necessary during initial germination, added as true leaves develop)
- Labels (optional, but recommended for tracking varieties)
Step-by-Step Guide: Starting Seeds for Hydroponics
Follow these five essential steps for high germination rates and strong hydroponic seedlings:
Step 1: Prepare and Soak Starter Plugs
- Hydrate starter plugs by soaking them in filtered water for 10–30 minutes. This ensures complete moisture saturation, crucial for consistent germination.
- Gently squeeze excess water to avoid waterlogging but keep them moist.
Step 2: Place Plugs in Net Pots or Trays
- Place each saturated starter plug into a net pot for stability and support during germination and later transplant.
- Arrange net pots in trays or in your hydroponic system’s seedling chamber. If not using net pots, position plugs in a shallow tray.
Step 3: Sow the Seeds
- Using clean, dry hands, drop 2–3 seeds into the hole at the top of each starter plug. Sowing multiple seeds increases the chance of successful germination in each plug.
- Lightly press seeds into the plug to ensure contact with the moist medium, but avoid packing them in too tightly.
- Do not bury seeds too deeply—follow depth guidelines from seed packets (typically 0.5–1 cm deep).
Step 4: Provide the Right Environment
- Cover the tray of seeded plugs with a humidity dome or clear plastic lid to retain warmth and moisture.
- Place in a warm, bright location (ideally 70–80°F/21–27°C). If conditions are cool or inconsistent, use a seedling heat mat.
- If growing indoors away from sunlight, set up grow lights about 2 inches (5 cm) above the starter plugs.
Step 5: Monitor, Thin, and Prepare for Hydroponic Growth
- Check the plugs daily, ensuring they remain moist but never soggy. Mist with water if the surface dries out.
- Once seeds sprout, provide ample light (14–16 hours a day for most seedlings) to avoid legginess.
- When seedlings have at least one set of true leaves, thin them to the strongest plant per plug by snipping weaker seedlings at the base with sterilized scissors.
- After roots begin to show through the bottom or sides of plugs, transfer seedlings into your main hydroponic system.
Choosing Seeds for Hydroponic Growing
Almost any vegetable, herb, or fruit seed can germinate in a hydroponic setup. However, varieties bred for compact growth, fast maturity, and disease resistance perform especially well.
Popular options for hydroponic seeds include:
- Lettuce, spinach, and kale
- Basil, cilantro, parsley, and other herbs
- Chard, mustard greens, arugula
- Tomatoes (dwarf or cherry types), peppers, and cucumbers
Use fresh, high-quality seeds for the best germination rates. Old or poorly stored seeds may yield slow or patchy results.
Hydroponic Starter Plug Options
Hydroponic growers use various inert starter plugs and growing media designed to retain moisture, provide airflow, and support seedlings without soil.
| Starter Plug Type | Description | Common Uses |
|---|---|---|
| Rockwool Cubes | Densely packed mineral fibers, pH-neutral after soaking, excellent moisture/air ratio | Versatile, common for vegetables and herbs |
| Coco Coir Plugs | Compressed coconut fiber, biodegradable, holds water well | Greens, herbs, environmental choice |
| Peat Pellets | Compressed peat, expands on soaking, easy to handle | Germinating fast-growing crops like lettuce |
| Rapid Rooter/Starter Sponges | Organic polymer sponges, maintain uniform moisture and oxygen | Widely used in both hobby and commercial systems |
| Perlite/Vermiculite Mixes | Loose, airy, good for direct sowing, less structured than cubes | Cuttings as well as seed starting |
Tip: Always pre-soak and rinse starter plugs (especially rockwool) before sowing seeds to flush out possible manufacturing residues and to balance pH.
Best Germination Environment
Seeds need warmth, constant moisture, and gentle airflow to sprout successfully. Here’s how to create the ideal environment:
- Temperature: 70–80°F (21–27°C) is best for most crops.
- Humidity: High humidity keeps plugs from drying out. Use a humidity dome or clear plastic to trap moisture, venting occasionally to prevent fungus.
- Light: After sprouting, give seedlings 14–16 hours of direct light. Use full-spectrum grow lights if sunlight is weak.
Caring for Hydroponic Seedlings
Once seeds germinate, focus on growing strong, resilient seedlings for transplanting into your hydroponic system:
- Gradually remove the humidity dome after germination to acclimate seedlings to lower humidity and reduce damping off.
- Do not fertilize until the first set of true leaves appear. Then, introduce a half-strength hydroponic nutrient solution.
- Consistently monitor moisture. Plugs should stay damp, not waterlogged or dry.
- Provide ample light to prevent leggy, weak seedlings. Adjust grow lights closer (but not touching) for compact growth.
Common Mistakes and Troubleshooting
- Seedlings not sprouting:
- Seeds are old or non-viable—try sourcing fresh seeds.
- Plugs too dry or too saturated—moisture balance is key.
- Temperature too low for germination—raise temperature with a heat mat.
- Leggy or stretched-out seedlings:
- Insufficient light—move light source closer or increase intensity.
- Extended darkness—ensure 14–16 hours daily light exposure.
- Mold or fungus on plugs:
- Overly high humidity or lack of air circulation—vent humidity dome daily for fresh air.
- Waterlogged plugs—reduce watering frequency and allow surface to dry slightly before next misting.
- Yellowing seedlings:
- Nutrient deficiency—start with diluted hydroponic nutrients once true leaves develop.
- Poor water quality—use filtered or distilled water to avoid chemical buildup.
Frequently Asked Questions (FAQs)
Q: Do I need to soak seeds before sowing in hydroponic medium?
A: For most small seeds, pre-soaking is not necessary. For tougher-coated seeds (peas, beans), an overnight soak can speed up germination, but it’s optional. The moist plug provides sufficient hydration for most varieties.
Q: How many seeds per plug should I sow?
A: Sow 2–3 seeds per plug to ensure strong germination. Thin to the healthiest seedling after sprouting to avoid overcrowding.
Q: When should I add nutrients to hydroponic seedlings?
A: Wait until the first true leaves appear before introducing a diluted hydroponic nutrient solution. Using nutrients too early can burn sensitive roots and seedlings.
Q: My seedlings are tall and floppy. What should I do?
A: This usually indicates insufficient light. Lower the grow light closer to the seedlings and increase light exposure to 14–16 hours a day. Seedlings should be compact and sturdy before transplanting.
Q: Can I start seeds for hydroponic systems outside in sunlight?
A: While it’s possible, fluctuating outdoor conditions (temperature, humidity, wind) make consistent germination harder. Indoors, you have much greater control.
Q: How do I transplant seedlings into my hydroponic system?
A: Once roots are visible through the bottom or sides of the starter plug and seedlings have at least one set of true leaves, gently transfer the entire plug into your system’s net cup or growing chamber. Avoid damaging delicate roots.
Q: What’s the best starter plug for hydroponics?
A: Rockwool, coco coir, peat pellets, and rapid rooter sponges all work well. Choose based on availability, sustainability preferences, and compatibility with your system.
Final Tips for Successful Hydroponic Seed Starting
- Label everything: Keep track of varieties with waterproof labels to avoid mix-ups.
- Be patient: Some crops sprout in 1–3 days, while others may take up to 2 weeks.
- Stay tidy: Keep your seed starting area clean to prevent mold and fungus.
- Experiment: Try different crops and note what works best in your setup for continual improvement.
With the right starter plugs, careful watering, and consistency, starting seeds for hydroponics is simple, clean, and sets the foundation for thriving plants. Embrace the process, pay attention to environmental cues, and watch your hydroponic garden grow from seed to harvest more efficiently than ever before.
References
Read full bio of medha deb

