Soil Blocking: A Comprehensive Guide to Sustainable Seed Starting
Eco-friendly seed cubes foster stronger roots without single-use plastic waste.

Soil blocking has emerged as a favorite seed-starting method among both home gardeners and professional growers. Unlike traditional plastic seed trays or pots, this technique forms compact, self-contained cubes of fertile, moist soil, ideal for germinating seeds and nurturing young seedlings. Here, you’ll find everything required to master soil blocking: the tools, recipes, step-by-step guidance, troubleshooting, pros and cons, and essential answers to frequently asked questions.
What is Soil Blocking?
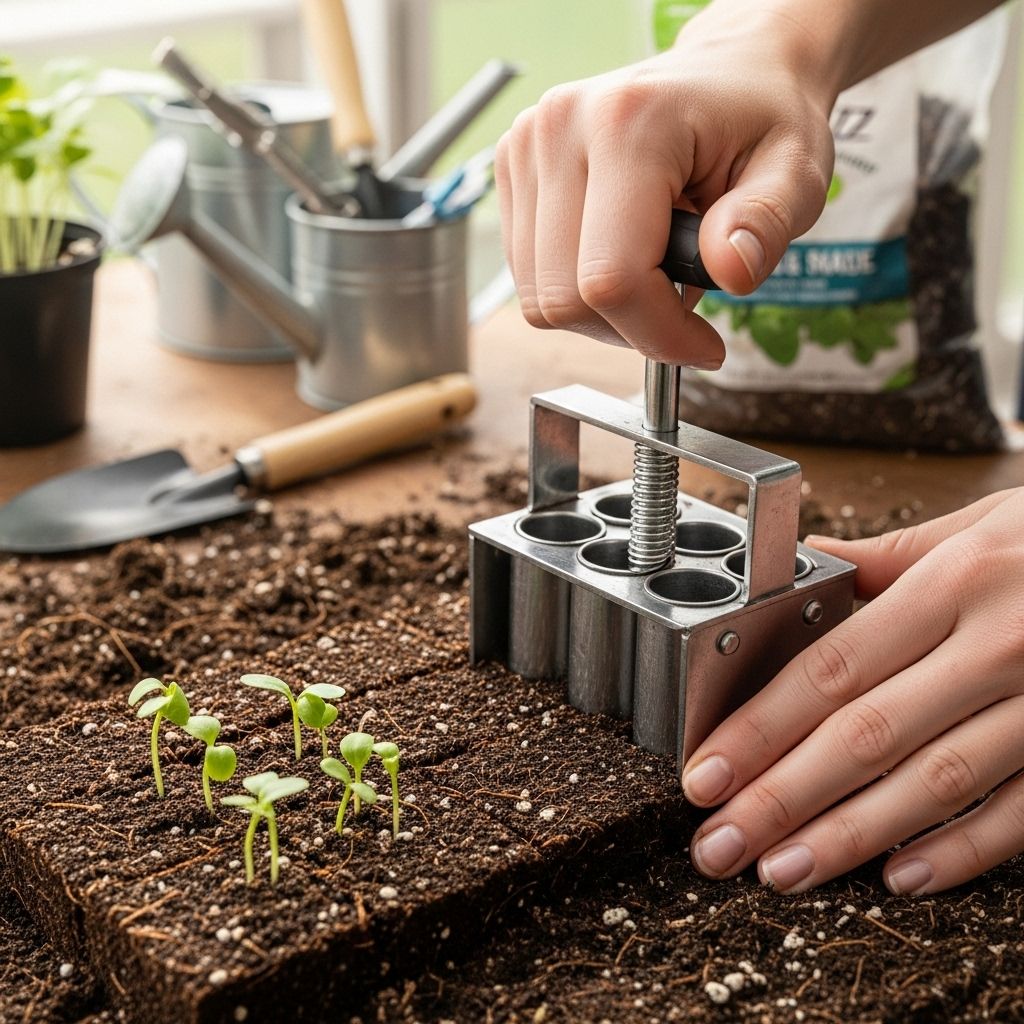
Soil blocking is a seed-starting approach that uses a specialized tool called a soil blocker to compress a custom potting mix into firm cubes, or blocks. These blocks stand freely on trays and provide optimal environments for seed germination and growth, without relying on individual containers or plastic cells. The method is valued for its sustainability and its ability to foster healthier, more resilient seedlings.
- No plastic waste: Unlike seed trays, soil blocking eliminates the need for disposable plastic pots.
- Air pruning roots: Roots grow to the edge of the block and are exposed to air, leading to natural root pruning rather than root circling, promoting robust, non-bound root systems.
- Custom soil nutrition: Blocking allows growers to use nutrient-rich, tailor-made mixes for optimal seedling health.
- Space efficient: Blocks can be arranged densely on trays to maximize germination space.
Core Benefits of Soil Blocking
| Benefit | Description |
|---|---|
| Air Pruning | Roots grow to the edge and naturally prune, leading to healthier, multi-branch-rooted seedlings. |
| Eliminates Pot Bound Roots | Prevents root circling often seen in plastic trays, resulting in better growth after transplanting. |
| Eco-Friendly | Reduces dependence on plastic—blocks biodegrade or compost after use. |
| Improved Space Utilization | Blocks can be closely set on flat trays, allowing you to start more seeds in less area. |
| Customizable Mix | Gardeners can create mixes tailored to specific plant needs and local resources. |
Essential Tools for Soil Blocking
- Soil Blocker Tool: Available in a range of sizes, typically 2″ or mini versions for smallest seeds. The tool compresses soil into uniform cubes.
- Sturdy Mixing Bin: Large enough for thorough mixing of potting ingredients and water.
- Spatula or Flat Masonry Tool: Used to level and release blocks cleanly from the soil blocker.
- Seed Tray: Flat trays (without cells) hold multiple blocks and can be reused season after season.
Crafting the Right Soil Blocking Potting Mix
Creating a mix with ideal structure is critical for success in soil blocking. The mix must be dense enough to hold together but also aerated to allow for root growth and water movement. Key ingredients are fiber-rich base, organic matter, and mineral amendments.
Ingredients Overview
- Peat Moss or Coconut Coir: The primary fibrous component; coir is preferable for sustainability.
- Compost: Provides nutrients and structure. Well-aged compost or worm castings work best.
- Perlite/Sand: Improves drainage, keeps blocks from compacting too tightly.
- Greensand or Rock Phosphate: Adds minerals for robust root health.
- Granular Mycorrhizae: Enhances root nutrient uptake through beneficial fungi.
- Blood Meal (optional): Adds a source of slow-release nitrogen for vigorous seedling growth.
Basic Potting Mix Recipes
- Recipe #1:
- 4 parts peat-free potting soil (sifted, remove chunks)
- 1.5 parts coconut coir (rehydrated)
- 0.5 part greensand
- 1 scoop granular mycorrhizae
- About 2 parts water (adjust for correct consistency)
For those just starting out and unsure about soil mixes, our detailed guide on choosing the right potting soil will help you find the ideal formulation for your seedlings. Having the right mix is crucial for their growth, so don’t hesitate to learn about your options! - Recipe #2:
- 1 part coir, peat, or peat alternative
- 1 part sifted compost (plant-based or animal-based)
- 1 part perlite
- 1 cup blood meal
- Water as needed for dampness
Tip: Add water gradually. The ideal consistency is wet but not runny—when squeezed, the mix should stick together yet not drip excessively.
Step-by-Step: How to Make Soil Blocks
- Sift the Mix: Remove large debris or chunky material to ensure smooth, firm blocks.
- Moisten Ingredients: Pre-hydrate coir or peat, then add water incrementally while mixing.
- Combine and Adjust: Mix ingredients thoroughly, aiming for a damp mix that forms a solid ball when squeezed.
- Pack the Blocker: Heap the mix in your bin. Press the soil blocker firmly down, rocking gently side to side for dense compaction.
- Release Blocks: When a slight mud forms at the top and base is level, operate the release lever to eject blocks into the seed tray. Use a spatula for precision and to ensure all blocks sit flat and intact.
- Arrange Blocks: Position blocks tightly on the tray, using the blocker edge to push rows together, maximizing space.
- Seed Planting: Press seeds gently into the block surface, ensuring excellent soil contact for fast germination. Water gently after planting.
Common Troubleshooting and Mistakes
- Crumbly or Weak Blocks: Usually due to a too-dry mix or overly coarse ingredients. Adjust water and sift the base more thoroughly.
- Blocks Sticking in Tool: Insufficient compaction or sticky release. Tap sides gently and clean the blocker between batches.
- Poor Seed-to-Soil Contact: Always pat down soil lightly after seeding, and water gently for firm seed embedding.
- Overwet or Waterlogged Mix: Results in blocks collapsing after ejecting. Use less water, and mix in additional dry potting material.
Sustainability in Soil Blocking
One of the main draws of soil blocking is sustainability. Growers are increasingly moving away from peat moss, which is slow to regenerate and a carbon sink, opting for coconut coir or locally sourced materials. Some innovators are exploring alternatives such as leaf mold, composted bark, or combinations with proprietary organic blends, reducing environmental impact and supporting soil health.
- Peat Reduction: Coir is more sustainable, though some gardeners also aim to phase out coir for even more local options.
- Reusable Tools & Trays: Use long-lasting metal or high-grade plastic tools and trays to minimize disposable waste.
- Biodegradable Inputs: Compostable mixes and amendments mean each block returns nutrients to the soil after transplanting.
Soil Blocking: Pros and Cons
| Pros | Cons |
|---|---|
|
|
Frequently Asked Questions (FAQs)
Q: What is the best mix for soil blocking?
A: The best mix uses fibrous components (peat or coir), organic compost, perlite or sand, and a wet but not dripping consistency. Add minerals or mycorrhizae for best results.
Q: Can I use regular potting soil for soil blocking?
A: Standard potting soils are often too coarse or lack the fibrous quality needed for blocks. They can work if finely sifted and supplemented with coir or peat and extra moisture.
Q: How do soil blocks compare to seed trays?
A: Soil blocks foster air-pruned, non-circling roots and eliminate plastic waste, but require more hands-on mixing and compaction skill.
Q: Is soil blocking suitable for all seeds?
A: Almost all garden seeds, from vegetables to flowers, can start in blocks. Very delicate or slow-to-germinate seeds benefit from mini-blocks, while robust or vigorous seeds do well in larger blocks.
Q: How moist should the mix be?
A: Aim for a damp, sticky consistency that holds its shape but doesn’t run. Too dry leads to crumbling; too wet and blocks collapse or fail to release cleanly.
Advanced Tips for Success
- Use warm water for mixing—helps activate microbes and mycorrhizae in compost.
- Press the blocker down firmly, rock gently, and scrape excess soil off the base to ensure even blocks.
- Gentle post-release handling is crucial; support blocks with your free hand to prevent collapse during tray placement.
- Choose trays just deep enough to contain blocks with minimal side gaps, maximizing humidity and root protection.
- For increased sustainability, experiment with completely peat- and coir-free mixes based on home compost and leaf mold.
Transitioning Seedlings from Soil Blocks to the Garden
Seedlings grown in soil blocks usually show vigorous roots upon transplanting, thanks to the air pruning effect. Lift the block gently from the tray, handling from the base, and plant directly into prepared garden beds or containers. The blocks break down naturally, and roots quickly extend outward, accelerating seedling establishment.
Soil Blocking vs. Other Seed Starting Methods
| Method | Pros | Cons |
|---|---|---|
| Soil Blocking | No plastic waste; healthier roots; adaptable mix | Learning curve; requires tools |
| Seed Trays | Easy setup; keeps soil contained | Can cause root circling; plastic waste; less customization |
| Winter Sowing | Minimal setup; hands-off approach | Limited control; not ideal for all seeds |
Conclusion: Why Choose Soil Blocking?
Soil blocking is a transformative approach for seed starting, particularly for growers committed to sustainability and robust seedling health. Though it requires initial investment in tools and a bit of learning, the superior root development, reduced waste, and flexibility ultimately offer enduring benefits for gardeners of any skill level.
Frequently Asked Questions (FAQs)
Q: Is soil blocking more sustainable than traditional seed trays?
A: Yes, because it eliminates plastic waste and allows for compostable, biodegradable mixes based on locally sourced materials.
Q: What size soil blocker should I use?
A: Mini-blockers (1.5cm cubes) suit tiny or slow seeds; 2-inch blockers are best for most vegetables and flowers.
Q: Can I reuse soil blockers and trays?
A: Absolutely. Properly cleaned and stored, soil blockers and trays function for many growing seasons.
Q: What if my blocks keep crumbling?
A: Adjust your water content and sift the mix more thoroughly. Aim for a damp, sticky consistency with few air pockets or large particles.
Q: Do blocks need to be watered differently?
A: Gentle, bottom-watering works best to prevent block collapse and ensure consistent hydration. Misting is ideal for newly seeded blocks.
References
Read full bio of Srija Burman


