Reviving a Dying Aloe Vera: A Step-by-Step Rescue Guide
A clear, step-by-step approach to nurse struggling aloe vera plants back to robust growth.
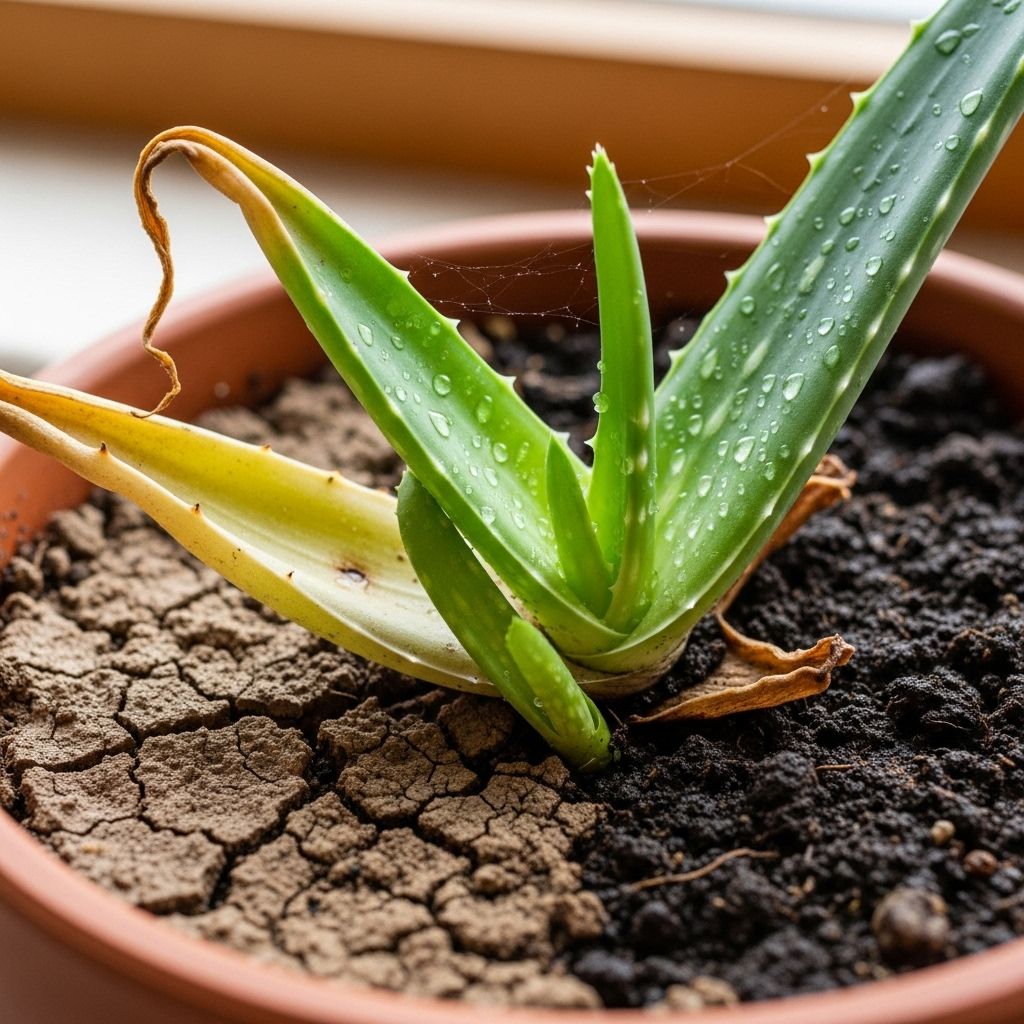
Aloe vera is celebrated for its resilience, unique aesthetics, and medicinal properties. Despite this, even the toughest aloe plants may show distress if conditions are unfavorable. If your aloe has wilted, browned, or lost its vigor, there are clear steps you can take to revive it. This guide covers the symptoms, causes, and a seven-step process to restore your aloe vera’s health and vitality.
How to Tell if Your Aloe Vera is Dying
Before jumping into rescue techniques, it’s essential to accurately assess your aloe’s health. Aloe plants can often recover from periods of neglect, but rapid decline in appearance suggests the need for immediate intervention.
- Wilting or sagging leaves: Leaves lose their firmness and may droop or collapse.
- Discoloration: Leaves turning yellow, brown, or transparent signal stress.
- Soft, mushy tissue: Indicates root rot or stem rot.
- Leaf tips dry or shriveled: Signs of underwatering or excess sun.
- Foul smell from soil: Root rot or decomposition.
If you notice several of these signs, your plant is likely suffering from one or more environmental or care-related problems.
Common Reasons an Aloe Vera Plant Declines
Aloes are tough, but they are also sensitive to mistakes that often stem from misunderstanding their basic needs. Here are the most prevalent causes of aloe distress:
- Overwatering: The most frequent culprit, overwatering leads to waterlogged soil and root rot. Succulent roots must have air as much as moisture.
- Poor drainage: Containers without proper drainage or heavy soils trap excess moisture and suffocate roots.
- Incorrect light: Both insufficient and excessive light cause leaf browning or etiolation (stretching, pale growth).
- Sudden temperature changes: Fluctuating temperatures or cold drafts can stress or shock aloes.
- Pest or disease problems: Fungal diseases, root rot, or infestations like mealybugs and aphids can weaken plants.
- Old or depleted soil: Over time, soil can compact, lose nutrients, and develop poor structure for root health.
- Underwatering: While tolerant to drought, extended neglect without water depletes aloe leaves and causes shrinkage.
The 7-Step Process to Revive a Dying Aloe Vera
Restoring a sick or dying aloe requires patience, observation, and the right sequence of interventions. Follow these seven evidence-based steps:
Step 1: Remove the Plant and Inspect the Roots
Begin by gently easing the plant out of its pot, taking care not to damage brittle leaves or roots.
Inspect roots for:
- Healthy roots: Firm, tan, orange, or yellow in color
- Unhealthy roots: Dark brown/black, slimy, mushy, or with a foul odor
Dispose of as much old, wet, or compacted soil as possible while you work. This helps expose the entire root system for thorough assessment and pruning.
Step 2: Prune Away Damaged Roots and Leaves
Using sanitized, sharp pruning shears, carefully cut away all mushy, discolored, or rotting roots. If roots disintegrate by touch, remove them entirely. Likewise, trim off any extremely damaged or diseased leaves at the base using a sterile blade.
- After each cut, wipe pruning blades with a paper towel dipped in 70% rubbing alcohol to prevent disease transfer.
- It’s common to be left with only a few viable roots or just a healthy base. This is preferable to leaving diseased tissue, which would jeopardize recovery.
Step 3: Prepare New Potting Mix and Pot
Healthy aloes require very well-draining soil—commonly a commercial succulent or cactus mix. You can further improve drainage and aeration by adding extra perlite, pumice, or coarse sand (about 30–50% of the total mix).
- Choose a pot with drainage holes. Terracotta is ideal, as its porous nature helps release excess moisture.
- If the previous soil was waterlogged, discard it and use entirely new substrate.
| Soil Component | Function |
|---|---|
| Potting mix | Base for nutrients, root anchorage |
| Perlite/Pumice | Enhances drainage and air flow |
| Coarse Sand | Improves texture and reduces compaction |
Step 4: Allow Roots to Dry and Callus (If Needed)
If you had to cut away a significant portion of roots or the base is still moist, let the plant “rest” out of soil for 24–48 hours in a warm, shaded environment. This encourages wounds to callus over, reducing the risk of rot when replanted.
Step 5: Repotting the Aloe
Once the plant base and roots are dry, set the aloe upright in the fresh potting mix. Ensure the root base sits slightly above the soil line to discourage further rot. Steady the plant with the substrate, but avoid compressing the potting mix too firmly.
- Do not water immediately after repotting. Wait at least 5–7 days before giving a light watering. This waiting period helps prevent rot as cuts heal and roots acclimate.
Step 6: Establish Proper Watering Regimen
With aloes, err on the side of under-watering, especially after recovery:
- Allow the soil to dry out completely between waterings.
- Water deeply until excess drains from the holes, then empty the saucer to avoid standing water.
- Reduce watering frequency in winter when the plant is dormant.
- Signs of overwatering include soft, yellow leaves and persistent soil moisture; underwatering symptoms are wrinkled, thin leaves.
Step 7: Optimize Lighting and Environment
Place your aloe in a location that receives bright, indirect sunlight. Morning sun is ideal. Avoid harsh afternoon rays that can scorch leaves and cause browning.
- Keep the aloe in a room with stable temperatures and good air circulation.
- Avoid cold drafts, rapid temperature swings, and very humid environments, all of which stress the plant further.
Aftercare: Fertilizing, Pruning, and Monitoring
- Fertilizing: Aloes do not need frequent feeding. In early spring or summer, use a diluted, phosphorus-rich liquid fertilizer once if your plant shows signs of new growth.
- Pruning: Regularly remove dead, shriveled, or diseased leaves as needed. Only remove a few leaves at a time to minimize stress.
- Monitoring: Check for signs of pests (like mealybugs, scale) and fungal issues (like aloe rust). Early detection makes pest and disease control much easier.
Pest and Disease Considerations
Unhealthy aloe vera plants are more susceptible to certain pests and diseases, including:
- Aloe rust: Appears as orange/brown spots, typically develops in humid, moderately cool conditions. Prune affected leaves and treat with sulfur powder.
- Root rot: Caused by persistent soil moisture. Prevention by proper soil and watering is key. Severely affected plants may not recover.
- Insect pests: Mealybugs and aphids can stunt growth. Remove by hand or treat with insecticidal soap as needed.
Preventing Aloe Vera Decline: Best Practices
Once your aloe shows signs of new, healthy growth, continue to provide optimal care to prevent future problems. Key practices include:
- Always use well-draining soil and pots with drainage holes.
- Water only when soil is completely dry.
- Locate in bright, indirect sun with some morning sun if possible.
- Fertilize sparingly during periods of growth.
- Prune only damaged leaves and always with clean tools.
- Check regularly for pests and remove dead plant material quickly.
Frequently Asked Questions (FAQs)
Q: Why is my aloe vera squishy or mushy?
A: Mushy leaves and roots are clear indicators of overwatering and root rot. Remove the plant from the wet soil, prune away mushy parts, let the base callus, and repot in dry, well-draining media.
Q: My aloe is turning brown at the tips. What should I do?
A: Brown tips may result from too much direct sun, underwatering, or salt buildup in the soil. Move to indirect light, adjust your watering schedule, and flush the soil with clean water if needed.
Q: How soon will my aloe show improvement after repotting?
A: Visible recovery varies. New roots may take a few weeks to appear; fresh leaf growth signals true revival. During recovery, avoid overwatering and provide stable conditions.
Q: Is there any chance of saving an aloe with no roots?
A: If the central stem and some leaves are healthy, even a rootless aloe can sprout new roots in well-draining soil with patience and correct care. Allow the base to callus before planting and avoid watering until roots begin to form.
Q: Can I propagate a healthy leaf if my main plant has died?
A: Leaf cuttings rarely root successfully in aloe vera. It’s best to propagate by division or pups (offshoots) when possible.
Recap: The Essentials of Aloe Vera Revival
- Remove from wet soil and prune away all rot.
- Allow the plant to callus if roots are cut away.
- Replant in dry, porous media and wait before watering.
- Resume cautious watering, ensuring soil dries out between each application.
- Provide plenty of indirect light and a stable environment.
- Monitor for new growth — the surest sign of recovery.
With attentive care and patience, even the most battered aloe vera can recover and ultimately thrive, rewarding your efforts with years of lush, resilient growth.
References
- https://www.epicgardening.com/revive-dying-aloe/
- https://www.gardeningknowhow.com/houseplants/aloe-vera/aloe-plant-dying.htm
- https://www.epicgardening.com/aloe-vera-plant-care/
- https://garden.org/thread/view/101105/Save-this-dying-aloe-vera-plant/
- https://www.tiktok.com/@epicgardening/video/6797458983738264837
Read full bio of Sneha Tete

