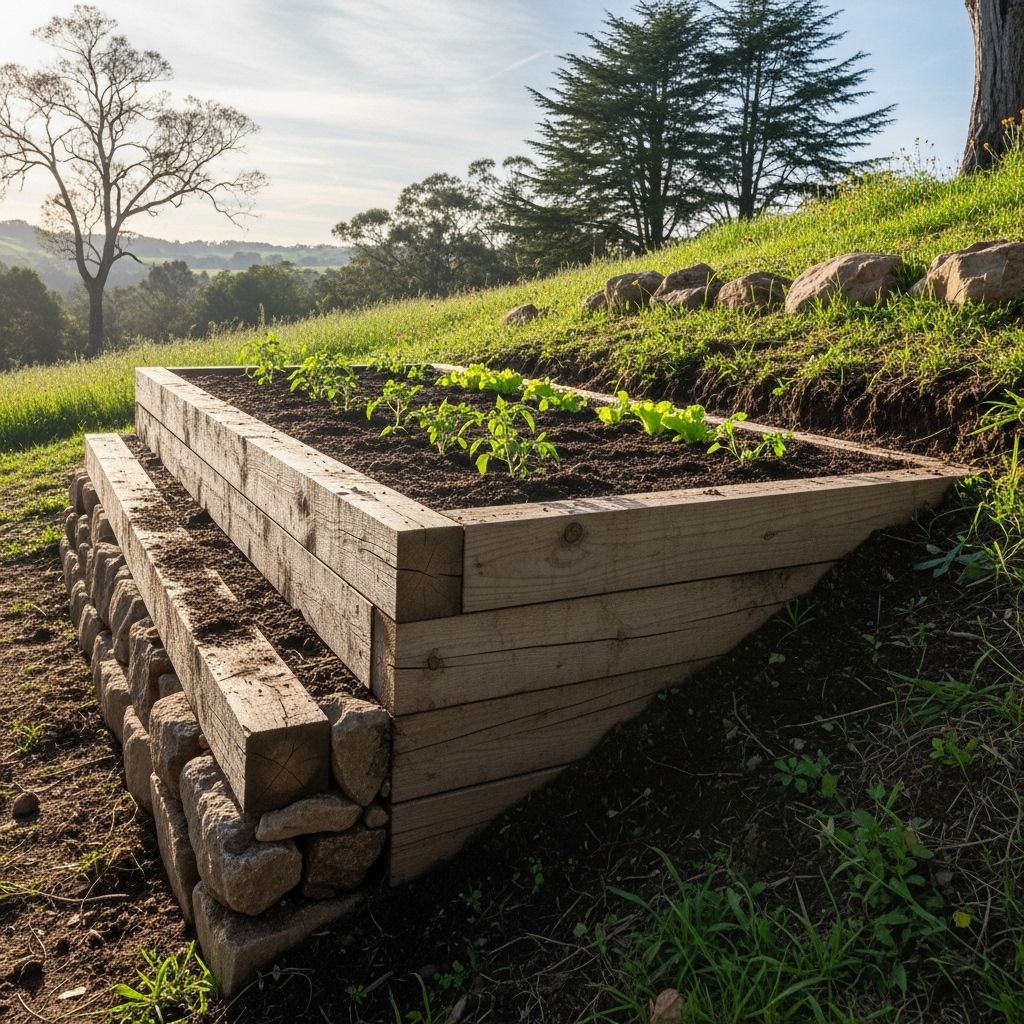
Building a Raised Bed on a Slope: Expert Methods for Success
Turn uneven terrain into level plots that fight erosion and flourish year after year.

Image: HearthJunction Design Team
Building a Raised Bed on a Slope: How to Do It Right
Gardening on a slope presents unique challenges—from water runoff and soil erosion to the complexities of stabilizing your garden structures. However, with the right approach, you can turn a sloped yard into a beautifully productive gardening space by installing raised beds that are secure, level, and built to last. This guide covers expert methods, materials, and troubleshooting tips for building raised beds on slopes, ensuring long-term success for your hillside garden.
Why Build Raised Beds on a Slope?
Sloped gardens can be difficult to manage, but raised beds help:
- Prevent soil erosion by keeping planting medium contained.
- Improve drainage and reduce waterlogging.
- Allow for efficient use of space on otherwise challenging ground.
- Make gardening easier by raising plants to a comfortable working height.
Planning Your Raised Beds on a Slope
Proper planning is essential before construction. Consider:
- Slope Degree: Gentle slopes may need minor leveling, while steeper hills might require terracing.
- Bed Orientation: Orient beds with the slope for effective drainage, unless using terraces which require cross-slope alignment for stability.
- Accessibility: Ensure safe, convenient access for planting and maintenance.
- Water Flow: Plan beds so rainwater runs off into pathways or designated drainage areas, reducing soil erosion.
Site Preparation: Leveling and Compacting the Ground
To ensure the longevity and stability of your raised bed:
- Clear all debris, rocks, and vegetation from the selected site.
- Create a flat, level surface where the raised bed will sit. Use a shovel and a level to achieve this.
- Tamp the soil to compact the surface, providing a stable base for your bed.
- For steeper slopes, dig into the hill to make a level platform, or consider building retaining walls for extra support.
Choosing the Right Raised Bed Materials
The choice of materials affects both the durability and ease of installation, especially on slopes.
Steel Raised Beds
Galvanized steel garden beds are robust, quick to assemble, and ideal for sloped settings. They resist weathering, are lightweight compared to timber, and fit seamlessly into most landscape designs. Steps include:
- Assemble the steel bed using provided hardware.
- Place the frame so the bottom is flush with the ground and the top remains level.
- Backfill or remove soil as necessary to fit the bed snugly into the slope.
- Lay hardware cloth underneath to protect against burrowing pests if needed.
- Secure the bed with long stakes (rebar or metal preferred) driven inside the bed along the downhill side to prevent sliding.
Timber Raised Beds
Wooden raised beds are a popular DIY choice. Use rot-resistant lumber such as cedar or treated pine. Key steps:
- Cut boards to fit your desired bed size.
- Construct the bed frame and position it on the leveled ground.
- Use stakes or bury part of the frame for additional stability.
- Ensure the uphill side is slightly buried or reinforced to resist pressure from the inset soil.
Other Materials
- Stone, bricks, or concrete blocks—durable and visually appealing, perfect for terracing.
- Composite boards—weather-resistant and lightweight, suitable for DIY assembly on slopes.
Step-by-Step: Installing a Raised Bed on a Slope
- Outline the Bed Area: Mark out the dimensions and location of your raised bed using string, stakes, or spray paint.
- Level and Prepare the Ground: Dig into the hillside to form a level base, using a spirit level to double-check accuracy.
- Address the Slope:
- On gentle slopes: Level the ground under the bed frame.
- On steeper slopes: Bury the high-slope end deeper or shore up the lower side with timber, pavers, or bricks.
- Install the Frame: Assemble your chosen bed material on the prepared site. For steel or wood beds, ensure the structure is square and level.
- Stake for Stability: Secure the bed in place with long stakes—drive them into the ground from the inside of the bed along the downhill edge.
- Pest Protection (Optional): Lay hardware cloth or mesh at the bottom to deter moles and gophers.
- Backfill and Fill: Add soil to the inside of the bed, compacting gently as you go to minimize settling. For terraced beds, use retained soil to fill the new level area.
Terracing for Steep Slopes
If the slope is particularly steep, consider terracing to create a series of flat planting areas:
- Build retaining walls using logs, rocks, blocks, or landscape timbers.
- Backfill behind each wall to form a level surface before installing the raised bed.
- Terraced beds allow water to soak in rather than run off, reducing erosion and increasing planting options.
Managing Water and Erosion
Water control is crucial on a slope:
- Orient beds with the slope to direct water down pathways, preventing soil loss from within the beds.
- Install drainage solutions such as gravel trenches or French drains if water pooling occurs.
- Mulch heavily inside and around the bed to reduce erosion and retain moisture.
Pro Tips for Success
- Use landscape fabric or cardboard under the bed for weed suppression.
- For modular beds (like steel kits), get creative with extensions to fit irregularly shaped slopes.
- Regularly check for shifting soil and re-support beds as needed after heavy rains.
- Plant deep-rooted crops on the uphill side to anchor soil.
Common Problems & Solutions
| Problem | Solution |
|---|---|
| Bed sliding downhill | Install sturdy rebar or metal stakes on the downhill side; use retaining walls if needed. |
| Soil eroding from edges | Install edging or barriers; mulch generously. |
| Pest intrusion | Use hardware cloth or mesh liners at the base. |
| Bed settling unevenly | Re-level the site; add or remove soil under the bed as needed. |
Maintenance and Long-Term Care
- Check bed stability annually, especially after winter and heavy rains.
- Top up soil as needed to compensate for compaction or erosion.
- Inspect for rot or corrosion (if using timber or metal) and repair as required.
- Maintain drainage channels and mulching around the beds each season.
Frequently Asked Questions (FAQs)
Q: Can I use pre-made raised bed kits on a slope?
A: Yes, galvanized steel and modular wooden kits work well on slopes. Level the site carefully and secure the beds with stakes for extra stability. For uneven slopes, you may need to dig in one side, shore up the other, or use extensions to customize the fit.
Q: How do I keep my raised bed from sliding down the hill?
A: Use strong stakes (preferably metal) driven deep into the ground on the downhill side of the bed. On steeper slopes, install a low retaining wall or terrace to provide additional support.
Q: What soil mix should I use in a sloped raised bed?
A: Use a high-quality potting mix blended with compost for fertility. If your bed is deep, consider layering with coarse organic material at the bottom to improve drainage.
Q: Should I orient my raised beds up-and-down the slope or across?
A: For mild slopes, orienting beds up-and-down the slope allows water to run off the beds and into pathways, which minimizes erosion inside the bed. Across the slope is possible with terraces or retaining walls but requires more substantial engineering.
Q: Is terracing always required?
A: Terracing is only necessary on steep slopes. Gentle slopes can be managed by leveling the bed site and stabilizing the downhill side.
Conclusion: Transform Your Slope into a Productive Garden
With careful planning, the right materials, and sound construction techniques, you can build strong, beautiful raised beds on any slope. Address the challenges of water, soil movement, and stability from the start, and your hillside garden will reward you with bountiful harvests season after season.
References
- https://www.epicgardening.com/raised-bed-on-a-slope/
- https://shop.epicgardening.com/products/3-minute-raised-bed
- https://www.epicgardening.com/gardening-on-slope/
- https://epicgardening.gorgias.help/en-US/how-do-i-install-birdies-beds-on-sloped-ground-250446
- https://www.youtube.com/watch?v=x7b94PAWJtU
Read full bio of Srija Burman


