Propagate Polka Dot Plants In 5 Simple Steps For Lush Growth
Your colorful houseplants will multiply effortlessly with these easy rooting methods.
How to Propagate Polka Dot Plants in 5 Simple Steps
Polka dot plants (Hypoestes phyllostachya) are celebrated for their vibrant, speckled foliage and their adaptability as decorative houseplants. Propagating these showy plants is remarkably straightforward, making them an excellent choice for gardeners of all skill levels. Whether you want to create fuller indoor arrangements or share cuttings with friends, this comprehensive guide covers every aspect of polka dot plant propagation—from timing and materials to step-by-step instructions and ongoing care.
Why Propagate Polka Dot Plants?
There are several advantages to propagating polka dot plants:
- Increase your plant collection affordably by creating new plants from an existing specimen.
- Refresh leggy or overgrown plants by starting with vigorous new cuttings.
- Share colorful houseplants easily with friends, family, or fellow gardeners.
- Experiment with different cultivars—pink, purple, red, or white-spotted forms.
- Enjoy a hands-on gardening experience and observe key stages of plant development.
Understanding the Polka Dot Plant (Hypoestes phyllostachya)
The polka dot plant is a perennial native to Madagascar, widely grown as a vibrant houseplant. Its leaves feature bold spots or mottling in various colors depending on the cultivar—most commonly pink, white, or red against a green background. Due to their manageable size and striking appearance, these plants are popular choices for terrariums, mixed pots, and indoor gardens.
Best Time to Propagate Polka Dot Plants
Spring and summer are the ideal seasons for propagating polka dot plants, as these are their primary growth periods. Early spring, after indoor temperatures have risen, provides the best conditions for quick root development and healthy establishment. Cuttings propagated during the cooler fall and winter months require greater attention, as slow growth and low humidity could lead to rot or delayed rooting. If propagating in winter, keep cuttings in a warm, bright spot or use a heating mat to speed up root formation.
Tip: Always avoid intense, direct sunlight during rooting, regardless of the season.
Propagation Methods
Polka dot plants can be propagated using two primary methods:
- Stem cuttings (most common)
- Seeds
The following sections detail both approaches, beginning with the quickest and most reliable: stem cuttings.
Propagating Polka Dot Plants from Stem Cuttings
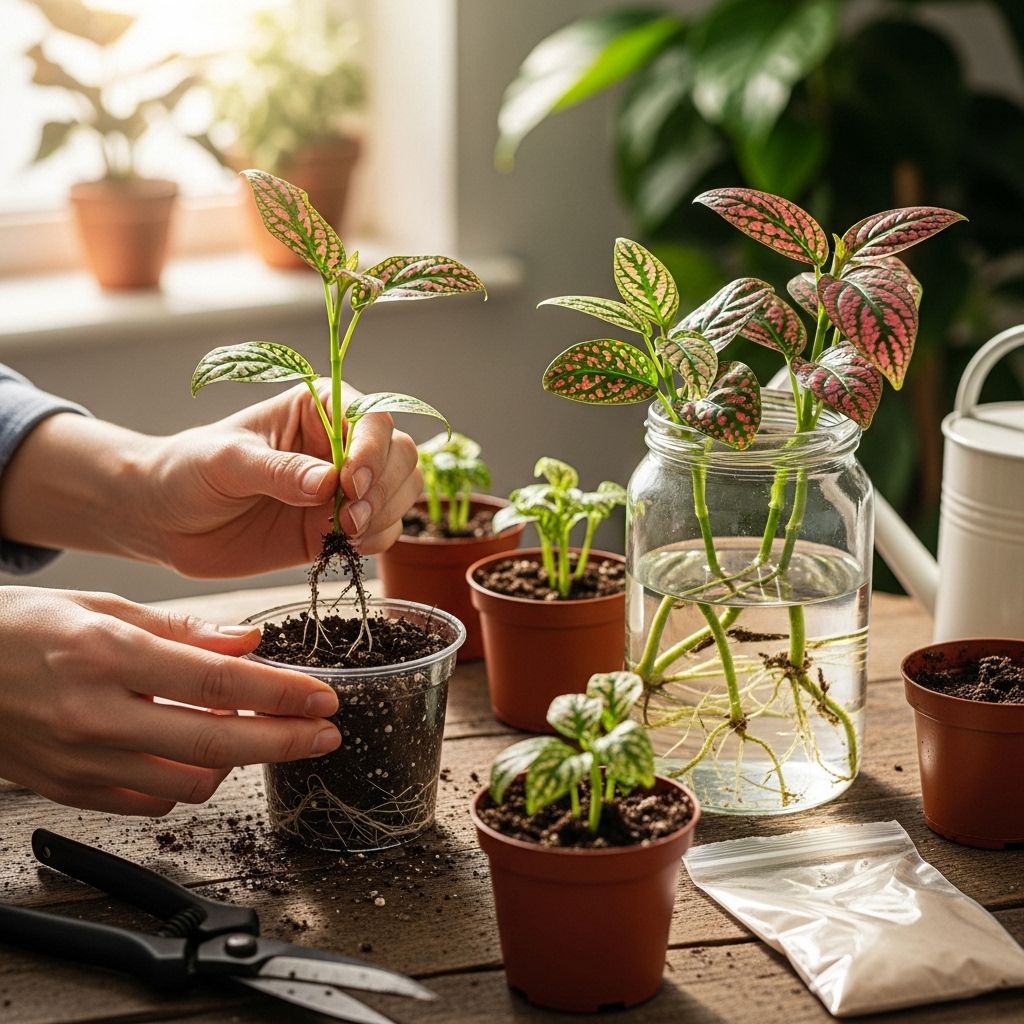
Stem cuttings remain the preferred method due to their speed, reliability, and ability to produce true-to-type plants. You can root cuttings in either water or a soil-based propagation medium.
Materials Needed
- A healthy, mature polka dot plant
- Sharp, sanitized pruning shears or scissors
- Small pots or containers with drainage holes (for soil method)
- Transparent glass or jar (for water method)
- Propagating mix (equal parts coconut coir or peat moss and perlite)
- Plastic wrap and rubber bands (optional, for increased humidity)
- Rooting hormone (optional, but may speed up rooting)
- Labels and pen (to track dates and plant types)
Step-By-Step Instructions for Cuttings
- Take a Healthy Cutting
Choose a non-flowering stem with at least two or three sets of healthy leaves. Using sanitized shears, snip a 4-inch section just below a node (the spot where leaves emerge from the stem), as nodes are key rooting points. Remove lower leaves, leaving only the top two or three.
To further develop your indoor gardening knowledge, check out our Dumb Cane Care Guide. Understanding how to care for different plants like these will enhance your overall success as a plant enthusiast. - Prepare Your Propagation Medium
You can root the cuttings in:
- Water: Place the cutting in a clear jar with enough room-temperature water to submerge the nodes. Change the water twice a week to prevent bacterial buildup.
- Soil: Use a well-draining, sterile mix of coconut coir (or peat moss) and perlite. Moisten the mix and fill a small pot with drainage holes.
If you're interested in other propagation techniques, explore our guide on Propagating Ficus Trees. It shares essential practices that can similarly help enhance your skills and success rate when growing polka dot plants. - (Optional) Dip in Rooting Hormone
For faster rooting and reduced risk of rot, dip the cut end into a rooting hormone powder or gel. While not strictly necessary, it can improve success rates, especially in less than ideal conditions.
- Plant the Cutting
- Soil Method: Insert the lower end of the cutting about an inch deep into the prepared potting mix, ensuring at least one node is below the soil surface. Gently firm the soil around the stem and mist lightly.
- Water Method: Arrange the cutting upright in water so the bare node is submerged. If using several cuttings, avoid crowding to allow for airflow and viewing.
- Maintain Ideal Conditions
- Light: Place the container in bright, indirect sunlight. Avoid direct sun, which may scorch tender cuttings.
- Humidity: Covering the cutting with a plastic bag or dome (not touching the foliage) retains humidity, but ensure some ventilation to prevent mold.
- Temperature: Keep at room temperature, ideally between 68-75°F (20-24°C).
- Monitor and Transplant
- Water Method: Roots typically appear in 1–2 weeks; wait until the roots are at least 2.5 inches (6 cm) long before transplanting to potting soil.
- Soil Method: Resistance to gentle tugging or the appearance of new growth generally indicates successful rooting after 2–4 weeks.
- Transplant rooted cuttings to individual pots with standard potting mix and resume standard care.
Propagating Polka Dot Plants from Seeds
Growing from seed is another option, especially for large batches or experimenting with new color varieties. Keep in mind that plants grown from seed may differ from the parent plant in color or pattern due to genetic variation.
Materials Needed
- High-quality polka dot plant seeds
- Propagation tray or small pots
- Light, well-draining seed starting mix
- Clear plastic dome or bag (to increase humidity)
- Spray bottle for watering
- Labels and pen
Seed Sowing Instructions
- Fill a tray or small pots with moistened seed-starting mix ((e.g., coconut coir and vermiculite)).
- Sow seeds evenly, pressing them gently onto the surface. Light is beneficial for germination, so avoid deep burial—at most, a very fine covering of soil.
- Mist thoroughly and cover with a plastic dome or bag to retain humidity.
- Place in bright, indirect light at a warm temperature (68-75°F/20-24°C); use a heat mat for faster germination in cool rooms.
- Seeds typically sprout within 5–14 days. Once seedlings have two or more true leaves, transplant them to larger pots or their final location.
Best Propagation Media: Water vs Soil vs Alternatives
| Medium | Advantages | Disadvantages |
|---|---|---|
| Water | – Easy to monitor root growth – Simple, clean process | – Transition to soil needed – Higher risk of rot if neglected |
| Soil (Coconut coir/perlite or peat/perlite) | – Roots adapt better to soil life – Lower shock when repotting | – Harder to observe roots – Risk of fungal growth in overly wet mixes |
| Sand/Vermiculite Mix | – Well-draining – Prevents stem rot | – Needs additional nutrients after rooting – Less common in home settings |
Aftercare: Transition and Ongoing Care
After your cuttings have developed an adequate root system, it’s time to move them to their permanent pots or garden beds. This step is crucial for robust, stress-free growth.
- Prepare fresh, well-draining potting soil rich in organic matter. A mix of standard houseplant soil amended with coir or perlite works well.
- Gently transplant rooted cuttings, disturbing roots as little as possible to prevent shock.
- Water in thoroughly, then position your plant in bright, indirect light.
- Increase humidity for the first week if possible by covering the pot (briefly) or misting regularly.
- Avoid fertilizing until new growth emerges robustly, then resume gentle, balanced feeding monthly during the growing season.
Note: Polka dot plants dislike having their roots disturbed, so only repot when necessary and opt for gradual increases in pot size.
Common Problems and Troubleshooting
- Cutting Wilts or Rots: Usually from excess moisture or humidity; ensure excellent drainage and moderate humidity.
- No Roots Forming: May result from either too little warmth/light or using overly mature or weak stems. Try young, healthy growth in spring.
- Leaf Drop: Normal for lower leaves after cutting. New roots and growth should follow.
- Delayed Growth in Winter: Move to a warmer, brighter spot and be patient—growth resumes with longer days.
Frequently Asked Questions (FAQs)
Q: Can I propagate polka dot plants in winter?
A: Yes, but expect slower rooting and increased chances of rot. Use a heating mat and maintain bright, indirect light. Humidity is important, but ensure some ventilation to reduce fungal risk.
Q: Why do my cuttings wilt after transplanting?
A: Most likely, the roots were disturbed or the cuttings are getting too much direct sun or not enough moisture. Keep them evenly moist and shaded until established.
Q: How long does it take for polka dot plant cuttings to root?
A: Typically 1–2 weeks in summer, but up to 4 weeks in cooler weather. Water propagation lets you clearly observe root growth, while soil-rooted cuttings are ready when gentle tugging meets resistance or new leaves appear.
Q: Do I need to use rooting hormone?
A: Rooting hormone is optional but often increases success rate, especially when propagating in soil or during off-peak seasons.
Q: How large will my propagated polka dot plant get?
A: Indoors, polka dot plants generally reach 12–18 inches tall, but can remain smaller in terrariums or with regular pinching to encourage bushier growth.
Q: What are the best conditions for new cuttings?
A: Bright, indirect light, moderate humidity, and warm temperatures (68-75°F/20-24°C) give the best results. Avoid direct sun until well established.
Expert Tips for Successful Propagation
- Always use clean, sanitized tools to prevent transmission of disease.
- Label each batch with the date taken and cultivar/variety, especially when propagating multiple plants.
- Pinch off flower buds on cuttings so the plant channels energy into root formation.
- Check water-propagated cuttings regularly for signs of rot (slimy, discolored stems); trim back as needed or restart with a new cutting.
- Once established, pinching new growth encourages bushier, fuller plants with more colorful foliage.
Conclusion
Polka dot plants reward propagators with rapid growth, vivid coloration, and ongoing opportunities to expand their indoor garden. By following the simple steps detailed above—whether rooting in water, soil, or starting from seed—you can create a thriving collection to enjoy or share. Remember that patience, attention to temperature and humidity, and gentle handling are the keys to success at every stage.
References
Read full bio of Srija Burman


