Pressed Seaweed Prints: A DIY Guide to Ocean-Inspired Art
Turn beach finds into delicate framed displays that showcase nature’s intricate textures.
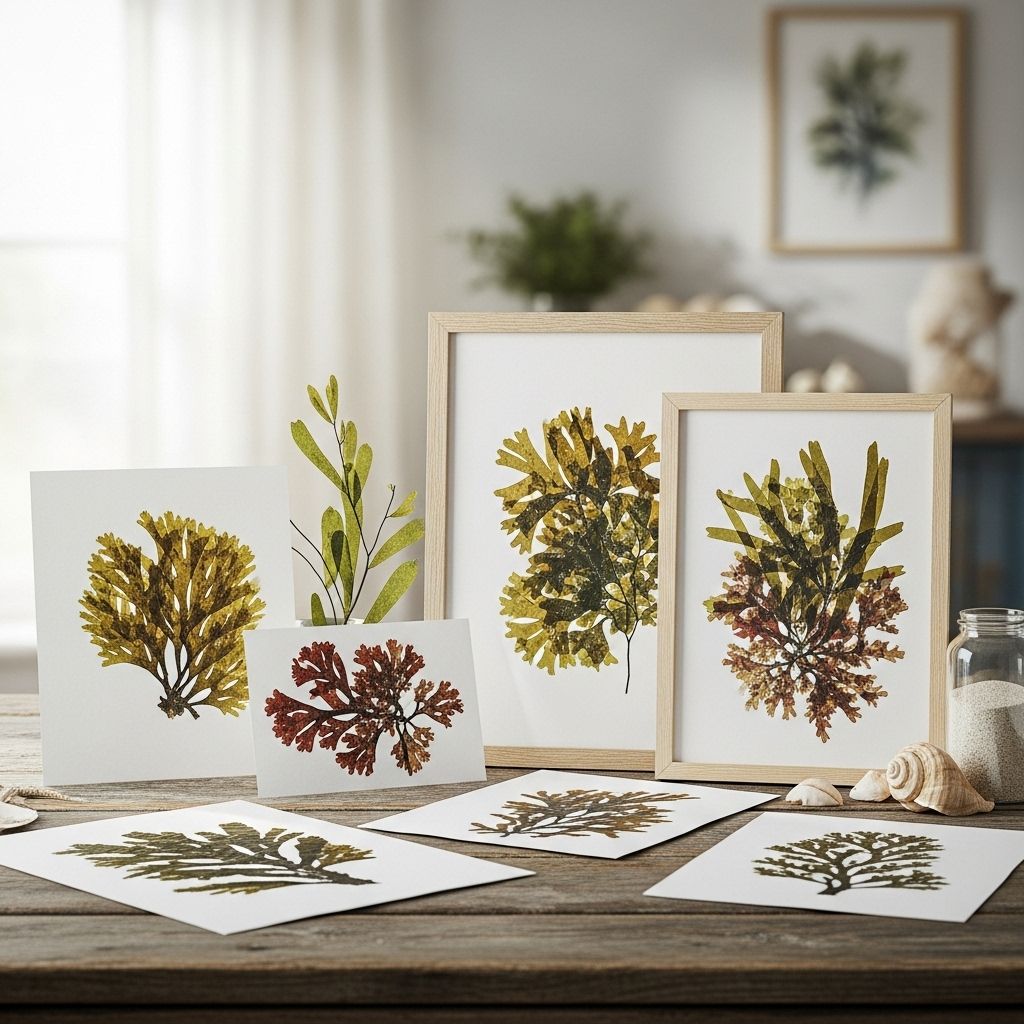
Foraging along windswept beaches and gathering treasures from the tide line is a timeless summer ritual. Among shells, stones, and driftwood, seaweed stands out as a material of both scientific intrigue and aesthetic potential. Pressed seaweed prints blend the beauty of marine life with the elegance of botanical illustration, offering anyone a chance to create lasting artwork that recalls tranquil days by the ocean.
Table of Contents
- Introduction: Nature Meets Art
- Essential Materials
- Collecting and Choosing Seaweed
- Preparation Steps
- Arranging the Seaweed Prints
- Techniques for Pressing Seaweed
- Finishing, Framing, and Display
- Tips for Success and Troubleshooting
- Inspiration: Variations and Artistic Ideas
- Frequently Asked Questions
Introduction: Nature Meets Art
Seaweed is a marvel of the shoreline: uniquely shaped, richly textured, and available in a stunning variety of hues. It has long been a muse for artists and naturalists. By pressing seaweed, we preserve its delicate form and translucent beauty, transforming it into an art piece reminiscent of antique botanical prints or contemporary nature decor. This simple DIY project is accessible to beginners and rewarding for seasoned crafters alike, offering a creative way to commemorate seaside adventures and to celebrate the wonders of marine ecosystems.
Designer Karen Robertson popularized this method, merging her appreciation for the ocean with artistic flair, and showed us how easy it is to bring a touch of the sea into our homes.
Essential Materials
- Seaweed (freshly foraged, ideally a mix of delicate and sculptural types)
- 140-lb Watercolor Paper (thick, absorbent, suitable for botanical presses)
- Bucket of Seawater (for transport and rinsing)
- Rectangular Bucket with Several Inches of Cool, Clean Water
- Cardboard (corrugated, for absorbing moisture and supporting the press)
- Weedblock Fabric or Mesh Cloth (such as weed screen or mesh gardening cloth)
- Artist’s Paintbrush (medium-size, for gentle positioning)
- Toothpicks or Tweezers (for fine adjustments)
- Two Pieces of Wood (to make the outer layers of the press)
- Heavy Weights (books, bricks, or a plant press)
- Paper Towels (for blotting excess moisture)
Most of these items can be found at craft supply stores, garden centers, or around the house. The only technical requirement is the watercolor paper; its thickness ensures the paper won’t buckle when wet and will hold the seaweed securely as it dries.
Collecting and Choosing Seaweed
Step 1: Beachcombing
The first—and perhaps most fun—step in creating pressed seaweed prints is gathering your specimens. Head to your local beach at low tide, when a diverse range of seaweed is exposed on rocks and sand. Look for undamaged, interesting strands and fronds; avoid decaying, slimy, or overly sandy bits.
- Bring a bucket of clean seawater to keep finds fresh and hydrated.
- If collecting with children, let them make selections—this project is ideal for sparking curiosity and family collaboration.
Types of Seaweed
- Delicate, translucent species (e.g., fern weed, sea lettuce) yield the most visually striking prints.
- Thicker, sculptural seaweeds (e.g., dulse, wrack) bring bold shapes but are harder to press.
- Mix and match for varied compositions.
The uniqueness of every seaweed specimen ensures each print is truly one of a kind.
Preparation Steps
- Sort and Rinse: Rinse seaweed thoroughly in cool, clean water to remove sand, salt, or debris. Delicate handling is essential to avoid tearing.
- Soak Before Use: Keep seaweed hydrated in your bucket to maintain flexibility for arranging and pressing.
- Prepare the Paper: Bring out thick watercolor paper, ideally cut to your desired print size in advance.
Arranging the Seaweed Prints
Step 1: Submerged Arrangement
With your paper submerged in a tray of cool water, gently lay the seaweed on the surface of the paper. Water supports the delicate fronds and allows you to experiment freely without sticking or tearing.
- Use fingers, paintbrush, tweezers, or toothpicks for detailed adjustments.
- Compose carefully: simple, airy designs often yield the most elegant results.
- Remove stray sand or bits for a clean aesthetic.
Step 2: Lifting the Design
Once satisfied, lift the paper out of the water. Angle to drain off excess water, preserving your composition as best as possible.
Techniques for Pressing Seaweed
- Place Arrangements on Cardboard: Positioned, drained paper goes atop a sheet of corrugated cardboard.
- Cover with Mesh Cloth: Add a layer of weedblock fabric or mesh (to absorb moisture and allow air circulation).
- Stack Multiple Prints: If pressing several, alternate layers: cardboard, mesh, seaweed print, repeating as needed.
- Sandwich in Wood Boards: Place stacks between two flat pieces of wood.
- Apply Heavy Weights: Top with books, bricks, or a dedicated plant press to flatten and dry prints evenly.
- Air Circulation: A fan can speed up drying in humid climates.
This drying process can take several days, depending on relative humidity and the thickness of the seaweed. Patience is key for crisp, well-pressed artworks.
Finishing, Framing, and Display
Once fully dried, gently remove weights, boards, and mesh cloth to reveal your pressed seaweed prints. If moisture lingers, reassemble the pressing stack until fully dried.
Finishing Touches:
- Identify your specimens (optional): Use guidebooks or online resources to research and label each seaweed by genus and species in pencil for a scientific flourish.
- Frame your prints: Simple white or driftwood frames enhance the art and allow the seaweed’s colors and forms to shine.
- Mount with acid-free tape or corners on backing boards for preservation.
- Consider grouping multiples for gallery-like wall arrangements, or place a single framed print above a mantel for understated elegance.
Pressed seaweed art fits seamlessly into homes with coastal, botanical, or minimalist aesthetics.
Tips for Success and Troubleshooting
- Choose delicate, translucent seaweeds: These varieties produce the cleanest and least messy prints, with refined lines and subtle coloration.
- Work gently while wet: Most damage happens during transfer from water to paper—slow movements help maintain structure.
- If prints curl or buckle: Ensure weights are evenly distributed and paper remains thick enough for stability.
- Layer prints sparingly: Too many stacked prints can cause uneven drying and risk tearing.
- Label carefully: Research your specimens with scientific precision—botanical Latin names add a decorative and educational element.
Inspiration: Variations and Artistic Ideas
- Experiment with different species for an array of patterns, colors, and textures—contrast bold reds or deep browns with pale greens for an eye-catching display.
- Include other beach finds, such as shells, sea glass, and driftwood, or create multi-media “flotsam & jetsam” wall art.
- Play with arrangement styles: single fronds, layered silhouettes, or dense clusters.
- Use pressed seaweed prints as gifts for nature lovers, or as educational tools in science classrooms.
- Frame in nontraditional formats: shadowboxes for three-dimensional works, long panoramic frames for dramatic effect.
Frequently Asked Questions
Q: What is the best kind of seaweed for pressing?
A: Translucent, delicate species—like fern weed or sea lettuce—give the sharpest and most beautiful results. Heavier varieties can be used but may not lie flat and can be more difficult for beginners.
Q: Can I use regular paper instead of watercolor paper?
A: Watercolor paper is essential because it absorbs moisture evenly and resists tearing during pressing. Regular paper may buckle, warp, or rip when wet; for best results, stick to thick, high-quality watercolor sheets.
Q: How long does it take to dry pressed seaweed prints?
A: Drying can take anywhere from three to seven days, depending on climate, species thickness, and humidity. Use a fan to expedite the process if needed.
Q: Is it possible to color or tint pressed seaweed prints?
A: Yes! Once completely dry, prints can be enhanced with watercolors or colored pencils for artistic effect. Natural colors tend to fade slowly, so adding pigment can create vivid contrasts.
Q: Are pressed seaweed prints long-lasting?
A: With correct drying and framing, prints can last for many years. Display away from direct sunlight to prevent fading, and use acid-free materials to prevent discoloration.
Q: Can I collect seaweed anywhere?
A: Always follow local regulations; in protected areas or marine reserves, foraging may be restricted. Gather responsibly and never take more than you need, leaving enough for coastal ecosystems to thrive.
Preserving Shoreline Beauty: The Final Word
Pressed seaweed prints bridge scientific inquiry and artistic exploration, transforming a stroll on the sand into a hands-on craft project that yields museum-worthy results. With simple materials and thoughtful technique, anyone can create delicate, evocative art to cherish memories of the ocean—or inspire dreams of future beachcombing adventures. Whether you’re seeking a weekend family project, a mindful solo endeavor, or a creative classroom activity, the process of pressing seaweed offers connection to nature and a beautiful end product suitable for personal or decorative use.
For more inspiration, experiment with leaf prints or homemade bayberry candles—use your pressed seaweed as an anchor in a gallery wall of nature-inspired DIY art.
References
- https://www.remodelista.com/posts/pressed-seaweed-prints/
- https://www.gardendesign.com/pictures/how-to-press-and-preserve-seaweed_209/
- https://www.beachhouseart.co.uk/blogs/inspiration/how-to-press-and-preserve-seaweed-for-art
- https://www.gardenista.com/posts/pressed-seaweed-prints/
- https://www.remodelista.com/posts/pressed-seaweed-prints-diy/
- https://www.gardenista.com/posts/sandy-suffield-paper-flower-collages-and-botanical-art-prints/
- https://www.tandfonline.com/doi/full/10.1080/26388081.2024.2407366
- https://seagrant.umaine.edu/2023/04/20/seaweed-inspires-art-qa-with-john-ewen/
Read full bio of medha deb

