How To Prepare Blackberry Bushes For Winter: 8 Essential Steps
Early pruning and mulching ensure a healthier, more bountiful berry patch next season.

How to Prepare Blackberry Bushes for Winter: Essential Steps for Healthy Overwintering
With the arrival of fall and the conclusion of the berry harvest, it’s time to shift focus towards winterizing your blackberry bushes. Whether you’ve just established a new patch or inherited old, wild canes, the right cold-weather preparation ensures your bramble stays productive, tidy, and disease-free for years to come. Proper overwintering not only preserves the health of your plants but also boosts next year’s harvest potential, reduces winter dieback, and guards against pests and rot.
Table of Contents
- Why Overwinter Blackberries?
- Step 1: Assess, Tag, and Select Canes
- Step 2: Remove Dead, Diseased, or Unwanted Wood
- Step 3: Tidy and Train the Remaining Canes
- Step 4: Thin the Patch for Airflow
- Step 5: Tidy the Ground and Remove Fallen Leaves
- Step 6: Apply Mulch
- Step 7: Monitor for Pests and Disease
- Step 8: Protect from Extreme Weather
- Bonus Tips: Overwintering Blackberries in Containers
- Frequently Asked Questions
Why Overwinter Blackberries?
Blackberries are perennial plants that can remain productive for decades—sometimes up to forty years—if treated well before and through winter. Without seasonal maintenance, blackberry canes become tangled, disease-prone, and less fruitful.
- Promotes plant vigor: Pruning and preparing builds stronger new growth in spring.
- Improves harvest: Fewer, well-tended canes produce larger, tastier berries.
- Reduces disease and pests: Clean beds make for healthier, more manageable plants.
- Prevents winter damage: Proper mulching and selection protects roots and crowns from deep frost and desiccating winds.
Step 1: Assess, Tag, and Select Canes
Blackberry bushes produce two key types of canes: primocanes (new growth from this season) and floricanes (one-year-old canes that bore fruit this summer). Understanding this lifecycle is crucial because:
- Primocanes: Will bear next year’s fruit. These need to be identified and saved.
- Floricanes: Have finished producing and will soon die. These should be removed.
Start by tagging or marking this year’s primocanes if you haven’t done so; this helps distinguish which to keep during pruning. Assess for any canes that look weak, broken, or diseased for removal in later steps.
Step 2: Remove Dead, Diseased, or Unwanted Wood
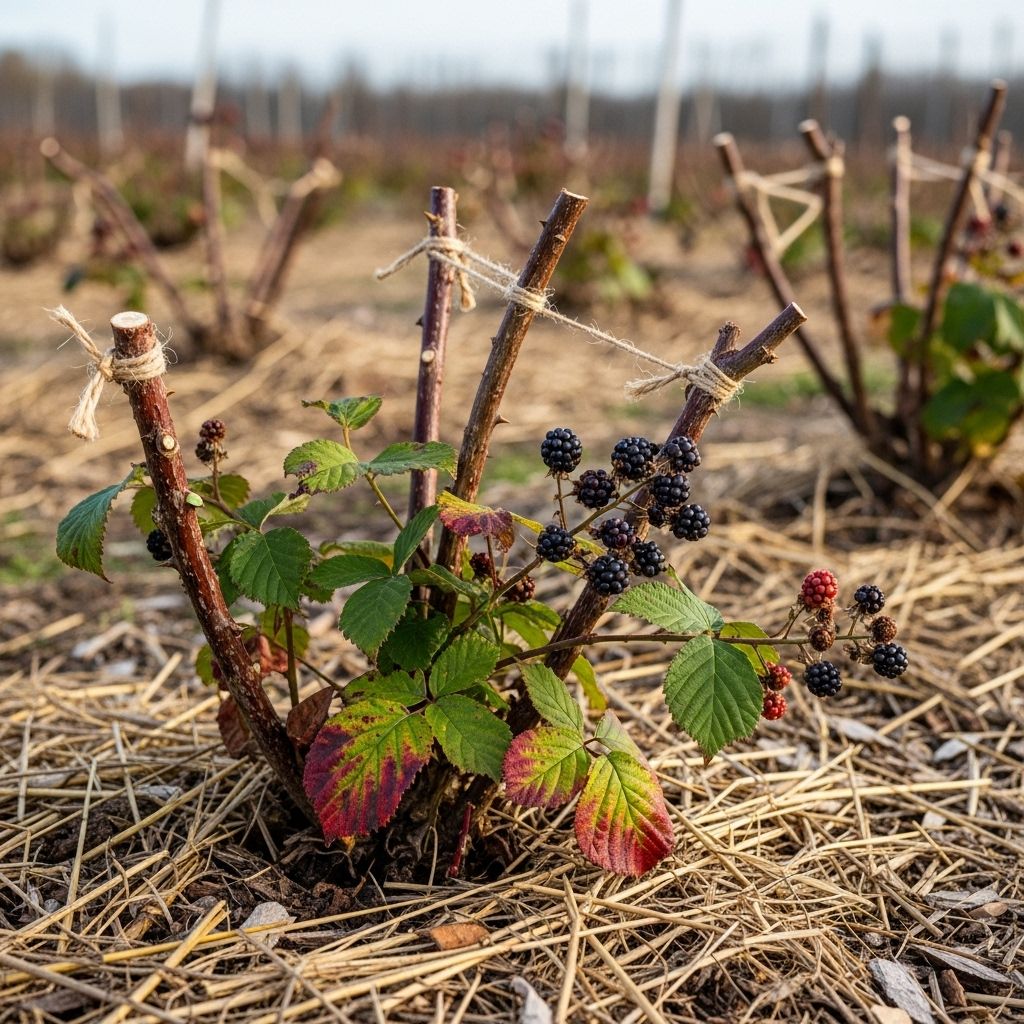
Once you’ve differentiated primocanes from floricanes, prune away all spent floricanes. Cut each one at the base, right at ground level. This step:
- Reduces risk of fungal infection and insect pest overwintering.
- Opens up space for healthy growth in spring.
- Prevents nutrient theft from living canes.
Dispose of pruned material away from your garden. If you notice signs of disease (cankers, blackened spots, unusual lesions), cut several inches below affected tissue and sterilize tools between cuts to avoid spreading pathogens.
Step 3: Tidy and Train the Remaining Canes
Primocanes that remain after pruning need to be managed for optimum health and productivity. Here’s how:
- Tip Primocanes: If canes are very long, tip them back to 4–5 feet. For newer, shorter primocanes, simply trim the last inch from the tip (“tip pruning”) to encourage productive lateral (side) shoots in spring.
- Train to a Support: Trellis or tie the canes to wires or supports about 6–8 inches apart. This keeps them upright, improves air circulation, and reduces breakage in winter storms.
- Limit number per plant: If you find your bush has many more primocanes than usual, thin to the healthiest 4–6 canes per plant. This focuses energy on strong, fruitful canes.
Pro tip: Proper training now makes next year’s pruning and picking much easier and less painful (especially if you grow thorned varieties).
Step 4: Thin the Patch for Airflow
Dense brambles harbor fungal diseases and pests. Space out the canes during training, and thin overcrowded patches as needed until remaining canes are not touching. Improving air circulation:
- Lowers humidity among canes, which deters rot and mildew.
- Makes spring and summer maintenance much easier.
If your blackberry patch has gotten especially congested, plan to spread out new canes and consider relocating some as root cuttings or through natural tip layering (see propagation tips below).
Step 5: Tidy the Ground and Remove Fallen Leaves
A clean garden floor is the first line of defense against overwintering pests and pathogens. Carefully rake away all leaf litter, pruned canes, shrunken berries, and other garden debris. Benefits include:
- Minimizing disease risk, especially from fungi like anthracnose or rust.
- Discouraging insects and rodents from making homes beneath your plants.
- Making it easier to see new growth and keep weeds at bay next spring.
Compost only healthy, disease-free material; dispose of anything suspicious separately.
Step 6: Apply Mulch
Mulching is critical for protecting both the root system and the crown of your blackberry bushes in winter. Here’s how and why:
- Insulates roots: Helps regulate soil temperature, reducing freeze-thaw cycles that can damage roots.
- Suppresses weeds: Prevents spring weed germination and competition for nutrients.
- Improves soil structure: By decomposing, mulch adds organic matter to the soil, which blackberries love (aim for at least 3% organic content).
- Moisture retention: Keeps the soil damp during dry winter winds.
Apply a 2–4 inch layer of aged compost, leaf mold, straw, pine needles, or shredded bark around the base of each plant, taking care not to pile it directly against the canes to avoid crown rot. Mulch should ideally stretch to the full drip line of the plant.
Step 7: Monitor for Pests and Disease
Winter is a crucial time to check for signs of persistent disease or overwintering pests. Steps to take:
- Inspect canes for scale insects, galls, or cankers and remove them immediately.
- Remove any mummified or shriveled berries, as these often host fungal spores or larvae.
- Apply dormant oil sprays if necessary, following organic methods when possible and always checking product labels for safety on brambles.
Continue to monitor through winter thaws, particularly in climates with unpredictable temperature swings.
Step 8: Protect from Extreme Weather
Most established blackberries can handle cold temperatures down to 0–10°F, but young plants or tender varieties may suffer when temperatures plummet further. To protect them:
- For very cold climates: Choose cold-hardy varieties when planting, or heavily insulate vulnerable ones with extra mulch, row cover, or burlap wrap.
- Tie or lay canes down: In the harshest climates, gently bend canes close to the ground, secure them, and mulch over the length to offer maximum protection.
- Water during winter drought: If you’re experiencing a warm, dry winter with little snow, give your plants a good drink on milder days to avoid desiccation.
Bonus Tips: Overwintering Blackberries in Containers
Blackberries grown in pots need extra care since their roots are more exposed to temperature fluctuations:
- Move containers to a sheltered location, such as against a south-facing wall or inside an unheated garage or shed.
- Wrap pots with insulating materials (burlap, bubble wrap, straw bales) to buffer extreme cold.
- Keep soil evenly moist but never waterlogged; periodic checks throughout winter are essential.
- Mulch thickly right up to the stems as added insulation.
Propagation & Bonus Maintenance Tips
- Root Cuttings: Take pencil-thick root sections in late fall, store at 32°F in moist peat, and plant in late winter or early spring for new bushes.
- Tip Layering: Bend a healthy primocane tip to the ground, cover with soil, and allow to root for new plants—often accomplished naturally if not trellised.
- Seasonal Pruning: Complete dormant pruning in late winter, removing any further winter-killed canes.
Table: Winter Preparations for Blackberries
| Task | Benefits | Timing |
|---|---|---|
| Remove floricanes | Reduces disease, encourages new growth | Late summer to early fall |
| Prune/tip primocanes | Focuses energy, increases yield | Fall; Tip again in late winter if needed |
| Apply mulch | Insulation, weed suppression | After first frost, before heavy freeze |
| Remove debris | Prevents pests and disease | Late fall |
| Protect with coverings (if needed) | Protects from severe cold | As temperature drops |
Frequently Asked Questions
Q: Do all blackberry varieties need winter protection?
Most blackberry cultivars tolerate mild winters, but in zones where temperatures dip below 0°F, use extra mulch or grow cold-hardy varieties. Container plants always need protection.
Q: How do I know which canes to prune?
Prune the canes that bore fruit this year (floricanes): they usually look more woody or have remnants of old fruit clusters. Save healthy new primocanes that grew this year for next season’s fruit.
Q: What’s the best mulch for blackberries?
Aged compost, straw, shredded leaf mulch, and pine needles are all excellent choices. They provide both insulation and slow-release nutrients as they break down.
Q: Can I propagate new bushes with pruning leftovers?
Yes! Use healthy root cuttings or tip-layer strong canes in late fall or early spring for new plants, but avoid re-using diseased materials.
Q: Should I fertilize blackberries in the fall?
Instead of chemical fertilizers, use a top dressing of compost or well-rotted manure in fall; this feeds the soil and improves structure over winter without causing soft, freeze-prone growth.
Conclusion
Annual winter preparation is vital to maintaining thriving, productive blackberry bushes. With careful pruning, cleaning, mulching, disease prevention, and the right cold-weather protections, you will set your patch up for years of sweet rewards. Time spent now pays off in easier upkeep and bigger, juicier berries come summer.
References
Read full bio of medha deb


