Potato Growth Stages: From Sprout to Harvest Explained
Use targeted care at each growth phase to produce healthier plants and larger potatoes.

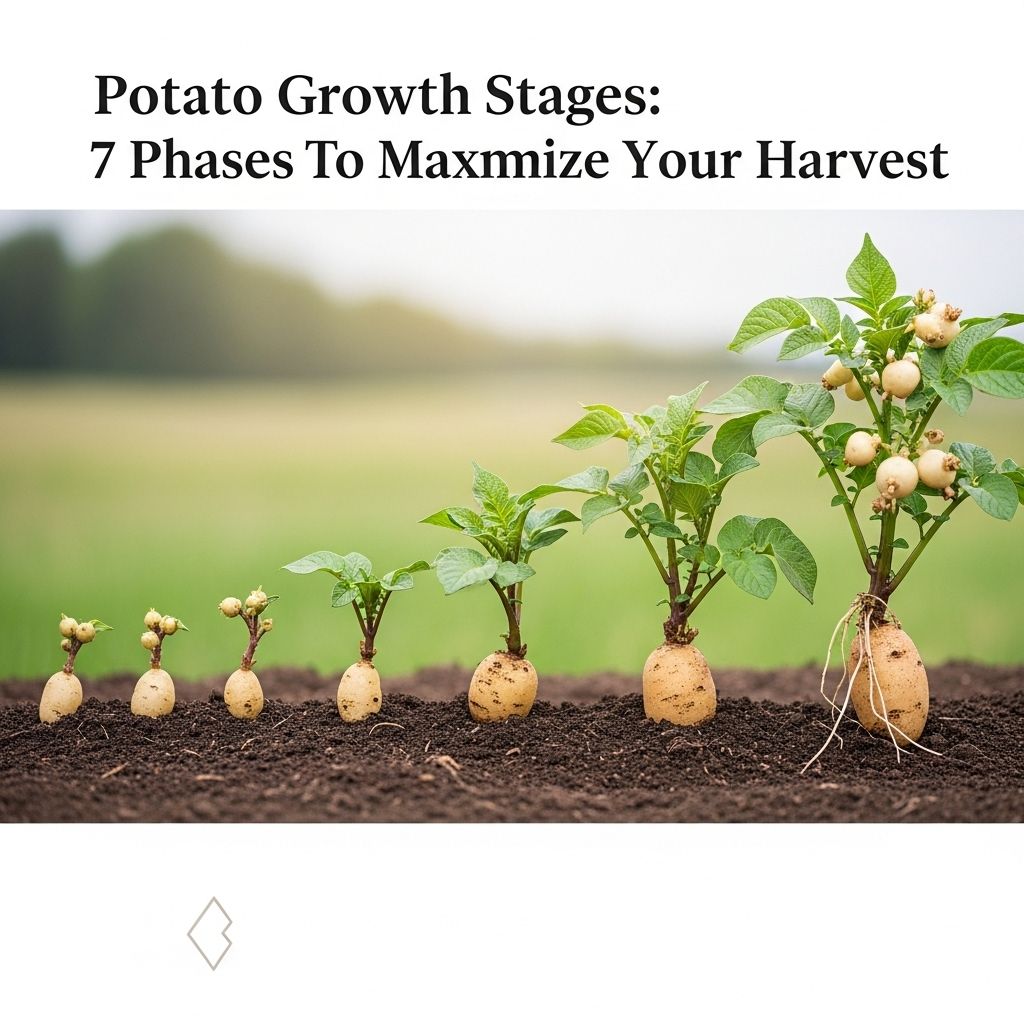
Potatoes are a staple crop for home gardeners and commercial farmers alike, prized for their reliable yields and versatility in the kitchen. Understanding each stage of potato growth is essential for achieving optimal harvests and preventing common problems such as tuber greening or disease. This article provides a detailed, stage-by-stage overview of the potato plant’s life cycle, guiding you through pre-planting, emergence, vegetative growth, tuber formation, bulking, maturation, and harvest. Whether you are new to potato gardening or seeking to fine-tune your skills, this comprehensive guide will help you grow bountiful, healthy potatoes.
Table of Contents
- Understanding Potato Growth
- Pre-Planting: Chitting and Seed Preparation
- Planting Seed Potatoes
- Stage 1: Sprout Emergence
- Stage 2: Vegetative Growth
- Stage 3: Tuber Initiation
- Stage 4: Tuber Bulking
- Maturation and Harvest
- Potato Growth Cycle Timeline
- Frequently Asked Questions
Understanding Potato Growth
Potatoes (Solanum tuberosum) develop underground tubers by progressing through several well-defined stages of growth. Each stage plays a crucial role in tuber size, quality, and overall plant health. Let’s examine these potato growth stages in detail, highlighting what is happening both above and below the soil.
Pre-Planting: Chitting and Seed Preparation
Potato cultivation begins before a single tuber reaches the soil. Careful selection and preparation of seed potatoes can make a substantial difference in yield:
- Selecting Seed Potatoes: Choose disease-free, certified seed potatoes for planting. Seeds can be whole or cut pieces, each with 2–3 eyes for strong sprouting.
- Chitting: Chitting is the process of allowing seed potatoes to sprout before planting. Place tubers in a light, cool area for 3-6 weeks until sturdy shoots appear. This helps accelerate emergence after planting and encourages vigorous growth.
- Cutting Tubers (Optional): Large seed potatoes can be cut into several pieces, each containing at least two eyes. Allow cut pieces to dry for a few days to reduce the risk of rot when planted.
Planting Seed Potatoes
Once chitted, tubers are ready for planting:
- Soil Preparation: Choose a site with loose, well-draining soil and full sun. Amend with organic matter for best results.
- Planting Depth: Set seed potatoes 4–6 inches deep, with eyes facing upward. Space 12–15 inches apart in rows spaced 24–36 inches apart. Shallow planting allows for easier sprouting.
- Temperature: The ideal soil temperature for planting is at least 50°F (10°C). Planting too early in cold, wet soil can cause rot and slow growth.
Stage 1: Sprout Emergence
In the first two to three weeks after planting, potato sprouts begin pushing through the soil surface:
- Timeline: 7–21 days post-planting
- What Happens: Sprouts (called shoots or stems) break through the soil, while roots develop below. Vigorous root growth establishes a strong foundation for the coming stages.
- Above-Ground Signs: Small, leafy shoots emerge, forming the plant canopy. Plants are sensitive to frost at this stage, so cover with row fabric if cold threatens.
- Tip: Keep soil consistently moist but not waterlogged to support healthy root and shoot growth.
Stage 2: Vegetative Growth
Once sprouts have emerged, rapid vegetative growth begins, focusing on foliage and root development:
- Timeline: 2–6 weeks after emergence
- What Happens: The plant produces bushy, dark green leaves and a sturdy stem structure. Underground, roots spread and specialized horizontal stems—stolons—form, which will later develop into tubers.
- Above-Ground Signs: Lush, grass-green growth. Plants typically reach 1–1.5 feet tall. Good leaf and stem health now determines the plant’s ability to produce large tubers later.
- Soil Care: Weed frequently to reduce competition, and continue watering evenly. Mulch can help conserve soil moisture and reduce weeds.
Stage 3: Tuber Initiation (Tuber Formation)
The critical transition from vegetative growth to underground tuber development begins during tuber initiation:
- Timeline: 15–30 days after sprout emergence
- Process: Plant hormones trigger the development of tubers at the tips of stolons beneath the soil. Initially, these tubers are tiny—only the size of peas or marbles.
- Conditions: Cool, moist soils and continued moderate temperatures favor early and abundant tuber formation. High soil temperatures or drought can reduce yields or stall formation.
- Above-Ground Signs: Some varieties begin to show flower buds at the same time tuber formation starts, but not all potatoes flower. The presence or absence of flowers is not a reliable indicator of tuber development.
- Garden Practice: Begin the first round of “hilling” (see below) as soon as plants reach 6–8 inches tall to ensure expanding tubers remain well buried and protected from sunlight.
Stage 4: Tuber Bulking (Tuber Growth)
During the tuber bulking stage, tubers rapidly increase in size as nutrients and carbohydrates are stored within them:
- Timeline: 45–90 days after sprout emergence
- What Happens: No new tubers are created. Existing tubers grow larger, accumulating starch reserves. High-quality sunlight, rich soil, adequate nutrients, and ample space all support maximum tuber expansion.
- Hilling Technique: Mound soil or mulch around the base of plants every few weeks. This prevents tubers from being exposed to light, which causes greening and bitterness, and helps control weeds.
- Signs of Progress: While the above-ground plant may appear to stop growing, the real action is happening underground. Leaves may start yellowing as the plant shifts energy from leaves to tuber growth.
- Critical Watering: Consistent soil moisture is vital. Uneven watering can cause tubers to crack, split, or develop hollow centers. Avoid both drought and waterlogging.
Maturation and Harvest
The potato plant’s lifecycle concludes with tuber maturation, followed by harvest. Timing and technique are key to preserving your potato crop:
- Maturation: Foliage and stems yellow and die back as the plant senesces (ages naturally). At this stage, skin on the tubers thickens and toughens, making them suitable for storage.
- Timeline: Maincrop potatoes mature in 15–20 weeks from planting. Early varieties mature in 10–16 weeks.
- Harvesting New Potatoes: For tender, thin-skinned “new” potatoes, gently harvest tubers when plants still have some green foliage—about 2–3 weeks after flowering begins.
- Harvesting Mature Storage Potatoes: Wait until all foliage has died back. Carefully dig tubers with a fork or spade; avoid spearing potatoes. Allow tubers to air cure with skins intact for optimal storage quality.
- Dormancy: Freshly harvested potatoes enter a period of dormancy and will not sprout until this has naturally ended (4–8 weeks, depending on variety). Store in a dark, cool, well-ventilated place.
Potato Growth Cycle Timeline
| Stage | Timing After Planting | Main Activity |
|---|---|---|
| Pre-Planting | 3-6 weeks before planting | Chitting and preparation of seed potatoes |
| Sprout Emergence | 7–21 days | Shoots appear above ground; roots develop |
| Vegetative Growth | 2–6 weeks | Formation of leaves, stems, and root system |
| Tuber Initiation | 15–30 days after emergence | Underground stolons swell into tiny tubers |
| Tuber Bulking | 45–90 days after emergence | Tubers accumulate starches and grow to full size |
| Maturation | 10–20 weeks total | Plant dies back; tuber skins thicken for harvest |
Why and How to Hill Potatoes
Hilling is the process of mounding soil or mulch around potato plants as they grow. It is a crucial gardening practice during the vegetative and tuber bulking stages:
- Purpose: Protects developing tubers from sunlight (prevents greening), increases potential yield, and helps control weeds.
- How to Hill:
- When plants are 6–8 inches tall, gently mound 3–4 inches of soil or straw around the base of each plant.
- Repeat every 2–3 weeks or whenever new growth emerges, keeping tubers well covered.
- Careful not to bury the stems or leaves excessively; focus on covering the lower stem and root area.
Potato Varieties and Their Growth
Potatoes come in over a hundred varieties, and growth duration can differ based on the variety:
- Early Varieties: Ready to harvest in 10–16 weeks. Small size, thin-skinned, often called “new potatoes.”
- Maincrop Varieties: Require 20 weeks or more. Large size, thick skin, best for storage.
- Different Dormancy Lengths: Some potatoes (e.g., Red Cloud) have long dormancy and are suitable for storing, while others (e.g., Russian Banana Fingerling) sprout more quickly.
Common Potato Growing Problems and Tips
- Uneven Watering: Causes cracked, hollow, or misshapen tubers. Maintain consistent soil moisture, especially during bulking.
- Exposure to Light: Results in green, bitter potatoes. Hill frequently to prevent light exposure.
- Pests and Disease: Monitor for potato beetles, wireworms, and blight. Rotate crops and inspect plants regularly.
- Soil Quality: Rich, well-drained soil with balanced nutrients maximizes yield. Test and amend as necessary.
Frequently Asked Questions
Q: How long does it take potatoes to grow from planting to harvest?
A: Most potatoes take 10–20 weeks from planting to full maturity, depending on variety and growing conditions.
Q: When should I start hilling my potatoes?
A: Begin hilling when plants reach 6–8 inches tall, and repeat every few weeks during active growth.
Q: My potatoes have green patches. Are they safe to eat?
A: No. Green patches indicate solanine, a toxic compound. Cut away green parts or discard potatoes with extensive greening.
Q: Can I harvest some potatoes early?
A: Yes. “New potatoes” can be gently harvested as soon as tubers reach desired size, typically two to three weeks after flowering begins.
Q: What’s the best way to store potatoes after harvest?
A: Cure freshly dug tubers in a dark, well-ventilated space for 1–2 weeks. Store them in a cool (40–50°F), humid, and dark location for maximum shelf life.
Final Tips for Growing Incredible Potatoes
- Choose certified disease-free seed potatoes.
- Chit and prepare seeds ahead of planting.
- Hill plants regularly and provide steady moisture.
- Monitor for pests and yellowing foliage as cues for maturation.
- Harvest carefully, cure, and store properly for a high-quality, long-lasting crop.
References
Read full bio of Shinta


