Ollas: Harnessing Ancient Wisdom for Sustainable Garden Watering
Unglazed clay pots feed plant roots automatically, reducing water waste and garden upkeep.
For generations, gardeners across arid and temperate regions have sought simple, effective ways to nurture their crops while conserving valuable water. Among the most ingenious solutions is the olla—an unglazed clay pot with roots tracing back thousands of years. This ancient, self-regulating irrigation device can transform any garden by fostering healthy plants, reducing waste, and minimizing maintenance. Read on to explore the origins, benefits, installation methods, and practical tips for using ollas to water your garden sustainably.
What Is an Olla?
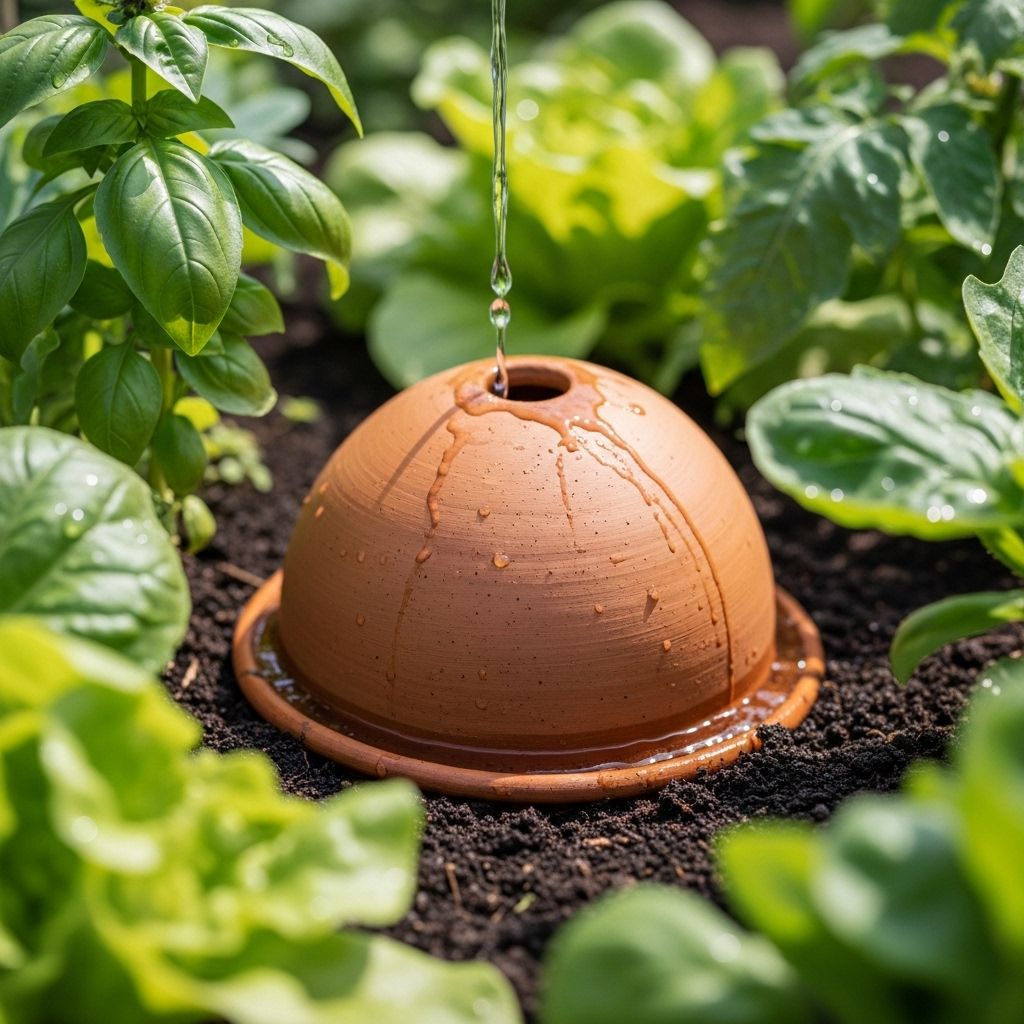
An olla (pronounced OY-yah) is a porous clay vessel, traditionally featuring a bulbous body and a narrow neck. Planted beneath the soil with only its neck exposed, the olla acts as a subterranean water reservoir. Gardeners fill the exposed neck with water, and the vessel gradually releases moisture directly to the surrounding soil via gentle seepage through its porous clay walls.
- Material: Unglazed, natural clay for slow water release
- Shape: Wide body for maximum reservoir capacity, narrow neck for minimal evaporation
- Placement: Buried with the rim just above or level with the soil surface
Unlike typical surface watering, which can evaporate quickly or run off, the olla keeps moisture anchored below ground, delivering water precisely where plant roots need it most.
Historical Origins and Cultural Significance
The term ‘olla’ is Spanish for ‘pot,’ but this efficient irrigation concept spans continents:
- Ancient China and Africa: Early clay pot irrigation was common in semi-arid regions for centuries.
- Ancient Greeks and Romans: Used unglazed pots to store food and water, as well as garden irrigation.
- Indigenous peoples of the Americas: The Native Americans of the southwestern U.S. and Mexico utilized ollas for drought-tolerant crop gardening.
Today, ollas are valued worldwide by both traditional farmers and modern backyard gardeners as an effective, low-tech solution for sustainable watering, especially in water-scarce environments.
How Does an Olla Work?
At the heart of the olla’s effectiveness is soil moisture tension. The mechanism is simple but powerful:
- Fill the olla with water using the exposed neck.
- The surrounding dry soil creates a suction effect, pulling moisture through the clay walls.
- When the adjacent soil is moist, water stays in the pot, minimizing waste and preventing overwatering.
- Plants draw water only as needed, reducing both drought stress and root rot risk.
This autoregulation maintains consistent soil moisture, benefiting plant health and simplifying garden care.
Physical Principles Behind Ollas
- Porosity: The unglazed clay allows water molecules to pass through microscopic pores, but not rapidly enough to flood the soil.
- Capillary Action: Roots grow towards the moisture source, wrapping around or even adhering to the olla surface.
- Evaporation Reduction: Water seeping deep underground is less prone to loss from sun and wind, leading to efficient moisture use.
Benefits of Olla Irrigation
Integrating ollas into your garden unlocks multiple advantages for both plants and gardeners:
- Water Conservation: Save between 50–70% of water compared to surface irrigation, especially in hot and arid climates.
- Consistent Moisture: Roots receive a steady supply, reducing stress from drought or overwatering.
- Less Weeding: Subsurface watering limits surface moisture, meaning fewer weeds germinate in garden beds.
- Reduced Labor: Ollas can go days or even weeks between refills, depending on weather and plant size, lowering the frequency of manual watering.
- Healthier Plants: Autoregulated delivery helps mitigate root diseases associated with waterlogged soils and improves overall plant yield and quality.
- Low-Tech and Eco-Friendly: No electricity, timers, or complex systems—just clay, water, and gravity.
Where and When Should You Use Ollas?
Ollas are best for:
- Vegetable gardens, especially for deep-rooted crops like tomatoes, peppers, squash, and eggplant.
- Perennial beds or edible landscapes with fruiting shrubs or herbs.
- Container gardens—they work inside pots or raised beds too!
Ideal Timing: Install ollas at planting time or before sowing seeds for best root establishment, but they can be added carefully around mature plants as well.
How to Install and Use Ollas
Step-by-step installation:
- Choose an appropriately sized olla for your planting area (see table below for spacing guidelines).
- Dig a hole wide and deep enough to fit the bulbous body, leaving the neck and opening just above the soil.
- Insert the olla and pack soil firmly around it—ensure stability and good contact between pot wall and soil.
- Fill the olla with water through the exposed neck, then cap the top with a ceramic, terra cotta lid, or stone to minimize evaporation and block debris.
- Plant seeds or seedlings around the olla, within its effective moisture range.
- Monitor water levels as needed and refill when the water is nearly depleted—typically every 3–7 days, depending on weather and soil dryness.
Olla Sizing and Spacing Table
| Olla Size | Water Capacity (Liters) | Effective Watering Radius | Recommended Plants |
|---|---|---|---|
| Small (2–3 L) | 2–3 | Up to 12–16 inches | Herbs, small greens, container plants |
| Medium (5–7 L) | 5–7 | 16–24 inches | Tomatoes, peppers, bush beans, flowers |
| Large (10–12 L+) | 10–12 | 24–36 inches | Pumpkins, melons, large shrubs |
DIY Ollas: How to Make Your Own
Making your own olla is both simple and affordable. Follow these steps:
- Obtain two unglazed terra cotta pots (commonly used for houseplants).
- Seal the drainage hole of one pot using a ceramic plug, cork, or waterproof non-toxic epoxy.
- Apply waterproof, food-safe epoxy around the rim and join the two pots—openings facing each other—to create a sealed sphere with one open neck.
- Let the adhesive cure fully.
- Dig a hole in your garden, insert the olla with the neck exposed, and follow standard filling and planting practices.
Alternatively, a single deep pot with a plugged base works well for small beds or containers. The most important element is the unglazed clay, which must remain porous.
Commercial vs DIY Ollas: Pros and Cons
| Aspect | DIY Olla | Commercial Olla |
|---|---|---|
| Cost | Low to moderate | Moderate to high |
| Material Quality | Varies by pot source | Tested for porosity and food safety |
| Shape & Capacity | Often limited by available pots | Optimized for maximum volume and minimal evaporation |
| Durability | Depends on DIY skills and materials | Engineered for longevity |
| Custom Sizing | Highly customizable | Standardized options |
Best Practices for Using Ollas
To maximize olla efficiency and garden productivity, keep these tips in mind:
- Protect the Opening: Always cap your olla to prevent mosquito breeding, evaporation, and debris accumulation.
- Mulch Generously: Mulching around ollas further reduces evaporation and keeps soil temperatures stable.
- Monitor Plant Needs: Heavy-feeding or fast-growing plants may require closer placement to an olla or more frequent filling.
- Clean Annually: Empty and clean ollas at the end of the season to prevent mineral buildup or bacterial growth on pot walls.
- Winter Care: Remove ollas from the ground in freezing climates to avoid cracking from frozen water expansion, or ensure pots are properly drained.
Common Mistakes and How to Avoid Them
- Placing Too Few Ollas: Underestimating garden water needs can leave plants thirsty beyond an olla’s reach. Use the spacing table above for guidance.
- Neglecting to Cap Ollas: Uncovered necks are susceptible to pests, debris, or excessive evaporation.
- Using Glazed or Painted Pots: Only unglazed, natural terra cotta is suitable—glazed walls block water flow.
- Forgetting to Monitor Water Level: Especially in hot seasons, it’s easy to underestimate plant water consumption.
Integrating Ollas with Other Irrigation Methods
Ollas are compatible with a range of watering systems for versatile gardens:
- Mulched Beds: Combine with organic mulch to further limit evaporation.
- Drip Irrigation: Use drip lines to refill ollas automatically or target plants that are out of an olla’s range.
- Rainwater Harvesting: Funnel rainwater directly into ollas via above-ground collection barrels.
This hybrid approach maximizes water efficiency and convenience for seasonal or diverse plantings.
Ollas for Containers and Raised Beds
The olla method isn’t limited to traditional in-ground plots. It excels in:
- Large patio containers or grow bags—bury a mini or DIY olla centrally.
- Raised beds—space multiple ollas for even moisture throughout the soil volume.
- Small spaces—single-plant ollas can keep thirsty herbs thriving with minimal effort.
Environmental and Economic Impact
Embracing ollas contributes to a more eco-friendly garden in the following ways:
- Significant reduction in water usage, benefiting both the environment and your utility bills.
- Built from natural materials—clay pots are long-lasting and biodegradable.
- Reduction in fertilizer runoff, as water moves directly to roots rather than washing nutrients away via surface flow.
Popular Questions About Ollas
How often do I need to refill an olla?
Depending on climate, soil type, and size, refill intervals typically range from every 3 to 7 days. Hot, dry weather or thirsty crops may require more frequent attention.
Which plants benefit most from olla watering?
Deep-rooted vegetables (tomatoes, squash, eggplant) and perennials. Avoid very shallow-rooted plants that may not benefit from subsurface moisture.
Can I use ollas in clay or sandy soils?
Ollas work well in most soil types, but sandy soils may require closer olla spacing or larger pots, as they lose water more rapidly. In heavy clay, ensure good soil contact for seepage and avoid soil compaction.
Do DIY ollas work as well as commercial ones?
DIY ollas can deliver comparable performance if they are made of unglazed clay and well-sealed. Commercial products may offer optimized designs, tested durability, and convenience.
Is it possible to overwater using ollas?
No. The autoregulation of clay and soil ensures only as much water is released as plants draw out, preventing overwatering. If the soil is already wet from rain, water remains in the olla for later use.
Frequently Asked Questions (FAQs)
Q: Are ollas safe for organic gardening?
A: Yes. Make sure the clay pot is unglazed and not colored with toxic pigments. Many commercial and well-sourced DIY ollas are food-safe and organic-approved.
Q: Should I remove ollas in winter?
A: In regions with freezing winters, remove, empty, and store ollas to prevent cracking. In milder climates, they can remain buried year-round.
Q: How do I clean my ollas?
A: At the end of the season, flush the pot with water and scrub with a brush to remove any mineral or algae deposits. Avoid strong chemicals which may leave residues.
Q: Can I fertilize using ollas?
A: Apply fertilizers to the soil, not inside the olla, as concentrated solutions may clog pores and damage the pot or nearby roots.
Final Thoughts: Reviving Ancient Methods for Modern Gardens
Simple, sustainable, and highly effective, ollas are a testament to the ingenuity of ancient agriculture. By safeguarding water and nurturing roots right where they need it, this revived tradition empowers today’s gardeners to grow lush, resilient gardens while conserving precious resources. Whether you choose to make your own or purchase a set, integrating ollas into your watering routine is a smart step towards healthier plants, lower bills, and a more sustainable world.
References
Read full bio of medha deb

