Ollas: Ancient Clay Pot Irrigation for Modern Gardens
Water is delivered where plants need it, cutting waste and encouraging robust growth.
Modern gardeners are continually searching for ways to use water more efficiently and ensure their plants thrive with minimal effort. Ollas—unglazed clay pots buried in soil and filled with water—offer an ancient yet elegant solution. This guide covers everything you need to know about using ollas, including how they work, their historical significance, key benefits, installation methods, DIY tips, product options, and frequently asked questions.
What Are Ollas?
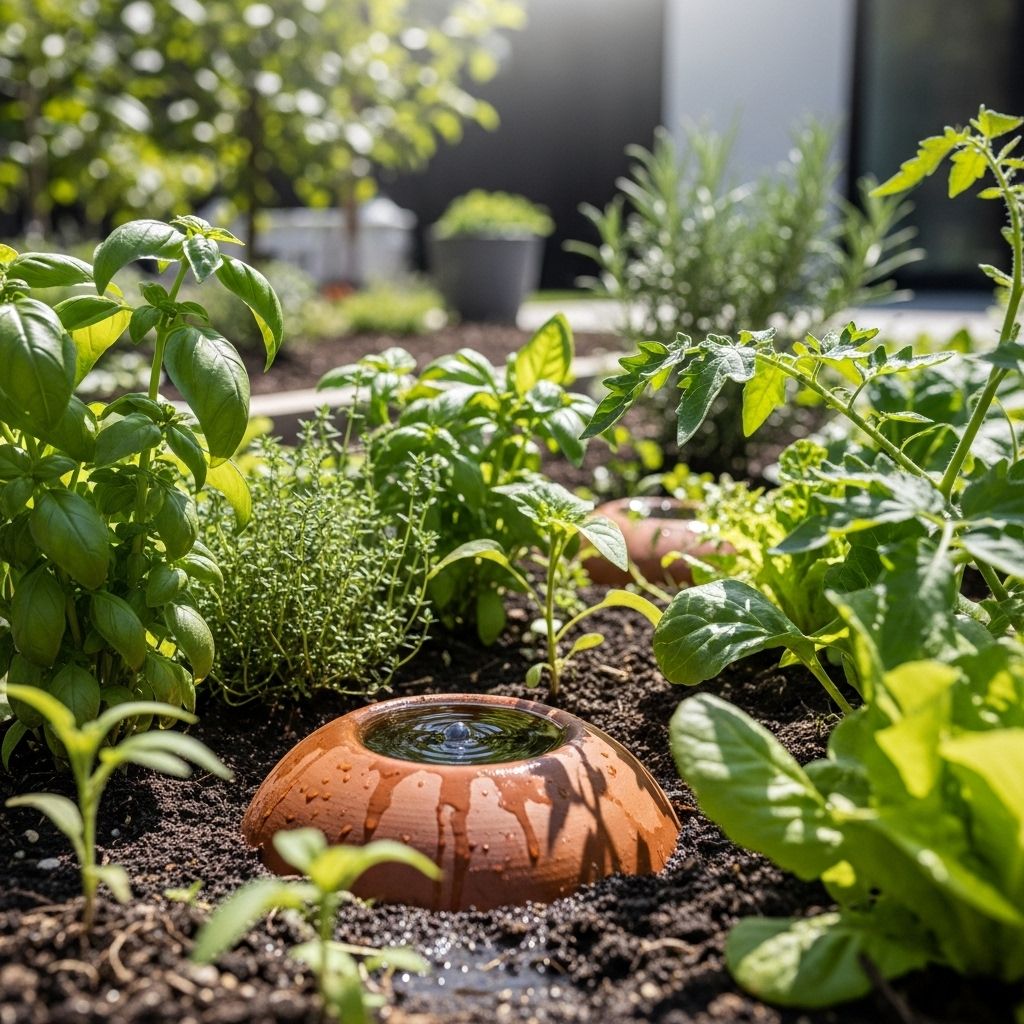
An olla (pronounced “oy-ya”) is a traditional, unglazed, porous clay vessel with a narrow neck and wide base. The pot is installed below the soil surface with only the opening exposed. Water poured into the olla gradually seeps out through microscopic pores in the clay, hydrating the surrounding soil at the root level of nearby plants. Ollas are a passive, soil-moisture-driven irrigation technology that provides a consistent water supply while preventing the common problems of overwatering and underwatering.
Historical Use of Ollas
The word olla means “pot” in Spanish, but these vessels have been used globally for millennia. Ancient agricultural societies—including Native Americans of the Southwest, Mesoamericans, and cultures from China, the Mediterranean, and Africa—employed ollas both for cooking, storing food, and crucially for irrigating crops in hot, arid climates. The low-tech efficiency of olla irrigation remains highly valued by both traditional farmers and 21st-century gardeners.
How Do Ollas Work?
The science behind ollas is deceptively simple:
- Bury the olla: The unglazed clay pot is installed with the majority of its body beneath the soil. The mouth remains above the surface for easy filling.
- Fill with water: Water is poured into the olla until full.
- Slow, steady seepage: Water moves through the tiny pores of the clay, released only when the surrounding soil is drier than the water inside. This process is controlled by soil moisture tension and the principle of “autoregulation”—the plant roots take only what they need.
- Reduced evaporation: The majority of the water is delivered underground, where loss from evaporation is minimal and weeds (which thrive with surface watering) are discouraged.
If rainfall or overhead irrigation makes the surrounding soil saturated, the flow of water out of the olla stops until the soil dries out again.
The Ideal Olla Shape
Traditional ollas have a wide belly (to maximize capacity) and a narrow neck (to reduce evaporation and make filling easy). DIY ollas or commercially made products may vary in shape and size, but the classic form is efficient for water retention and delivery. Modern products, like the Garden Oya Watering Pot, are based closely on this ancient design.
Benefits of Using Ollas for Irrigation
- Water Efficiency: Ollas can reduce water usage by up to 70% compared to surface irrigation, as nearly all water goes directly to plant roots.
- Evens Soil Moisture: By providing a consistent water source, ollas prevent cycles of drought and waterlogging, which improves plant health.
- Reduces Weeding: Water is delivered below the surface, minimizing weed germination, which is stimulated by surface moisture from traditional watering.
- Improves Yield: Plants receive water as needed, at root level, which boosts productivity in vegetables and flowers.
- Slows Disease Spread: Less water splashes leaves and fruit, decreasing conditions for fungal and bacterial diseases to take hold.
- Saves Time: Ollas need filling less frequently than daily watering, especially useful in dry climates or during vacations.
- Promotes Deep Root Growth: Roots grow toward the water source, enhancing drought resistance and plant stability.
- Environmentally Friendly: Made from natural clay, ollas are fully biodegradable and non-toxic.
Where Can You Use Ollas?
Ollas are versatile and can be used successfully in several garden settings:
- In-ground vegetable beds
- Raised beds
- Containers and pots (with mini-ollas)
- Orchard tree plantings (using larger or multiple ollas)
- Herb spirals, flower borders, and edible landscapes
Their main requirement is well-draining soil, as ollas are most effective where water can spread laterally and roots can access the moisture.
How to Install and Use Ollas
- Select your olla: Choose a size appropriate for your planting area. For most veggies or flowers, smaller ollas (1–2 quarts) work well, while larger containers may require pots holding several gallons.
- Dig a hole: Bury the olla so that its neck and fill-hole protrude above the soil line (2–3 inches exposed). Ensure the olla sits level and upright.
- Backfill soil: Firm the soil around the pot, removing air pockets and ensuring good root contact.
- Fill with water: Add clean water to the olla. Place a cover or lid (stone, cap, or ceramic topper) over the opening to prevent debris, evaporation, and mosquito breeding.
- Monitor and refill: Check water levels every few days (daily in very hot conditions). Roots will grow toward the olla and absorb water as needed.
- Mulch for best results: Apply mulch around the olla to further reduce evaporation and keep soil moisture even.
How Many Ollas Does Your Garden Need?
For best results:
- 1 gallon-sized olla waters about a 3-foot diameter area (28 square feet).
- Multiple ollas can be spaced to overlap coverage for larger beds.
- Container or small bed gardeners can use mini ollas (pint-quart size).
Comparing Olla Irrigation to Other Methods
| Method | Water Use Efficiency | Effort | Weed Growth | Disease Risk |
|---|---|---|---|---|
| Olla Irrigation | Very High | Low/Moderate | Low | Low |
| Drip Irrigation | High | Moderate | Low/Moderate | Moderate |
| Soaker Hose | Moderate | Moderate | Moderate | Moderate |
| Overhead Sprinkler | Poor | Low | High | High |
Ollas shine in water-limited environments, enabling up to 70% water savings while minimizing time, labor, and pest problems.
DIY Ollas: Making Your Own Clay Pot Irrigator
If commercial ollas are out of reach, making your own is an accessible and affordable option. The process uses unglazed clay pots (terra cotta) that are widely available at garden centers.
- Find two unglazed terracotta pots of the same size. Pot sizes from 6–12 inches work well for most uses.
- Seal the drainage hole of one pot with waterproof clay, aquarium sealant, or a fitted tile.
- Apply non-toxic waterproof glue to the rim and join the two pots to form a “double-sided” vessel with one open mouth.
- When dry, dig a hole and bury the assembled vessel with the opening above soil level.
- Fill with water and cover as you would with a commercial olla.
Alternatively, single pots with a sealed hole can be used, filled from the top.
- For containers, use mini-ollas made from smaller terracotta pots or bottles.
- Check for water leaks before burying the pot.
- Replace and reseal as needed over years.
Modern Olla Options: Kits & Products
A number of companies now sell olla-based irrigation products for home gardeners. Kits may include multiple ollas, reservoirs, lids, and installation guides for easy use in raised beds, rows, or planters. Products like the Garden Oya™ Watering Pot and Thirsty Earth systems are designed for minimal effort and maximum water savings—sometimes claiming up to 61% less water waste compared to drip lines.
- Choose size based on the area to be irrigated.
- Most olla kits use food-grade terracotta, but some modern designs use food-safe plastic for the reservoir.
- Follow provided installation instructions for optimal coverage.
Tips for Successful Olla Irrigation
- Use clean water to prevent clogging clay pores.
- Cover ollas to keep out debris and mosquitoes.
- Don’t fill ollas with fertilizers, as salts can block the pores; apply nutrients separately.
- Monitor water needs weekly, adjusting fillings during hotter, drier months.
- Use mulch to enhance moisture retention around the olla area.
Frequently Asked Questions (FAQ)
Q: How long does a full olla last before needing refill?
A: Depending on climate, soil, and plant size, a typical one-gallon olla lasts 3–7 days before requiring refill. Hotter weather and larger or fast-growing plants may use water more quickly.
Q: How many ollas do I need for my raised bed?
A: Space ollas 2–3 feet apart, overlapping their coverage. For a 4×8 foot bed, 2–3 gallon ollas spaced evenly should be sufficient.
Q: Can I use ollas with drip irrigation or other watering systems?
A: Yes, ollas can be used in addition to drip systems for extra drought protection, or as the main method in water-limited gardens.
Q: Are ollas good for all plants?
A: Ollas work best for vegetables, herbs, annuals, and perennials with roots within 18–24 inches of the surface. Deep-rooted trees may need larger ollas or supplemental watering.
Q: What kind of soil works best for ollas?
A: Ollas perform best in sandy-loam and loam soils. In heavy clay, water spreads slowly but stays in the root zone longer; in very sandy soil, it can drain too fast and require more frequent refilling.
Q: Will the olla crack or break in winter?
A: Freezing and thawing can damage clay; if you live in a frost-prone area, remove ollas at the end of the growing season or ensure they are completely drained and dry before freezing weather.
Conclusion
Ollas are time-tested, eco-friendly tools that allow modern gardeners to conserve water, minimize weed growth, protect plants from drought, and enjoy healthier harvests. Whether you purchase or build your own, integrating olla irrigation is a straightforward way to make your garden more resilient and sustainable for years to come.
References
Read full bio of medha deb

