Kale Growth Stages: 4 Essential Phases For Bountiful Harvests
Mindful cultivation through every step nurtures nutrient-rich kale with tender leaves.
Kale Growth Stages: From Seed to Harvest Success
Kale (Brassica oleracea Acephala Group) is renowned for its hardiness, nutritional value, and adaptability across a range of climates. Whether you’re a new gardener or a seasoned grower, understanding the key stages in kale’s growth cycle is the foundation for abundant harvests and healthy plants. This comprehensive guide walks you through each stage—from sprouting seeds to harvesting mature leaves—emphasizing essential care practices for every phase.
Understanding the Kale Life Cycle
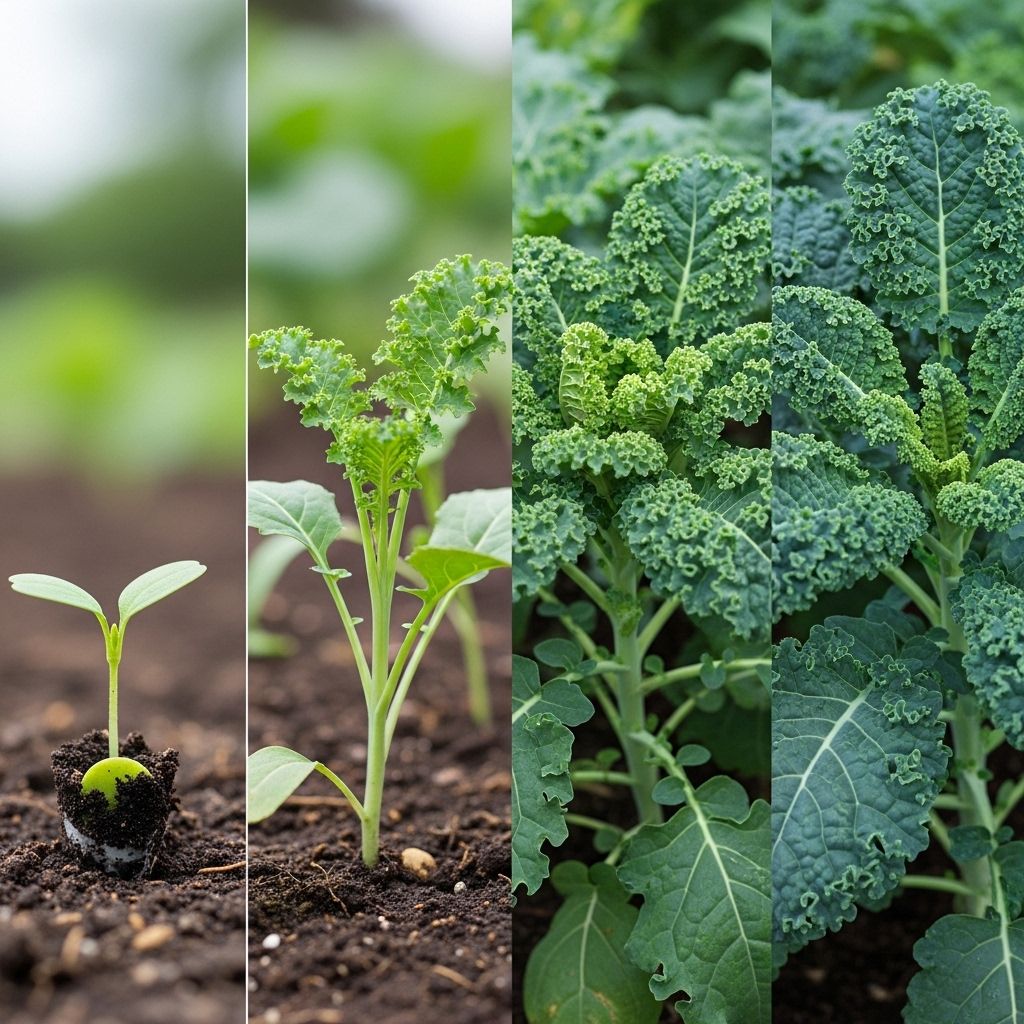
Like all leafy greens, kale develops in distinct stages, each with specialized needs. Recognizing these phases enables gardeners to optimize care, prevent common issues, and strategically plan for successive harvests throughout the season.
- Stage 1: Germination & Seedling
- Stage 2: “Teenager” (Juvenile Growth)
- Stage 3: Mature Plant & Leaf Harvest
- Stage 4: Flowering & Bolting
Stage 1: Germination & Seedling Phase
The journey begins the moment the kale seed is tucked into the soil. Understanding this fragile period is key for strong, resilient plants later on.
Key Features
- Duration: 1-2 weeks after sowing
- Emerging Leaves: The first leaves to appear are the cotyledons (seed leaves). True leaves follow within days.
- Appearance: Seedlings are generally 1-2 inches tall with a pair of rounded cotyledons and the beginnings of serrated true leaves.
Ideal Conditions & Care
- Temperature for Germination: 70-85°F (21-29°C) (optimal for rapid sprouting)
- Soil: Loose, well-drained, and kept consistently moist—avoid waterlogging.
- Light: Place seedlings in an area with direct sun or under grow lights (12-16 hours per day).
- Thinning: Once true leaves appear, thin to the strongest seedlings at 1-2 inches apart to avoid overcrowding.
Problems at This Stage
- Overwatering and soggy soil can cause damping-off (sudden seedling collapse).
- Insufficient light leads to leggy, weak stems.
- Lack of airflow can foster mold and fungus in trays.
Stage 2: “Teenager” Stage (Juvenile Growth)
The so-called teenager phase bridges the gap between delicate seedlings and sturdy, harvestable plants. This is a period of vigorous root and leaf expansion—both above and below ground.
Key Features
- Duration: 2-3 weeks (after seedling stage)
- Height: 4-12 inches tall
- Foliage: Several sets of medium-sized true leaves; leaves reach 3-6 inches long but may not be full-sized yet
- Stem: Central stem is still flexible and can be easily damaged
Ideal Conditions & Care
- Soil Drainage: Crucial for root expansion. Avoid compaction and waterlogged soil.
- Temperature: 55-75°F (13-24°C)
- Harden Off: Gradually acclimate indoor-started seedlings to outdoor conditions by exposing them to incremental sunlight and cooler nights before final transplanting.
- Watering: Less frequent than in germination, but maintain consistent moisture during root establishment.
Transplanting Tips
- Begin hardening off 1-2 weeks before moving outdoors.
- Plant in well-prepared soil, spacing 12-18 inches apart for ample air circulation and reach.
- If purchasing starts from a nursery, they typically arrive in this phase—ensure a gentle transition to the garden.
Stage 3: Maturity & Leaf Harvest
This stage transforms kale into the lush, leafy powerhouse that most gardeners envision. Robust plants offer repeated harvests, delivering abundant greens for culinary use.
Key Features
- Duration: Varies—continuous for weeks or months, depending on climate and care
- Appearance: Tall, branching rosettes with large, mature leaves (often 8-18 inches tall). Central stems thicken and toughen.
- Harvest: Outer leaves reach ideal harvest size (hand to forearm-length, depending on variety); inner leaves continue new growth.
Harvesting Guidance
- Begin harvesting when leaves are large enough (usually 4-8 inches long), and plants are at least 8-10 inches tall.
- Always remove the lowest, oldest leaves first, leaving the central bud and upper foliage to allow for continual new growth.
- Repeated, light harvests generally yield a longer productive lifespan than heavy single harvests.
Ongoing Care During Maturity
- Fertilize: Compost or a balanced organic fertilizer supports continual leaf production.
- Water: Maintain evenly moist soil—avoid letting it dry excessively, which can induce bitterness or slower growth.
- Inspect: Watch for signs of pests (aphids, cabbage worms) and remove yellowing or damaged leaves promptly.
Stage 4: Flowering & Bolting
In favorable conditions, kale can last for months as a productive leafy green. However, as plants sense increasing day length, heat, or stress, they eventually enter the bolting, or flowering, stage.
Key Features
- Trigger: Hot weather, age, or environmental stress
- Appearance: Central stalk rapidly elongates; small, yellow flowers form at the top.
- Leaf Quality: Older leaves may become smaller, tougher, or develop a more bitter taste.
Care & Options at Bolting
- Continue harvesting lower leaves, but note changes in flavor or texture.
- If saving seed, allow flowers to fully mature and dry before collecting pods.
- Remove bolting plants to make space for new seedlings, or let them flower for beneficial insects and pollinators.
Popular Kale Varieties (& Growth Considerations)
| Variety | Color/Leaf Features | Growth Duration | Notes |
|---|---|---|---|
| Siberian Dwarf | Green, ruffled leaves | 50 days | Super hardy, cold resistant |
| Redbor | Magenta to deep purple, frilly | 50 days | Striking color, tasty |
| Scarlet | Green to full purple, frilly | 50 days | Beautiful and high yield |
| Dwarf Blue Curled Scotch | Bluish-green, curly | 55 days | Heirloom, winter harvest |
| Russian Red | Oak-shaped, red tinge | 50 days | Tender and mild |
| Beira (Sea Kale) | Slate green | 80 days | Tall, traditional use in soup |
| Fizz | Golden-green, lobed | 40 days | Quick baby green crop |
Troubleshooting & Essential Kale Growing Tips
- Soil Quality: Loose, rich, and well-drained soil is ideal; mix in organic matter before planting.
- Timing: Sow seeds outdoors 4-6 weeks before last frost for early crops; start indoors for a head start in short seasons.
- Watering: Avoid water on the foliage at night to reduce fungal diseases like downy mildew.
- Mulching: Apply mulch around plants to retain soil moisture, cool roots, and suppress weeds.
- Pest Management: Inspect regularly for pest outbreaks, especially aphids and caterpillars, and use organic methods for control.
Frequently Asked Questions (FAQs)
Q: How long does kale take to grow from seed to harvest?
A: Most kale varieties reach their first harvest in 50-60 days from sowing. Baby greens can often be picked as soon as 25-30 days after sprouting, while full-size leaves are ready in about 2 months.
Q: Can I harvest kale multiple times?
A: Yes, kale is a “cut and come again” crop. As long as you leave the central growing point, new leaves will continually develop for multiple harvests, sometimes throughout several months.
Q: Why is my kale “bolting” or sending up a flower stalk?
A: Bolting usually occurs due to increasing temperatures, long days, or plant age. While leaves are still edible, they may become tougher or more bitter. Harvest regularly and start new plantings for tender greens, especially in hot weather.
Q: How do I prevent pest and disease problems?
A: Inspect leaves regularly for pests like aphids or caterpillars. Remove affected foliage, encourage beneficial insects, and avoid excessive overhead watering to reduce fungal diseases.
Q: Is kale a perennial?
A: While most kale is grown as an annual, in mild climates or with special care, some types (like tree kale) can survive for two or more years, though leaf quality may decline after the first season.
Summary: Mastering Kale for Gardeners
Each phase of kale’s unique lifecycle presents opportunities to tune your growing methods for abundant, flavorful harvests. By recognizing key growth stages—from tender seedlings through to maturity and eventual bolting—you’ll give your kale plants the best chance to thrive. Adapt your care, stay attentive to seasonal shifts, and enjoy the robust health and vibrant taste of homegrown kale all season long!
References
Read full bio of medha deb

