How to Transplant Coneflowers: Expert Guide for Thriving Plants
Learn the best techniques for transplanting coneflowers to ensure healthy growth in your garden

Image: HearthJunction Design Team
Introduction to Transplanting Coneflowers
Coneflowers (Echinacea) are beloved perennials known for their distinctive appearance, drought tolerance, and ability to attract pollinators. These hardy native plants are staples in many gardens, but occasionally they need to be moved to a new location. Whether you’re dividing overcrowded plants, redesigning your garden, or rescuing coneflowers from an unsuitable spot, knowing how to properly transplant them is essential for their continued health and vigor.
Coneflowers are notably resilient plants that can handle the stress of transplanting better than many other perennials. However, following proper techniques will minimize transplant shock and ensure your plants establish quickly in their new location. This comprehensive guide will walk you through everything you need to know about successfully transplanting coneflowers, from timing considerations to aftercare techniques.
Understanding Coneflowers
Before diving into the transplanting process, it helps to understand what makes coneflowers special. Echinacea purpurea and other coneflower species are hardy perennials native to the eastern and central United States. They feature stunning daisy-like flowers with drooping pinkish-purple petals surrounding a distinctive cone-shaped center. Growing 3-4 feet tall, these plants bring color, texture, and wildlife to gardens from mid-summer until frost.
Coneflowers are prized for several notable characteristics:
- Drought resistance once established
- Ability to attract pollinators and birds
- Deer resistance
- Low maintenance requirements
- Long blooming period (often a month or more)
- Excellent cut flowers
These hardy plants are suitable for USDA hardiness zones 3-8, thriving in full sun to part shade conditions. Their adaptability makes them excellent candidates for transplanting, though like all plants, they appreciate careful handling during the process.
When to Transplant Coneflowers
Timing is crucial when transplanting any perennial, including coneflowers. While these plants are resilient, choosing the optimal time for transplanting will significantly increase your success rate and minimize stress on the plants.
Optimal Seasons for Transplanting
The best times to transplant coneflowers are in early spring or early fall. These periods offer moderate temperatures and typically more rainfall, which helps plants establish before extreme weather conditions arrive.
Spring transplanting: Aim to transplant as soon as the soil can be worked and after the danger of hard frost has passed. This gives plants the entire growing season to establish before winter. Spring transplanting is ideal in regions with harsh winters.
Fall transplanting: Early to mid-fall works well in many regions, giving plants time to establish roots before winter dormancy. In warmer climates (zones 7-8), fall transplanting is often preferable as it avoids summer heat stress.
Summer transplanting is possible but not ideal. If you must transplant during summer, choose a cloudy day and be prepared to provide extra care, including shade and consistent moisture, to help the plants cope with the stress.
Signs Your Coneflowers Need Transplanting
Several indicators suggest it might be time to transplant your coneflowers:
- Overcrowding: Plants competing for space, nutrients, and water
- Reduced flowering: Fewer blooms than in previous years
- Center die-out: Older clumps often die out in the middle while continuing to spread outward
- Garden redesign: You’re changing your landscape design
- Improper growing conditions: Current location doesn’t provide adequate sunlight, drainage, or soil quality
Preparing for Transplanting
Proper preparation before digging up your coneflowers will streamline the transplanting process and improve outcomes. Taking time to prepare both the existing plants and their new location will pay dividends in plant health and establishment.
Tools and Materials Needed
Gather these essentials before you begin:
- Garden fork or spade
- Garden pruners
- Watering can or hose
- Compost or organic matter
- Mulch
- Wheelbarrow or tarp (for transporting plants)
- Containers (for temporary holding if needed)
Preparing the New Planting Site
Before digging up your coneflowers, prepare their new home:
Select an appropriate location: Choose a spot that receives full sun to part shade. Coneflowers perform best with at least 6 hours of direct sunlight daily but can tolerate some shade, especially in hotter climates.
Prepare the soil: Dig the new planting area to a depth of 12-18 inches, incorporating 2-3 inches of compost or organic matter. Coneflowers prefer well-draining soil but are adaptable to various soil types, including clay and rocky soils.
Consider spacing: Plan to space plants about 18-24 inches apart to allow for their mature spread. Most coneflower varieties grow about 2 feet in diameter but will spread over time.
The Transplanting Process
With preparation complete, you’re ready to move your coneflowers to their new location. Following these steps will help ensure a successful transplant with minimal stress to the plants.
Digging Up Established Coneflowers
The first step is carefully removing the plants from their current location:
Water thoroughly: A day before transplanting, deeply water your coneflowers. Moist soil is easier to work with, and hydrated plants handle transplant stress better.
Trim back foliage: Cut back the foliage by about one-third to reduce water loss through transpiration. If your plants are in bloom, remove all flower stalks and blooms to redirect energy to root establishment.
Dig widely: Use a garden fork or spade to dig around the plant, starting about 6-8 inches from the base. Coneflowers develop extensive root systems, so dig wide and deep to preserve as many roots as possible.
Lift carefully: Once loosened, gently lift the plant from the ground, supporting the root ball. If you’re dividing the plant, this is the time to do so.
Dividing Coneflowers (If Needed)
Division rejuvenates older plants and creates new ones for other areas of your garden:
When to divide: Divide coneflowers every 3-4 years to maintain vigor. Signs that division is needed include reduced flowering and center die-out.
Division technique: Gently pull or cut apart the root ball into sections, ensuring each division has both roots and several growing points or shoots. A sharp garden knife or spade can help separate tough root masses.
Size considerations: Smaller divisions (3-5 shoots) will establish more quickly but take longer to reach mature size. Larger divisions provide more immediate impact but may experience more transplant stress.
Planting in the New Location
With plants dug and possibly divided, it’s time to install them in their new home:
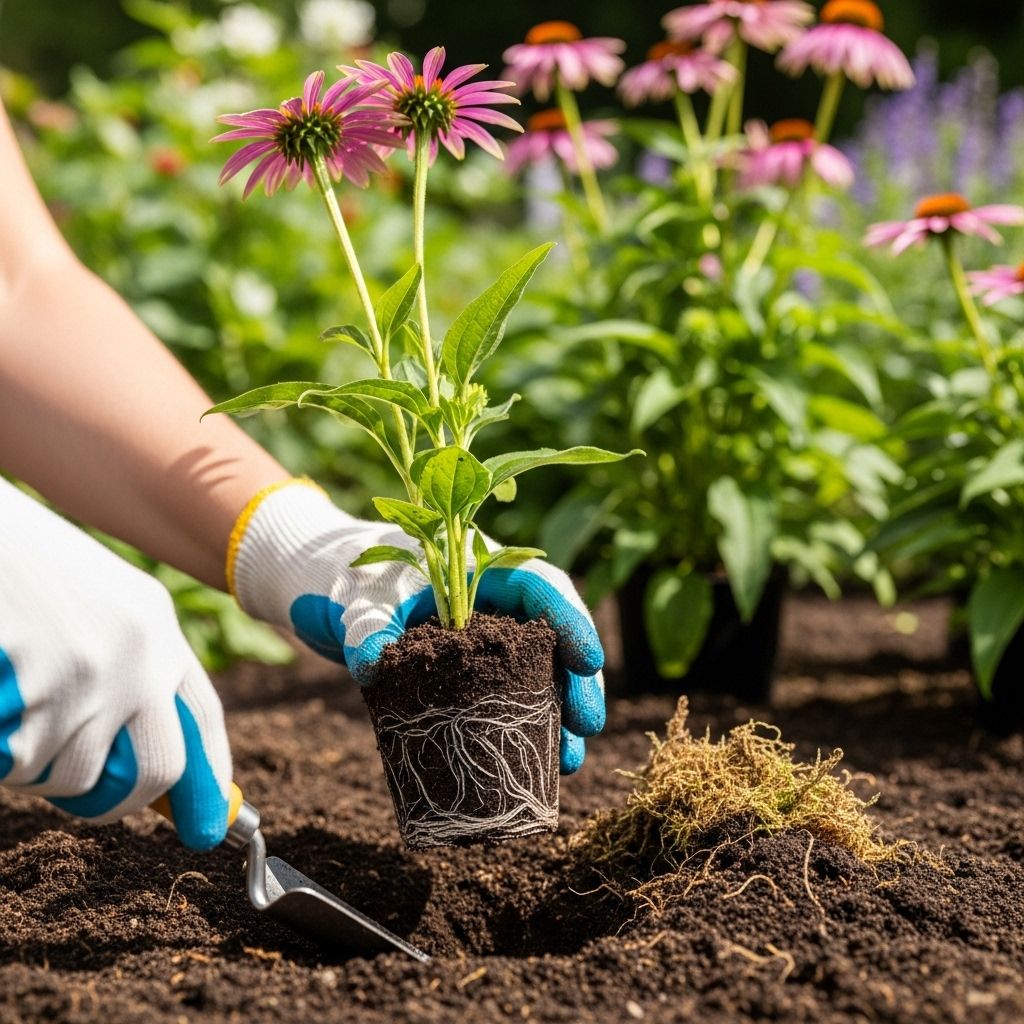
Dig appropriate holes: Create planting holes twice as wide as the root ball and just deep enough that the crown of the plant (where stems meet roots) will be at the same level as it was growing previously.
Amend the soil: Mix compost into the excavated soil to improve fertility and structure. For each hole, add about a cup of compost or well-rotted manure to the backfill.
Position the plant: Place the coneflower in the hole, spreading the roots outward. Ensure the crown is level with the surrounding soilâplanting too deeply can cause rot.
Backfill carefully: Return the amended soil around the roots, firming gently to eliminate air pockets without compacting the soil.
Water thoroughly: Immediately after planting, water deeply to settle the soil around the roots and provide essential moisture.
Post-Transplant Care
The weeks following transplanting are critical for establishment. Proper aftercare will help your coneflowers recover from transplant shock and resume healthy growth.
Immediate Aftercare
Provide shade: Temporarily shade newly transplanted coneflowers from direct sun for a few days to a couple of weeks. This reduces water loss while the plants establish new roots. Use shade cloth, old bed sheets, or even upturned containers for this purpose.
Maintain moisture: Keep the soil consistently moist (but not soggy) for the first 2-3 weeks after transplanting. Water deeply when the top inch of soil begins to dry.
Hold off on fertilizer: Avoid fertilizing immediately after transplanting, as this can stress new roots. Wait at least 2-4 weeks before applying any fertilizer.
Long-term Maintenance
Once established, coneflowers require minimal care:
Watering schedule: After establishment, coneflowers are drought-tolerant but benefit from deep watering during extended dry periods. Allow the soil to almost dry out before soaking thoroughly.
Mulching: Apply 2-3 inches of organic mulch around plants (keeping it away from stems) to conserve moisture, suppress weeds, and moderate soil temperature.
Deadheading: Remove spent flowers to encourage continued blooming. However, consider leaving some seed heads in fall to provide winter interest and food for birds.
Fall care: In late fall, you can cut plants back to a few inches above ground level, or leave the dried stalks for winter interest and wildlife habitat.
Troubleshooting Common Transplant Issues
Even with proper care, transplanted coneflowers might experience some challenges. Here’s how to address common problems:
Transplant Shock
Symptoms of transplant shock include wilting, yellowing leaves, and a generally stressed appearance. This is normal and temporary in most cases. Coneflowers are known to look quite poor after transplantingâsometimes for 2-3 weeksâeven when the transplant is successful.
Solutions:
- Provide consistent moisture without overwatering
- Offer temporary shade
- Be patientâconeflowers are resilient and usually recover
- Avoid fertilizing until the plant shows signs of new growth
Pest and Disease Issues
Transplanted plants may be more susceptible to pests and diseases until they regain full vigor:
Common issues:
- Powdery mildew: Improve air circulation and avoid overhead watering
- Aster yellows: Remove and destroy affected plants
- Japanese beetles: Handpick or use organic controls
Seasonal Considerations
Timing-specific challenges may require special attention:
Spring transplants: Protect from late frosts with row covers if necessary
Fall transplants: Apply a layer of mulch after the ground freezes to prevent heaving during freeze-thaw cycles
Summer transplants: Provide extra shade and water until established
Special Considerations for Container Transplants
Moving coneflowers from containers to the garden requires slightly different techniques:
Container preparation: Water container plants thoroughly before transplanting to ensure the root ball stays intact during removal.
Root inspection: Gently loosen circling roots before planting to encourage outward growth. If roots are severely bound, make several vertical cuts in the root ball.
Planting depth: Ensure the top of the root ball is level with the surrounding soil. Container-grown plants planted too deeply often struggle to establish.
Frequently Asked Questions
Q: When is the best time to transplant coneflowers?
A: The best times are early spring when soil can be worked or early fall when temperatures are moderate. Both seasons provide favorable conditions for root establishment before extreme weather arrives.
Q: My transplanted coneflowers look terrible. Are they dying?
A: Coneflowers often look very poor after transplantingâwilting, drooping, or appearing stressed. This is normal and temporary in most cases. They can look awful for 2-3 weeks before recovering. Keep them consistently moist and provide temporary shade to help them through this period.
Q: Should I cut back coneflowers before transplanting?
A: Yes, cutting back foliage by about one-third and removing all flowers and seed heads helps reduce transplant shock. This allows the plant to focus energy on root establishment rather than supporting extensive top growth.
Q: How far apart should I space transplanted coneflowers?
A: Space coneflowers 18-24 inches apart. They typically grow about 2 feet in diameter but will spread over time. Providing adequate spacing ensures good air circulation and room for mature growth.
Q: Can I transplant coneflowers while they’re blooming?
A: It’s best to avoid transplanting during blooming as the plant is using significant energy for flower production. If you must transplant during bloom time, remove all flowers and buds to redirect energy to root establishment.
Q: How do I know if my coneflowers need dividing?
A: Signs that division is needed include reduced flowering, center die-out (dead area in the middle of the clump), or overcrowding. Typically, coneflowers benefit from division every 3-4 years.
Conclusion
Transplanting coneflowers is a rewarding garden task that allows you to multiply these beautiful native perennials or optimize their growing conditions. While the process may temporarily stress the plants, coneflowers are remarkably resilient and typically bounce back with proper care.
Remember that patience is keyânewly transplanted coneflowers may look sad for a few weeks before showing signs of recovery. By following the guidance in this article, you’ll give your transplanted coneflowers the best possible start in their new location, ensuring years of colorful blooms, pollinator attraction, and garden beauty.
With their drought tolerance, wildlife benefits, and stunning appearance, properly transplanted coneflowers will reward your efforts many times over, becoming reliable, low-maintenance anchors in your perennial garden design.
References
Read full bio of Shinta


