How To Repot Spider Plants: 5-Step Guide For Healthy Growth
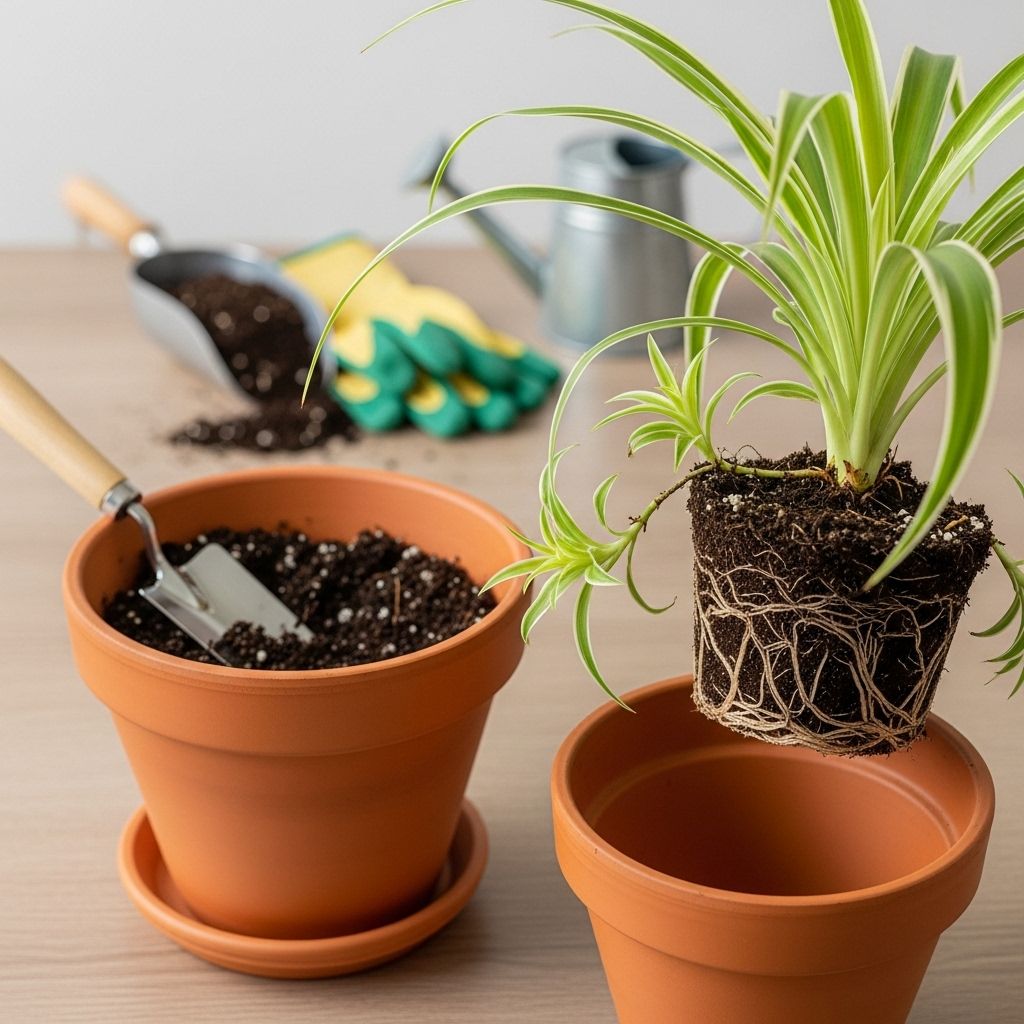
Fresh potting soil and added room promote stronger roots and fuller, vibrant leaves.

How to Repot Spider Plants: A Complete Step-By-Step Guide
Spider plants (Chlorophytum comosum) are celebrated for being easy-care, air-purifying houseplants admired for their vibrant green foliage and cascading pups. Occasional repotting is essential to keep them healthy, encourage robust growth, and prevent them from becoming rootbound. This thoroughly detailed guide explains the entire process of repotting spider plants step-by-step, with special tips, troubleshooting advice, and frequently asked questions to ensure thriving plant health in your home.
Why Repot a Spider Plant?
Spider plants generally thrive in smaller containers and prefer being slightly rootbound, but there comes a point when they require repotting. Understanding these triggers helps prevent stunted growth and encourages your spider plant to produce more attractive pups.
- Rootbound symptoms: Roots emerging from drainage holes or circling inside the pot, hardened soil, or dramatically slowed growth.
- Depleted resources: Over time, soil loses nutrients and becomes compacted, limiting moisture and oxygen supply to the roots.
- Visible overcrowding: Excessive foliage, drooping, or cracked pots indicate your plant needs a roomier environment.
- Water management: Water runs instantly through the pot or the plant dries out much faster than usual, signaling insufficient soil volume.
Typically, repotting is needed every 1 to 2 years for most spider plants and whenever you notice the above warning signs.
When Should You Repot Spider Plants?
Ideally, repot your spider plant in spring to early summer when new growth is strongest. This timing supports rapid root establishment and minimizes transplant shock. However, if the plant is in distress (e.g., root rot, severe rootbound conditions), repotting can be done anytime as an emergency measure.
What You Need Before Repotting
Gather the right equipment before you start. Preparation ensures a quick and clean process, minimizing stress on your plant.
- Fresh potting mix: High-quality, well-draining indoor potting soil. African violet mixes, or blends with peat moss, perlite, and compost work well.
- Appropriate-sized new pot: Choose a pot about 2 inches wider in diameter than the old one. Always opt for a pot with drainage holes.
- Clean, sharp pruning shears or scissors for root and foliage trimming.
- Mesh or coffee filter: To cover drainage holes (optional, prevents soil loss).
- Gloves, trowel, and a tarp or newspaper (for mess prevention and easier cleanup).
How to Repot a Spider Plant: Step-by-Step Instructions
Remove the Plant from Its Current Pot
Start by gently tipping the pot on its side. Carefully grip the base of the plant (never pull from the leaves) and slide it out. If the roots cling to drainage holes or the sides of the pot, gently loosen them with your fingers. For stubborn cases, run a knife around the inside of the pot to detach clinging roots. Squeeze the sides of plastic pots to help release the rootball if necessary.
If you're curious about maintaining the health of your other houseplants, discover our article on 9 signs your Philodendron needs repotting. Being proactive with your plant care can prevent potential issues and promote lush growth.Loosen and Inspect the Roots
After removing the plant, examine the roots. Healthy roots should be cream or white. Untangle any circling or densely wrapped roots using your fingers, shaking off excess old soil to make space for fresher, nutrient-rich mix. If the roots are heavily compacted, gently tease them apart at the base and edges.
Repotting isn't limited to spider plants—knowing how to handle other houseplants is equally important. Check out our essential guide to repotting Christmas cactus to expand your plant care knowledge and ensure your collection remains vibrant.- Trim any excessively long, damaged, or mushy roots with sterilized shears. Remove no more than one-third of the root mass to prevent shock.
- Dispose of any black, mushy, or rotten roots as these indicate rot.
Divide the Plant (Optional)
If your spider plant is very large or you’d like to propagate it, now is the perfect time for division. Identify natural sections with their own clusters of stems and roots. Gently pull these apart with your hands. If necessary, use a disinfected, sharp knife to separate congested areas.
- Each section should have plenty of healthy roots and its own crown of leaves.
- Remove some of the old soil from each section, allowing plenty of room for fresh mix.
Prepare and Fill the New Pot
Place a thin mesh or coffee filter inside the new pot to cover drainage holes (optional, but helpful for keeping soil in place). Add a 1–2 inch layer of fresh, moistened potting mix at the bottom. Center your spider plant or plant sections in the pot so that the crowns sit just above soil level.
- Fill in around the roots with potting mix, gently pressing to remove large air pockets. Avoid compacting the soil too tightly.
- Leave a half-inch to an inch of space below the rim for easy watering.
Water Thoroughly and Settle In
After planting, water thoroughly until water runs from the drainage holes. This helps to settle the soil around the roots and eliminates air pockets. Make sure the pot drains well and never allow the plant to sit in soggy soil.
- Place the newly potted plant in bright, indirect light.
- Avoid fertilizing or moving it into direct sunlight for a couple of weeks to allow for recover and acclimation.
Repotting Tips for Healthier Spider Plants
- Pot size: Spider plants prefer being comfy and rootbound rather than overpotted. Increase pot size by only 2 inches at a time.
- Soil choices: Well-draining mixes with perlite, peat, and compost promote healthy root development.
- Watering: Let the top 1–2 inches of soil dry out before rewatering. Avoid waterlogged conditions.
- Fertilizing: Wait 4–6 weeks after repotting before feeding to minimize burning sensitive new roots.
- Aftercare: Give your plant time—leaves may wilt or droop as it settles, but this usually resolves within a couple of weeks.
How to Propagate Spider Plants During Repotting
Spider plants are easy to multiply using pups or divisions. If your plant produces “babies” or you want to divide a mature specimen, this is the best time to propagate.
Propagating from Pups
- Identify pups at least 1–2 inches tall, ideally with their own small roots.
- Cut the pup off the parent plant using sharp, sterilized shears.
- Plant the pup in a small pot filled with moist potting mix and water well.
- Keep soil consistently moist (not soggy) until established.
- If pups lack roots, set the plantlet in water or moist propagating mix while still attached to the parent stem until roots appear, then sever and pot.
Dividing Mature Spider Plants
- After removing the plant from its pot, gently pull apart clumps with healthy roots and leaves.
- Trim roots only as needed and plant each division in its own pot with fresh soil, watering thoroughly.
Troubleshooting Common Repotting Issues
| Issue | Symptoms | Recommended Action |
|---|---|---|
| Root Rot | Black, mushy roots; foul odor; yellowing or wilting leaves | Trim affected roots, repot in fresh, well-draining soil, reduce watering |
| Pot Shock | Drooping leaves, little new growth | Provide indirect light, maintain stable temperatures, minimize watering, allow 2-3 weeks for recovery |
| Browning Leaf Edges | Brown, crispy tips on leaves | Flush soil with distilled water, avoid excessive fertilizer, use filtered water if possible |
| Stunted Growth | No or slow new leaves, roots fill pot quickly | Repot into a slightly larger pot, ensure rich, loose potting mix |
Frequently Asked Questions (FAQs)
Q: How often should I repot my spider plant?
Spider plants generally need repotting every 1–2 years. Signs include roots circling in the pot, roots emerging from drainage holes, noticeable slow growth, or soil that dries out too fast.
Q: What type of potting soil is best for spider plants?
Use a high-quality indoor potting mix with good drainage. Blends containing peat moss, perlite, and a small amount of compost provide a great balance of moisture retention and airflow.
Q: Can I repot my spider plant if it’s flowering or producing pups?
Yes. Repotting is safe during these times, though performing the task during peak active growth (spring or early summer) offers the best recovery. Remove and pot up any pups during the process if desired.
Q: Should I trim the roots while repotting?
Trim only excessively long, damaged, or rotten roots. Do not remove more than one third of the root system at one time to prevent plant shock.
Q: My newly repotted spider plant looks wilted. What should I do?
Some wilting is normal during adjustment. Keep the plant in a bright, indirect light area, avoid fertilizing, and maintain consistent watering. Plants generally bounce back after a couple of weeks as roots establish.
Aftercare: Helping Your Spider Plant Thrive Post-Repotting
Supporting your spider plant through the acclimation period is essential for successful repotting. Here are some aftercare essentials:
- Keep in bright, indirect light—avoid direct sunlight for 1–2 weeks
- Water carefully: Let soil begin to dry slightly between waterings
- No fertilizer: Hold off on feeding for 4–6 weeks to let roots recover
- Maintain stable temperatures (65–80°F/18–27°C) and avoid cold drafts
- Monitor for pests or signs of overwatering while the plant adjusts
Quick Recap: The Basic Steps to Repot a Spider Plant
- Remove the plant gently from its pot
- Tease and inspect roots, trimming as needed
- Divide, if desired, for propagation
- Set in fresh soil in a new, slightly larger pot
- Water thoroughly and provide gentle aftercare
Conclusion
Repotting a spider plant is an easy and rewarding process when done with careful attention and patience. Following the outlined steps, using the right supplies, and observing good aftercare will ensure your spider plant remains a healthy, vibrant feature of your home for years to come. With this guide, you can confidently tackle rootbound issues, divide or propagate new pups, and boost your plant’s resilience and beauty.
References
Read full bio of Srija Burman


