How to Repot an Orchid: A Step-by-Step Guide for Healthy Blooms
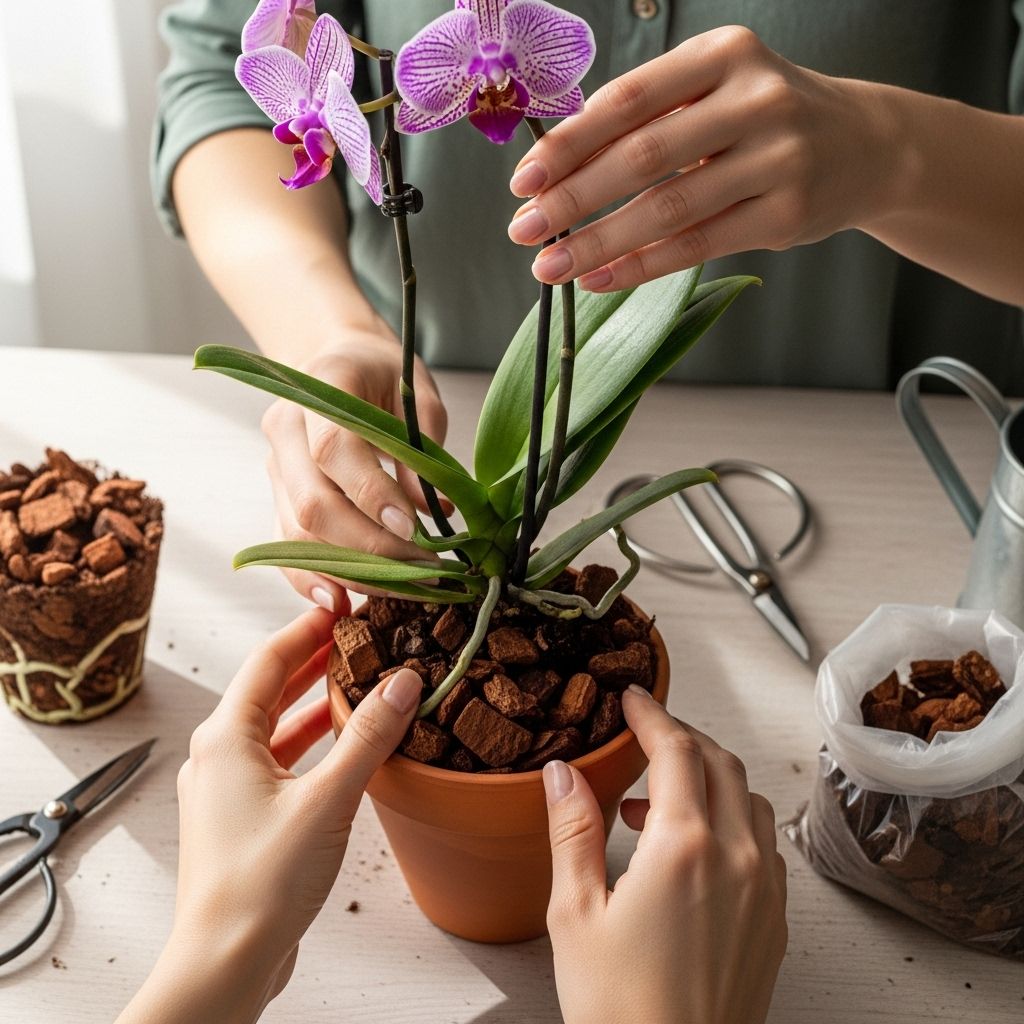
Fresh potting mix and root care lay the foundation for stronger, more vibrant blooms.

Image: HearthJunction Design Team
Orchids are among the most rewarding and popular houseplants, admired for their striking flowers, elegant foliage, and longevity. However, keeping an orchid thriving often hinges on knowing how and when to repot it properly. This guide offers a comprehensive overview of orchid repotting, covering everything from understanding the right time, gathering materials, following professional techniques, to maintaining post-repotting orchid care. Whether you are a beginner or experienced orchid grower, mastering these steps will keep your orchids blooming beautifully for years to come.
Contents
- Why Repot Your Orchid?
- When Should You Repot an Orchid?
- Essential Supplies for Repotting
- Step-by-Step Orchid Repotting Instructions
- Aftercare: What to Do After Repotting
- Troubleshooting & Common Problems
- Frequently Asked Questions
Why Repot Your Orchid?
Repotting is an essential practice for keeping orchids healthy and flowering. Orchid roots require plenty of space, moisture, nutrients, and—most importantly—air circulation. Over time, orchid potting media breaks down, compresses, and loses its ability to drain freely, causing roots to suffocate and rot. Repotting refreshes the orchid’s environment, removes decaying material, and prevents disease, guaranteeing longer-lasting blooms and vigorous growth.
- Ensures roots have access to air and moisture
- Prevents root rot from compacted or broken-down media
- Encourages new growth and better flowering
- Removes pests, disease, and fungal pathogens
When Should You Repot an Orchid?
Knowing the right time to repot an orchid is crucial. Generally, most orchids need repotting every 1-3 years, or sooner if key indicators appear. The optimal time is immediately after flowering, when new roots and leaves start to grow—as this reduces stress and gives the plant maximum recovery time.
- Newly purchased orchids (especially gift orchids in moss): Should be repotted after blooming, as starters are often overpacked in water-retaining moss that can cause root rot.
- Every 1-3 years: Check at least annually whether the potting mix has decomposed or the orchid has outgrown its container.
- Roots growing out of the pot: When roots spill over the edges or the plant looks crowded, it signals repotting is needed.
- Old or broken-down potting mix: When the medium looks soggy, compacted, or starts to smell musty, it is time to refresh it.
Essential Supplies for Repotting Orchids
Setting yourself up with the right tools and materials makes repotting much smoother and safer for the plant. Gather the following supplies:
- New Pot: Choose a pot just 1-2 inches larger in diameter than the old one. It must have ample drainage holes.
- Orchid Potting Mix: Use a specialty orchid mix made from bark, coconut husk, sphagnum moss, perlite or charcoal. Never use standard potting soil.
- Sterilized Scissors or Pruning Shears: For trimming dead or rotten roots.
- Gloves: Protect your hands, especially if you have sensitive skin.
- Plant Stake or Chopstick: To help anchor the orchid after repotting.
- Bowl or Bucket of tepid water: For soaking and hydrating roots and mix.
| Item | Purpose |
|---|---|
| Orchid potting mix | Quick drainage, aeration, mimics natural habitat |
| Pot with drainage holes | Prevents waterlogging, reduces risk of root rot |
| Sterile cutting tool | Trims dead or infected roots safely |
| Stake/chopstick | Keeps plant upright and stable in fresh media |
Step-by-Step Orchid Repotting Instructions
Follow this detailed process to give your orchid the best start after repotting:
1. Remove the Orchid from Its Pot
- Gently squeeze the sides of the pot to loosen the root ball.
- Tip the orchid out carefully, avoiding damage to fragile roots.
- If the orchid is stuck, run a sterile knife around the inside to release it.
2. Clean Roots and Remove Old Media
- Carefully shake or wash away all traces of old bark, moss, or debris from the roots.
- Discard any clumps stuck to the roots—it can harbor disease.
3. Trim Dead or Rotten Roots
- Inspect roots carefully: Healthy roots are white or green and firm; dead or rotten roots are brown, mushy, or hollow.
- Use sterilized scissors to remove any affected roots right back to healthy tissue.
4. Prepare the Pot and Potting Mix
- If using bark mix, soak it in water for 10-20 minutes to rehydrate before use.
- Place a layer of moistened bark mix in the bottom of the pot.
5. Position the Orchid in the New Pot
- Set the cleaned and trimmed orchid on top of the bark layer, splaying roots naturally.
- Use a plant stake or chopstick to help anchor the plant upright if needed.
6. Fill in Fresh Mix and Settle In
- Gradually add bark mix around the roots, gently tucking it in with a stick or fingers to fill gaps.
- Leave about 1/2 inch of space at the top of the pot.
- Tap the pot occasionally to settle the mix and roots in place. Do not pack tightly; roots need air.
7. Water and Drain
- Immerse the whole pot in a bucket of tepid water for 15-20 minutes to saturate the media and roots.
- Lift out and drain thoroughly—never let orchids sit in water.
- If the mix settles after watering, top up lightly as needed.
Aftercare: What to Do After Repotting
Proper post-repotting care is vital to help the orchid recover and thrive in its new home.
- Watering: Do not overwater; orchids prefer to dry out slightly between waterings. Wait a few days post-repotting before resuming normal care, allowing roots to heal.
- Humidity: Orchids love humidity. Place the pot on a tray filled with pebbles and water (without letting the pot base sit in water) to raise humidity.
- Fertilization: Hold off fertilizing for at least one month to avoid stressing the newly handled roots.
- Light: Keep in bright, indirect sunlight. Avoid direct midday sun, which can scorch leaves, and adjust for weaker winter light by moving closer to east or south-facing windows with a sheer curtain.
- Air Circulation: Ensure good ventilation to reduce the risk of fungal disease and boost root health.
- Observation: Monitor closely for signs of stress, pests, or disease. New leaves and roots are signs of success!
Troubleshooting & Common Orchid Potting Problems
Even with best practices, orchids can face challenges during and after repotting. Here’s how to handle the most common issues:
Root Rot
- Caused by overwatering or lack of drainage. Always use pots with holes and well-draining bark mixes.
- Remove affected roots, repot in fresh mix, reduce watering.
Pests (e.g., Spider Mites, Scale)
- Wipe leaves with a damp cloth or spray with horticultural oil. Improve air circulation.
- Isolate infested plants and treat regularly.
Mold or Fungal Growth
- Usually the result of excess moisture, poor ventilation, or decaying mix.
- Repot with sterile tools and fresh media. Increase airflow.
Orchid Not Blooming
- Could be due to insufficient light, over-fertilizing, or root stress.
- Ensure bright, indirect light and a stable routine after repotting.
Leaf Scorch
- Red or brown-tinged leaves indicate direct sun exposure; move orchid out of harsh rays.
- Use sheer curtains to soften midday sun.
Frequently Asked Questions (FAQ)
Q: How do I know it’s time to repot my orchid?
A: Signs include roots spilling out of the pot, compacted or deteriorating bark mix, or a newly purchased gift orchid in sphagnum moss. Repot after blooming when new growth begins.
Q: What is the best type of pot for repotting orchids?
A: Use a pot just 1 to 2 inches larger than the old one, with plenty of drainage holes. Clear plastic pots can help you monitor root health, but decorative ceramic or terracotta pots work as long as they drain well.
Q: Can I use regular potting soil for my orchid?
A: No, regular potting soil retains too much water and suffocates roots. Always use a specialized orchid mix containing bark, moss, or coconut husk.
Q: How long will it take for my orchid to bloom after repotting?
A: Orchids typically skip a flowering cycle when stressed, but healthy roots and leaves will encourage blooms within six months to a year.
Q: What should I do if my orchid has air roots?
A: Air roots are a sign of a healthy orchid. During repotting, leave healthy air roots outside the pot if they won’t fit gently within. Do not trim unless they are shriveled or dead.
Q: Should I fertilize my orchid right after repotting?
A: No, wait about a month before fertilizing to avoid stressing the newly handled roots.
Pro Tips for Successful Orchid Care
- Monitor bark breakdown: Replace potting mix at the first sign of decomposition or compaction.
- Cleanliness is crucial: Always sterilize scissors and use fresh, disease-free mix to prevent infection.
- Anchor securely: Newly potted orchids may wobble, so support them with stakes or ties until established.
- Be patient: Repotting can stress orchids. Expect a short adjustment period before vigorous new growth resumes.
Conclusion
Repotting is a straightforward and rewarding task that can dramatically improve the health and vibrancy of your orchid. By choosing the right time, using optimal materials, following careful technique, and providing attentive aftercare, you’ll empower your orchid to deliver brilliant blooms year after year. Remember to monitor regularly and don’t be afraid to step in with fresh media and sterile tools whenever your plant needs a refresh. Happy growing!
References
- https://www.chicagobotanic.org/plantinfo/smartgardener/how-to-repot-an-orchid
- https://www.gardenia.net/guide/how-to-repot-an-orchid-for-long-lasting-blooms
- https://homegarden.cahnr.uconn.edu/factsheets/orchid-care-and-repotting/
- https://www.youtube.com/watch?v=lZeyz20e6lg
- https://www.gardenista.com/posts/gardening-101-orchids/
Read full bio of Srija Burman


