How to Grow Vanilla: The Complete Guide to Cultivating Your Own Vanilla Beans
Step-by-step care and pollination unlock the sweet scent hidden in climbing orchids.
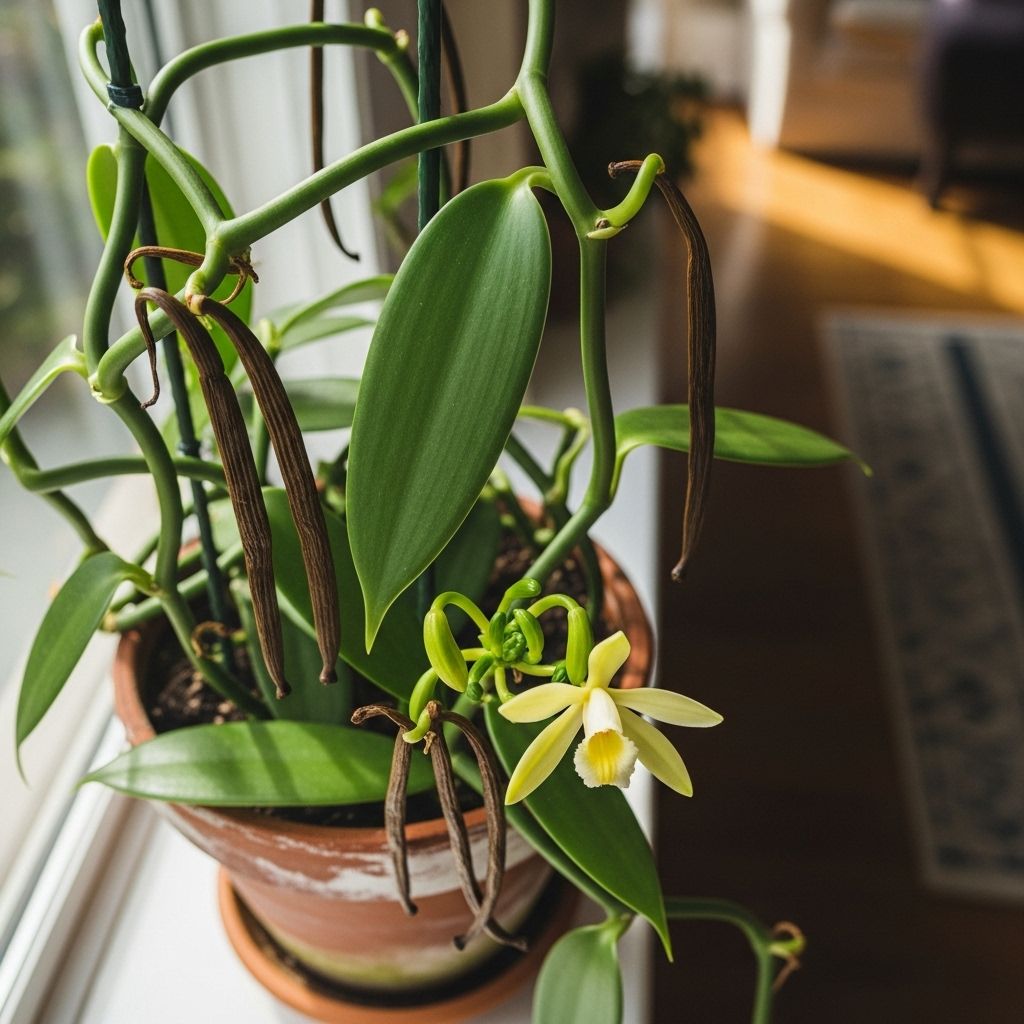
Vanilla is more than just a kitchen staple—it’s an exotic orchid that brings beauty and fragrance to the garden, and the satisfaction of harvesting your own flavorful beans. While growing vanilla (Vanilla planifolia) is a process that requires patience and attention, this detailed guide will equip you with everything you need to succeed, from planting to pollinating, harvesting, and curing your own homegrown vanilla beans.
Quick Care Guide
| Common Name(s) | Vanilla, vanilla orchid, flat-leaf vanilla, West Indian vanilla |
|---|---|
| Scientific Name | Vanilla planifolia or Vanilla tahitensis |
| Days to Harvest | 180 to 270 days after pollination |
| Light | Bright, indirect sunlight |
| Water | Consistent, light watering; keep consistently moist, not soggy |
| Soil | Well-draining mix of orchid bark and sphagnum peat moss or compost; pH 6.6–7.5 |
| Fertilizer | High-nitrogen (active growth), balanced (dormant) |
| Pests | Spider mites, mealybugs |
| Diseases | Root rot, stem rot |
About the Vanilla Orchid
The vanilla orchid (Vanilla planifolia) is a vining epiphyte native to tropical environments spanning from Mexico to Brazil. Cultivated vanilla is prized for its uniquely flavorful pods, but it remains one of the world’s most labor-intensive crops. It needs heat, humidity, and a carefully managed growing environment.
- Height and Spread: Mature vines can reach 6–10 feet tall and 2–3 feet wide.
- Growth Habit: Climbing vine, requires sturdy support.
- Blooming: After 3 to 5 years, mature vines bloom and may be manually pollinated to produce beans.
Where and How Does Vanilla Grow?
Vanilla naturally grows in the tropics, requiring:
- Consistently warm temperatures (ideally 60–90°F / 16–32°C)
- High humidity (80%+), best maintained in greenhouses or regions with tropical climates
- Filtered sunlight, such as that provided by a greenhouse or a bright indoor window
If you live outside natural vanilla-growing regions, you can grow vanilla indoors or in a greenhouse, provided you can simulate its preferred climate.
Requirements for Growing Vanilla
Light
Give your vanilla orchid bright, indirect sunlight in the morning and evening, and filtered shade in the afternoon. Avoid harsh midday rays, as too much direct sun will scorch the leaves and stunt growth. North- or east-facing windows work well indoors, or use shade cloth outdoors.
Temperature & Humidity
- Maintain an environment between 60–90°F (16–32°C).
- Keep humidity levels above 80% for optimal growth.
- Mist the leaves daily and provide good air circulation to discourage fungal issues.
Soil
- Use a well-draining potting mix—ideally half orchid bark and half sphagnum peat moss or coconut coir.
- Alternative: 100% orchid bark for better drainage.
- Soil pH: Aim for slightly acidic to neutral (6.6–7.5).
- Avoid dense, compacted soils—they will quickly rot vanilla’s sensitive roots.
Watering
- Keep the soil consistently moist but never soggy. Water when the top inch (2.5 cm) of the mix feels just barely dry.
- Use room-temperature water, and mist the foliage daily to simulate humidity.
- Container-grown vanilla needs more frequent, lighter watering than in-ground plants.
Planting Vanilla
- Choose a Container or Location:
Pick a container with excellent drainage. For in-ground planting (tropic regions), select a sheltered, humid spot. - Prepare the Potting Mix:
Fill the pot or planting hole with an orchid bark and peat/coir mix. If using compost, be sure it is very loose and airy. - Add a Support Structure:
Provide a moss pole, trellis, or fence for the vining orchid to climb. - Plant the Cutting or Young Plant:
Lay the vine horizontally against the medium, then gently arch and lift the growth upward against the support. - Water Thoroughly:
Saturate the mix, then drain thoroughly. Ensure no water remains pooled at the bottom. - Maintain Humidity:
Mist leaves regularly, especially for young or newly transplanted vines.
Fertilizing Vanilla Orchids
- Active Growth (Spring/Summer): Apply a heavily diluted high-nitrogen fertilizer (e.g., 30-10-10 NPK) weekly, only when the soil is moist.
- Dormant/Resting Period (Fall/Winter): Fertilize more lightly with a balanced orchid fertilizer (20-20-20 NPK), reducing frequency to every 4–6 weeks.
- Never add fertilizer to dry soil—this may damage the roots.
Pruning and Training Vanilla Vines
- Pruning: Prune only to remove dead or damaged stems, or when you wish to propagate.
- Training: Guide the vine upward on a moist sphagnum moss pole, trellis, or along a fence. If support is lacking, you can dangle the vine on nails or hooks to help it climb gently.
Vanilla Flowering and Pollination
Patience is crucial: vanilla orchids typically take 3 to 5 years to reach maturity and bloom when grown from cuttings.
- Flowers last for a single day and must be hand-pollinated to set fruit outside of their native region.
- Self-pollination is rare; use a toothpick or small stick to transfer pollen from the anther to the stigma.
- Pollinate in the early morning, as flowers wilt within hours.
Steps for Hand-Pollinating Vanilla Flowers
- Identify a fresh, open flower early in the morning.
- Lift the rostellum (flap separating the anther and stigma) carefully with a toothpick.
- Press the anther (pollen structure) against the stigma to transfer pollen.
- Mark pollinated flowers with ribbon or tape for later identification.
Successful pollination produces long green pods in 6–9 months.
Harvesting Vanilla Beans
- Timing: Vanilla beans are ready for harvest six to nine months after pollination, once they turn dark, slightly split at the tip, and begin to emit a distinct vanilla scent.
- Method: Cut pods from the vine with clean scissors, leaving the flower stem intact to encourage additional pod formation.
Curing Vanilla Beans
Fresh vanilla pods must be cured to develop their signature aroma and flavor. Curing is a multi-step process:
- Blanch: Soak harvested pods in hot water for a few minutes to kill bacteria and enzymes.
- Sweat: Wrap the pods in cloth and place them in a warm, humid place out of direct sunlight for 24–48 hours.
- Dry: Spread pods out on racks in the shade and turn daily for 3–4 weeks, allowing them to slowly shrink and darken.
- Condition: Store beans in a sealed, opaque container for several months to deepen aroma and flavor.
This process transforms the pod’s natural compound, glucovanillin, into the familiar, aromatic vanillin.
Problems While Growing Vanilla
Pests
- Spider mites: These tiny pests suck sap from the leaves, causing stippling and wilting.
- Mealybugs: Found in leaf axils, they excrete sticky honeydew that promotes fungal growth.
Control with insecticidal soap, neem oil, or by hand removal. Encourage natural predators, and maintain good air circulation and cleanliness.
Diseases
- Root rot: Caused by waterlogged soil; roots become mushy, leaves yellow and drop.
- Stem rot: Fungal or bacterial infection resulting in soft, collapsing stems.
Avoid by providing excellent drainage, never overwatering, and practicing good sanitation. Remove and destroy infected plant material.
Propagation: How to Start New Vanilla Orchids
- Use a mature, healthy vanilla vine. Cut a segment 12–18 inches long with several nodes (leaf joints).
- Let the cutting air-dry for a day to callus.
- Lay the cutting horizontally on top of your orchid mix, pinning it down to ensure contact at each node.
- Water thoroughly and maintain high humidity. New roots will emerge from leaf nodes in a few weeks.
Vanilla FAQ
Q: Can vanilla be grown indoors?
A: Yes, providing you have a warm spot with bright, indirect light, and you can maintain high humidity via misting or a humidifier.
Q: How long until I get vanilla beans?
A: Expect 3–5 years after planting before your vanilla orchid will flower and produce beans, provided it receives optimal care.
Q: Why do flowers drop without producing beans?
A: Outside of the orchid’s native environment, vanilla blooms require hand pollination. Without this crucial step, flowers naturally wither without setting fruit.
Q: Can I use regular potting soil?
A: Regular potting soil holds too much moisture and lacks aeration—use an orchid mix with bark, peat, or coir for best results.
Q: Do I need more than one vanilla plant?
A: No, the vanilla orchid is self-fertile, but each flower must be pollinated by hand if grown outside where native pollinators are absent.
Summary: Is Growing Vanilla Worth It?
Vanilla cultivation is a high-effort, high-reward adventure best suited to experienced gardeners or those wanting a botanical challenge. If you dream of harvesting fragrant vanilla beans at home, patience, attentive care, and manual pollination are key. With the right setup, you’ll enjoy one of the most rewarding edible orchid experiences—and perhaps one of the finest ingredients a home chef can produce.
References
Read full bio of Sneha Tete

