Grow Sweet Potatoes In Containers: 9 Steps For Bountiful Harvest
Turn any sunny spot into a mini farm and enjoy nutrient-packed roots and greens.

How to Grow Sweet Potatoes in Containers in 9 Simple Steps
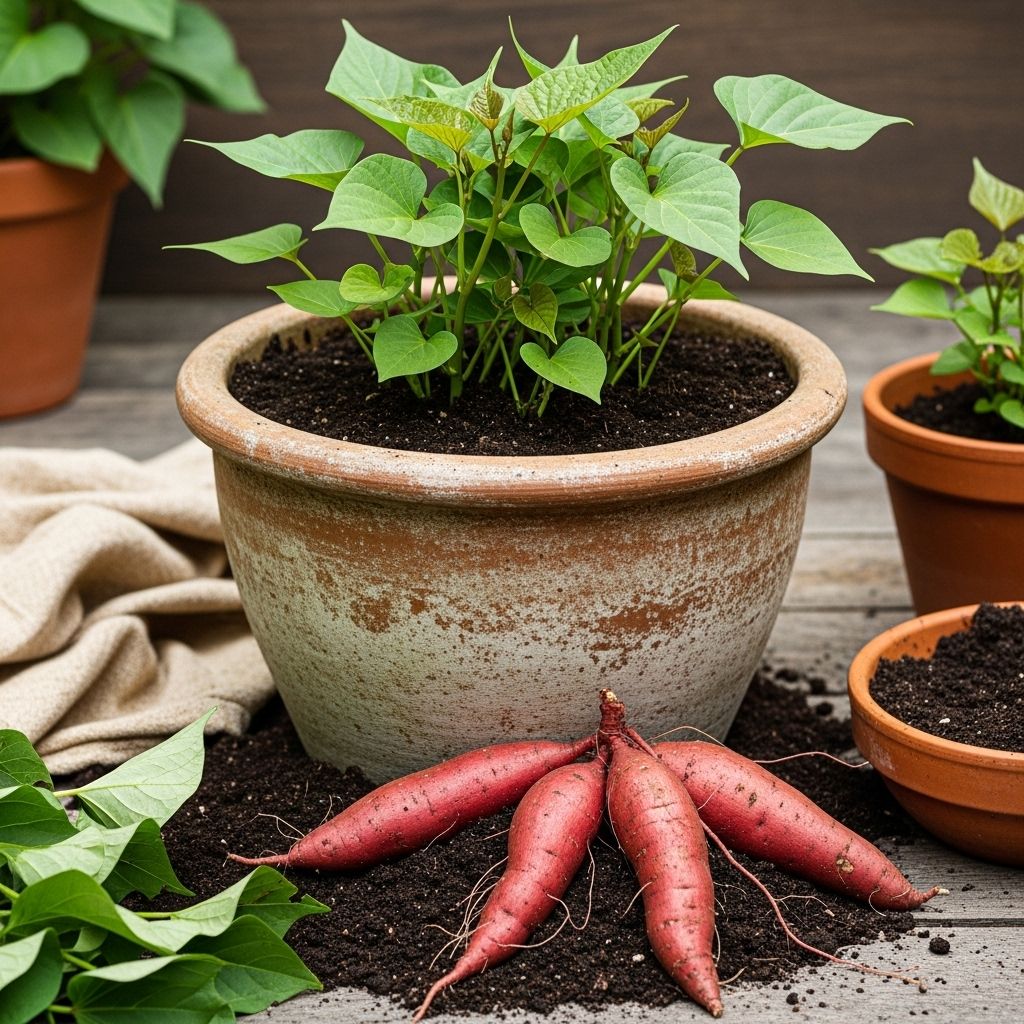
Sweet potatoes are a beloved root crop prized not only for their nutritious tubers but also for their beautiful, edible foliage. If you’ve hesitated to grow them because you lack garden space, fear not. Sweet potatoes thrive in containers, making them an ideal choice for patios, balconies, or wherever you have a sunny spot. Follow this comprehensive, step-by-step guide to maximize your container-grown harvest.
Why Grow Sweet Potatoes in Containers?
Growing sweet potatoes in containers provides several advantages:
- Space-saving: Ideal for small gardens, patios, or balconies.
- Mobility: Move containers to follow the sun or protect from harsh weather.
- Pest and disease reduction: Less exposure to soil-borne pests than in-ground planting.
- Ornamental appeal: Lush vines and attractive leaves enhance garden aesthetics.
- Edible leaves: Enjoy both the tubers and nutritious, spinach-like foliage.
Step 1: Choose the Right Container
Container size and material have a direct impact on your yield. Sweet potatoes develop large tubers and vigorous roots, so spacious containers are essential for success.
- Volume: Use pots or containers with at least 20 gallons capacity for optimal growth. Half whiskey barrels, grow bags, or sturdy plastic/fabric planters work well.
- Shape: A wide container encourages horizontal tuber development—which means more and larger sweet potatoes.
- Depth: Minimum 12–18 inches deep to give ample space for tubers to expand and protect them from sunburn or exposure.
- Drainage: Containers must have drainage holes to prevent waterlogging.
- Food-safe: If recycling containers (like buckets), ensure they are food safe, labeled with proper stamps—avoid any with unknown origins or that might leach chemicals.
Step 2: Selecting the Right Soil Mix
Sweet potatoes thrive in loose, well-draining, nutrient-rich soil. The appropriate soil mix prevents compaction, which can deform tubers and stunt plant growth.
- Texture: Loamy soil, rich in organic matter, amended with compost or aged manure.
- Drainage: Add perlite or coarse sand to improve aeration and prevent soggy conditions.
- pH: Target a slightly acidic to neutral pH (5.5–6.5 ideal).
- DIY Mix: Combine 2 parts high-quality potting mix, 1 part compost, and 1 part perlite or coarse sand.
Fill the container about 70% full to leave room for topdressing with extra compost or soil as the vines grow. You can continue to add soil to encourage the development of extra roots and tubers.
Step 3: Sourcing and Preparing Sweet Potato Slips
Sweet potato plants are propagated from slips—young shoots grown from mature tubers. You have two main options:
- Buy slips: Order certified disease-free slips from a reputable plant nursery or online gardening supplier.
- Grow your own: Root a mature sweet potato in water or moist soil indoors to produce slips. Each tuber can generate 10–12 slips.
How to Sprout Slips at Home:
- Place an organic sweet potato half-submerged in water (using toothpicks for support) or bury partway in moist soil.
- Keep in a warm, bright location. Shoots will emerge from the nodes.
- Once slips are 6–8 inches long, twist or cut them from the tuber.
- Place slips in water or moist soil to let them develop roots before planting.
Plan ahead—sourcing or sprouting slips takes several weeks. Start this process in late winter or early spring if you live in a region with a short growing season.
Step 4: Planting Sweet Potato Slips
When soil temperatures reach at least 60°F (16°C) and all frost risk has passed, it’s time to plant your slips.
- Spacing: Plant slips 10–12 inches apart within the container.
- Depth: Bury each slip with the bottom 4–6 inches in the soil, ensuring roots and lower nodes are well covered.
- Orientation: If slips are long and your container isn’t deep, lay slips slightly diagonally or horizontally, with at least the bottom half under soil.
- Firm soil: Gently press soil around each slip to remove air pockets.
Step 5: Location and Light Requirements
Sweet potatoes need maximum sun and warmth to thrive.
- Sunlight: Provide at least 6–8 hours of direct sunlight daily. More is better.
- Warmth: Place containers in a location that stays warm, such as a south-facing patio, balcony, or driveway.
- Mobility: If needed, move containers to chase the sun across the season.
Step 6: Watering and Feeding
Proper moisture and balanced nutrition are keys to healthy vines and big tubers.
- Watering: Keep soil consistently moist but not soggy. Containers dry out quickly, so check moisture regularly, especially in hot weather. Water deeply, ensuring water reaches the tuber zone.
- Reduce watering: About 2–3 weeks before harvest, let the soil start to dry to prevent tuber rot and to promote curing.
- Feeding: Mix a balanced, slow-release organic fertilizer into your soil at planting. Side-dress with compost or a complete organic fertilizer every 4–6 weeks. Too much nitrogen will produce more leaves at the expense of tubers, so favor phosphorus and potassium balanced or root crop formulas.
Step 7: Mulching and Maintenance
- Mulch: Apply a thick layer of chopped leaves, straw, or grass clippings around the base of plants. This conserves moisture, suppresses weeds, and keeps soil cool in extreme heat.
- Trellising: Sweet potato vines will spill over the container and can be guided up a small trellis or allowed to cascade down—choose whichever suits your space.
- Pest vigilance: While containers reduce some pest issues, check for signs of aphids, weevils, or fungal problems. Healthy plants rarely suffer major infestations.
- Remove flowers: Pinch off any flowers to direct more energy to tuber production if maximum yield is your goal.
Step 8: Harvesting Sweet Potatoes
Sweet potatoes are ready for harvest about 90–120 days after planting slips, or when foliage starts to yellow and die back. Here’s how to harvest:
- Check maturity: Lightly dig at the container edges to feel for tuber size and development.
- Harvest gently: Loosen soil with gloved hands or a trowel, taking care not to cut or bruise tubers.
- Cure tubers: Lay harvested tubers in a single layer in a warm, humid place (80–85°F, 85% humidity) for 7–10 days to toughen skins and convert starches to sugars.
- Storage: After curing, store sweet potatoes in a cool, dark, well-ventilated place. Properly cured, they’ll last for months.
Step 9: Using Sweet Potato Greens
Don’t overlook the leaves—they’re nutritious and tasty, high in vitamins A, C, and minerals.
- Harvest young, tender leaves as needed. Avoid taking more than 1/3 of the leaves from each plant to keep growth vigorous.
- Use leaves raw in salads, sautéed like spinach, or added to soups and stir-fries.
Common Issues and How to Avoid Them
| Issue | Cause | Solution |
|---|---|---|
| Small, thin tubers | Too little sunlight, small containers, or compacted soil | Use large, wide containers in full sun with loose soil |
| Rotten tubers | Overwatering, poorly-drained soil | Ensure proper drainage, allow topsoil to dry before watering again |
| Poor growth | Nutrient deficiency, insufficient warmth | Apply balanced fertilizer, use black/dark containers to absorb heat |
| Leaf yellowing or pests | Imbalances or aphids, weevils | Inspect plants regularly; use organic pest management methods |
Final Thoughts
Sweet potatoes are a versatile, productive crop perfectly suited to containers. With lush vines that double as edible greens and nutritious tubers below, they’re as attractive as they are practical. Start your plants early, provide consistent care, and you’ll enjoy a rewarding harvest—even from a small balcony or urban patio.
Frequently Asked Questions (FAQs)
Q: How many sweet potato plants per container?
A: For a 20-gallon container, plant 2–3 slips. Overcrowding leads to small tubers, so give each plant adequate space.
Q: Can I use grocery store sweet potatoes to grow slips?
A: Yes, but choose organic sweet potatoes to avoid those treated with sprout inhibitors, and make sure to start the process far in advance of your planting date.
Q: How long does it take sweet potatoes to mature in containers?
A: Typically 90–120 days from slip planting to harvest, depending on variety and conditions.
Q: Do sweet potatoes need pollination to form tubers?
A: No, tubers form underground from the roots, not from pollinated flowers.
Q: Can I grow sweet potatoes indoors?
A: It’s possible with very bright light or grow lights, but yields are best with outdoor sun and warmth.
Tips for Success
- Start early: Sprout or purchase slips well before your final frost date.
- Use wide, deep containers: The bigger the container, the greater your harvest.
- Keep soil loose and rich: Compacted, heavy soils lead to poor tuber formation.
- Water consistently: Don’t let plants dry out, but avoid soggy conditions.
- Mulch generously: Retains moisture and keeps vines healthier.
References
Read full bio of Anjali Sayee


