How to Grow Mustard Microgreens: A Complete Guide to Spicy Greens
Fresh sprouts deliver vibrant heat and concentrated nutrients for every homemade dish.
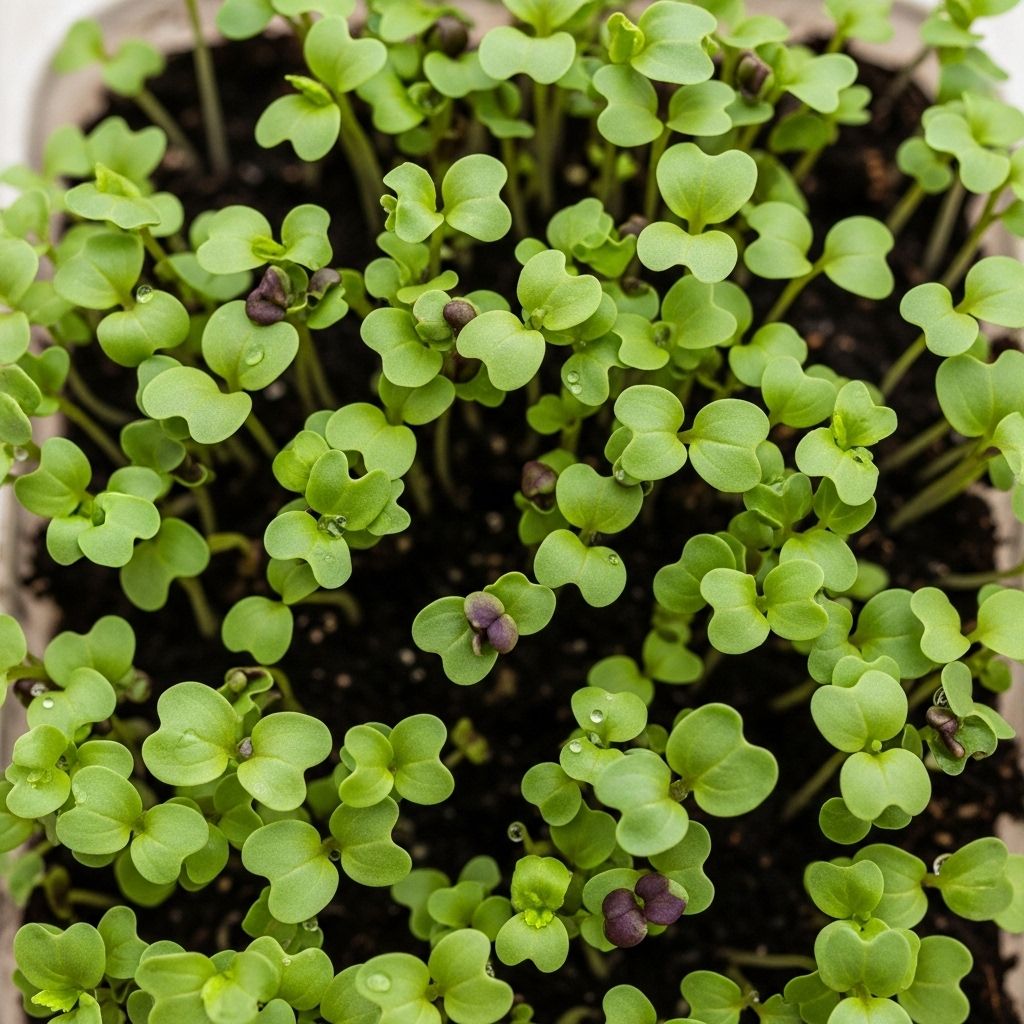
If you crave the punchy taste of mustard at every cookout, you’ll love cultivating mustard microgreens. These young greens offer the signature tang and heat you know from mustard condiments, yet bring additional nutrition and vibrant aesthetics to your dishes. This guide walks you through every step, from understanding varieties to harvesting, ensuring you have a fresh, homegrown supply of these spicy shoots.
Why Choose Mustard Microgreens?
Mustard microgreens are among the most flavorful microgreens available. Despite their compact size, they deliver a strong, hot, and sweet mustard flavor. Beyond just taste, these tiny greens are incredibly rich in nutrients, often surpassing the nutritional density of their mature counterparts.
- High in vitamins: A, B6, C, K, E
- Rich in minerals: Calcium, potassium, magnesium
- Excellent source of fiber and antioxidants
- Quick to harvest: Ready in about 7 days
- Easy to grow indoors year-round
Belonging to the Brassica genus, which includes broccoli, kale, and cabbage, mustard microgreens combine health benefits with culinary versatility.
Mustard Microgreen Varieties
Diversifying the varieties you grow adds color, texture, and flavor diversity to your microgreen garden. Here are some popular types of mustard microgreens to consider:
- Red Giant Mustard: Burgundy to brown leaves, striking on salads and sushi.
- Mizuna Mustard: Delicate, feathery leaves and a milder, peppery taste.
- Florida Broadleaf Mustard: Pale green, broad leaves with a classic mustard kick.
| Variety | Leaf Color | Taste & Notes |
|---|---|---|
| Red Giant | Burgundy/Brown | Spicy, visually striking, robust flavor |
| Mizuna | Light green | Mildly spicy, feathery leaves, great for blending |
| Florida Broadleaf | Pale green | Classic mustard heat, thick texture |
Mustard Microgreens: Nutrition and Health Benefits
Mustard microgreens provide a dense array of essential nutrients in a low-calorie package. Consumption supports overall wellness through:
- Boosted Immunity: High levels of vitamin C and antioxidants help shield the body from infections.
- Bone Health: Calcium and vitamin K contribute to strong bones.
- Eye Health: Vitamin A supports vision.
- Improved Digestion: Rich fiber promotes gut health.
Due to their nutritional density, mustard microgreens can rival or exceed mature leafy greens in delivering key micronutrients per gram.
How to Grow Mustard Microgreens in 5 Easy Steps
Mustard microgreens are among the easiest microgreens to cultivate, making them perfect for beginners and seasoned gardeners alike. Here’s a step-by-step breakdown:
Step 1: Gather Your Supplies
- Mustard microgreen seeds: Choose your preferred variety.
- Growing tray: A shallow, leak-proof tray; drainage not required.
- Growing medium: Soilless mixes (coconut coir, peat) or hydroponic mats.
- Mister or spray bottle: For gentle watering.
- Light source: Natural sunlight, LED grow lights, or a bright windowsill.
- Optional: A humidity dome or cover.
Step 2: Prepare the Growing Tray
- Fill the tray with about 1–2 inches of growing medium, leveling the surface but not compressing it.
- Moisten the medium thoroughly, ensuring it is damp but not soggy.
Step 3: Sow the Seeds Evenly
- Scatter mustard seeds evenly across the surface; do not bury them.
- For uniform density and growth, avoid clumping—overlap is fine as microgreens thrive densely.
- Mist lightly to settle seeds onto the medium.
Step 4: Germinate in Darkness
- Cover the tray with a lid, another tray, or a humidity dome to block light and retain moisture.
- Keep the tray at room temperature (65–75°F / 18–24°C).
- Check daily for moisture; mist if the surface dries out.
- Seeds typically sprout in 1–2 days.
Step 5: Grow and Harvest
- Once most seeds have germinated, remove the cover and expose the tray to strong light.
- Microgreens will green up and elongate toward the light.
- Water regularly (prefer bottom watering or gentle misting to prevent mold).
- Harvest when the first set of true leaves appear, usually in 6–7 days.
To harvest, snip the greens just above the root line using sanitized scissors. Rinse and use immediately, or pat dry and store in a sealed container in the fridge for up to a week.
Tips for Growing Success
- Dense seeding: Mustard microgreens thrive packed together, but ensure good airflow to prevent disease.
- Light importance: Microgreens grown in low light will be pale and leggy. Use a bright window or LED grow lights for best results.
- Watering: Keep the growing medium moist, but not waterlogged. Water from the bottom to minimize mold.
- Avoid soil compaction: Lightly spread the growing medium; do not press it down, as roots need air.
- Harvest timing: Microgreens taste best before the true leaves fully develop and grow tougher.
Common Problems and Solutions
| Issue | Cause | Solution |
|---|---|---|
| Mold or Fungus | Overwatering, poor airflow | Reduce watering, introduce gentle airflow, avoid crowding |
| Pale, Leggy Growth | Insufficient light | Provide stronger light source or move tray to brighter spot |
| Poor Germination | Dry medium, old seeds | Ensure thorough pre-watering, use fresh seeds |
| Wilted Microgreens | Dried out medium | Mist or water consistently, avoid letting medium dry |
Creative Uses for Mustard Microgreens
With their distinctive taste, mustard microgreens bring excitement to all sorts of culinary creations:
- Salads and Sandwiches: Adds a peppery, spicy twist.
- Garnishes: Decorative and bold on sushi, soups, and grilled mains.
- Egg and Cheese Dishes: Sprinkle on omelets, quiches, or grilled cheese for extra flavor.
- Smoothies: A small handful can elevate green smoothies with a mild zing.
- Microgreen Mixes: Combine with other Brassicas for varied textures and flavors.
Frequently Asked Questions (FAQs)
How long does it take to grow mustard microgreens?
A: On average, mustard microgreens are ready to harvest within 6–7 days after sowing, making them a fast-growing option for microgreen enthusiasts.
Do you need special seeds for microgreens?
A: Use seeds labeled for microgreens to avoid potential chemical treatments. Choose your preferred mustard variety for unique flavors and colors.
Should mustard microgreens be grown in soil or hydroponically?
A: Both methods work well. Soil or soilless mixes supply stable growth, while hydroponic mats are cleaner and convenient for indoor setups.
How spicy are mustard microgreens?
A: Mustard microgreens offer a notable spicy and piquant flavor, somewhat less intense than mature mustard greens but still distinctly peppery and tangy.
Can you reuse the growing medium?
A: Reusing soil is not recommended for microgreens due to disease risk. Always start with fresh, sterile growing mediums for each batch.
Are mustard microgreens safe for children and pets?
A: Yes, when grown without chemical treatments or pesticides, they are safe. Keep in mind the spicy taste may not appeal to everyone, especially children.
How should microgreens be stored after harvesting?
A: After harvest, pat dry and store the greens in an airtight container in the refrigerator. Use within a week for best flavor and texture.
Growing Mustard Microgreens: Final Tips
- Experiment with different varieties for flavor and visual appeal.
- Grow small batches regularly for a continuous harvest.
- Use fresh seeds and keep your tools sanitized to minimize spoilage and contamination.
- Encourage kids and beginners to try mustard microgreens as an introduction to home gardening—the quick, visible results make for a rewarding first project.
Incorporating mustard microgreens into your kitchen is an enjoyable, nutrient-rich upgrade to your meals—and growing them at home means a constant supply of fresh greens all year round.
References
Read full bio of Anjali Sayee

