How to Divide Hydrangeas in 6 Simple Steps
Create thriving hydrangea clusters by splitting roots and nurturing fresh growth.

Hydrangeas are beloved for their lush blooms, hardy nature, and ease of propagation. Whether you’re seeking more plants for your landscape or looking to rejuvenate an older shrub, dividing hydrangeas is one of the simplest and most rewarding methods to propagate these garden favorites. This comprehensive guide will walk you through every aspect of hydrangea division, helping you master the process and enjoy vibrant, healthy growth season after season.
Contents
- Which Hydrangeas Can Be Divided?
- Why Divide Hydrangeas?
- When Is the Best Time to Divide?
- Tools and Preparation
- How to Divide Hydrangeas: Step-by-Step
- Replanting and Aftercare
- Common Mistakes and Troubleshooting
- Frequently Asked Questions
Which Hydrangeas Can Be Divided?
With over six main types of hydrangeas commonly grown in gardens, it’s crucial to know which can be divided successfully for propagation:
- Big-leaf Hydrangeas (Hydrangea macrophylla): Easily divided and among the most common types seen in gardens.
- Oakleaf Hydrangeas (H. quercifolia): Can be divided similar to big-leaf varieties.
- Smooth Hydrangeas (H. arborescens): Division is straightforward, especially as they mature and send up shoots.
Other types like Panicle (H. paniculata), Mountain (H. serrata), and Climbing Hydrangeas (H. petiolaris) are less commonly propagated by division, as their growth habits don’t favor this technique, and alternative propagation methods—like cuttings or layering—are usually preferred.
Why Divide Hydrangeas?
Dividing hydrangeas offers several direct benefits to both plant and gardener:
- Increase Plant Numbers: Multiply your hydrangea collection to fill out a border or share healthy starts with friends and neighbors.
- Revitalize Older Plants: Older hydrangeas may become woody or crowded. Division rejuvenates both the original and new plants by reducing competition and stimulating vigorous growth.
- Manage Size: Prevent shrubs from outgrowing their space and help keep your garden design tidy.
When Is the Best Time to Divide?
The ideal time to divide hydrangeas is when the plants are dormant:
- Early Spring: Just as the ground thaws, but before new buds sprout, giving roots time to reestablish.
- Late Fall: After leaves drop but before the ground freezes, ensuring the plant is resting and less stressed.
Dividing at these times minimizes shock and increases the chances of successful transplantation. Never divide hydrangeas during peak bloom or the intense heat of summer, as this can severely stress the plant.
Tools and Preparation
Preparation is essential for a successful division:
- Sharp digging spade or shovel: For digging and separating roots.
- Garden forks (optional): Help gently lift large rootballs and prevent excess damage.
- Hand pruners: Trim roots or stems as needed.
- Trug or tarp: Contain loose soil or move plants easily.
- Bucket of water: Keep roots moist if there’s a delay before replanting.
- Compost or well-rotted manure: Enrich the new planting site.
- Mulch: Protect roots and conserve moisture after planting.
Tip: Water your hydrangea thoroughly several hours before you plan to divide. Well-hydrated roots are less prone to shock.
How to Divide Hydrangeas: Step-by-Step
Step 1: Preparation
Begin by assessing the plant for readiness. Look for distinct offshoots or “baby” shrubs forming at the sides of the main plant, each with a healthy set of roots and at least two or three branches. Water the plant deeply so the roots are hydrated, reducing stress during the process.
Step 2: Dig Up the Plant
Using two garden forks (or a sharp, clean spade), gently loosen the soil all around the base. Push the forks or shovel beneath the root system and carefully lift the entire plant with as much rootball as possible. Avoid pulling on stems, as this can tear and damage the plant.
If you only need a small division, sometimes removing just the offshoot is sufficient—dig around the area where the “baby” plant meets the parent and extract it without disturbing the entire clump.
Step 3: Shake Off the Roots
Lay the removed rootball on a tarp or a prepared surface. Carefully shake off or loosen excess soil to expose the root structure. This step helps you identify natural divisions between the main plant and its offshoots.
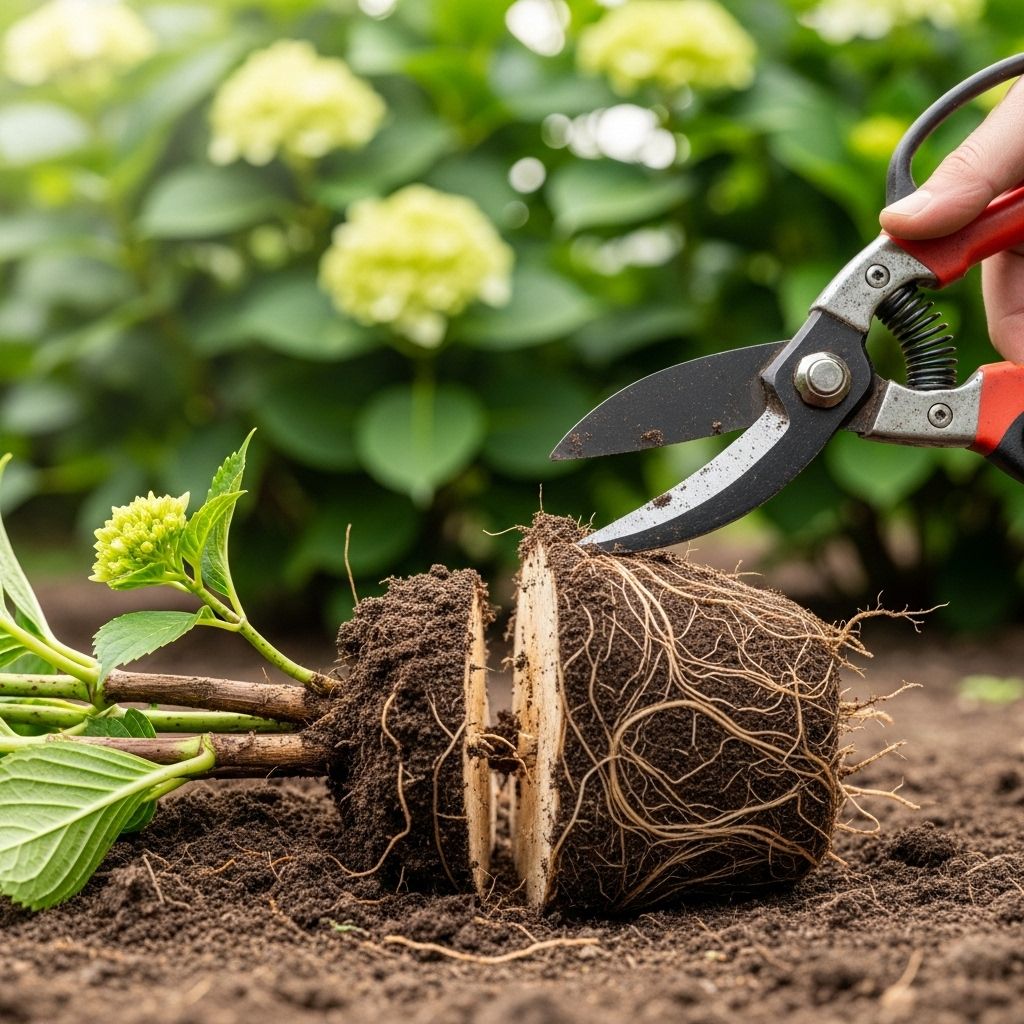
Step 4: Divide
Look for healthy sections with robust roots and several stems. Using a sharp spade or pruners, cut between these sections, separating the offspring from the main plant. Aim to provide each new division with a good root system and at least a couple of healthy stems. If needed, trim away any damaged or excessively long roots to encourage new, fibrous root growth after planting.
Step 5: Replant
Plant your hydrangea divisions promptly. Dig a new hole large enough for the new root mass. Mix compost or aged manure into the hole. Place the division at the same depth it was previously growing. Surround with soil, press firmly to remove any air pockets, and water thoroughly.
Step 6: Aftercare
- Water: Keep the soil moist, especially in the first few weeks after planting.
- Mulch: Apply a 2–3 inch layer of mulch around the base to retain moisture and regulate temperature.
- Monitor: Watch for signs of wilt or transplant shock. Some drooping is normal, but consistent watering and shade during hot days will help the new plants establish.
Replanting and Aftercare
Hydrangeas thrive in part shade with rich, well-drained soil. After transplanting, focus on giving each division the best possible start:
- Choose a part-shade location, avoiding intense afternoon sun.
- Enrich the planting area with organic matter for nutrients and water retention.
- Water regularly, especially during dry spells and the first growing season post-division.
- Support young, wilting plants with temporary shade (such as shade cloth) if needed.
- Remove weeds and grass from around the base to reduce competition for nutrients.
With attentive care, new divisions will quickly establish roots and resume healthy top growth. Most will produce blooms the following year, and some may even flower later in the first season if division occurs early enough in spring.
Common Mistakes and Troubleshooting
Even experienced gardeners can encounter challenges when dividing hydrangeas. Here are the most common pitfalls—and how to avoid them:
- Dividing at the wrong time: Summer division stresses plants and often leads to transplant shock. Stick to early spring or late fall.
- Poor root-to-shoot ratio: Each division should have a balanced amount of roots and stems. Too few roots makes it harder for the plant to recover.
- Failing to water: New divisions are highly sensitive to drying out. Consistent moisture is key.
- Planting too deeply or shallowly: Always replant at the same soil level as before; incorrect depth can suffocate roots or expose them to extremes.
- Neglecting aftercare: Mulching, regular watering, and weed removal during the first year are crucial for success.
Frequently Asked Questions (FAQs)
Q: Can I divide all types of hydrangeas?
A: Only certain types are suited to division—mainly big-leaf, oakleaf, and smooth hydrangeas. Climbing and panicle types are typically propagated through other methods.
Q: How can I tell if my hydrangea is ready to divide?
A: Look for established offshoots or “baby” plants at the base, each with several branches and their own sets of roots. Avoid dividing very young or newly planted hydrangeas.
Q: What if my division has droopy leaves after planting?
A: Some drooping is normal as roots settle. Consistent moisture and temporary shade support recovery. If wilting persists more than a week, check root moisture and adjust care as needed.
Q: Should I fertilize my newly divided hydrangea?
A: Delay heavy feeding until signs of strong new growth appear. Too much fertilizer too soon can burn new roots. Compost, leaf mold, or gentle liquid seaweed extract are ideal during initial establishment.
Q: How often should I divide my hydrangeas?
A: Most hydrangeas benefit from division every three to five years, depending on vigor and crowding. Observation of root or shoot congestion can help guide timing.
Hydrangea Division at a Glance: Step-by-Step Table
| Step | Description | Key Tips |
|---|---|---|
| 1. Prepare | Water plant; identify natural splits | Hydrate several hours ahead |
| 2. Dig Up | Gently lift whole plant or offshoot | Use forks or sharp spade |
| 3. Shake Roots | Loosen soil to find divisions | Avoid root breakage |
| 4. Divide | Separate sections with roots/stems | Use clean cuts, balance roots and shoots |
| 5. Replant | Plant in enriched soil at same depth | Firm soil, water immediately |
| 6. Care | Mulch, water regularly, watch for stress | Keep moist, weed-free, mulch 2–3″ |
Other Ways to Propagate Hydrangeas
If you want to expand your hydrangea bed beyond division, consider these propagation methods:
- Softwood Cuttings: Take cuttings in late spring or early summer and root in a moist, soilless mix for fast growth.
- Ground Layering: Bend a low-growing branch to the ground, secure and cover with soil. Roots develop at leaf nodes, then the branch can be separated and planted.
- Root Cuttings: For some species, slices of healthy root can be encouraged to sprout new growth.
Expert Tips for Success
- Always sanitize tools between cuts to prevent disease transmission.
- If dividing multiple plants, work in stages to keep roots from drying out.
- Share extra divisions with fellow gardeners for better community and biodiversity.
Summary
Dividing hydrangeas is a gardener’s secret to renewing a bed of these iconic shrubs, multiplying plants without cost, and ensuring consistent, lush blooms each season. By following each step—from preparation and gentle digging to careful replanting and aftercare—you’ll enjoy a thriving hydrangea collection that only grows better with time.
References
Read full bio of Anjali Sayee


