Hardscaping 101: The Complete Guide to Poured-In-Place Concrete
Professional techniques shape custom outdoor areas that resist wear and weather.

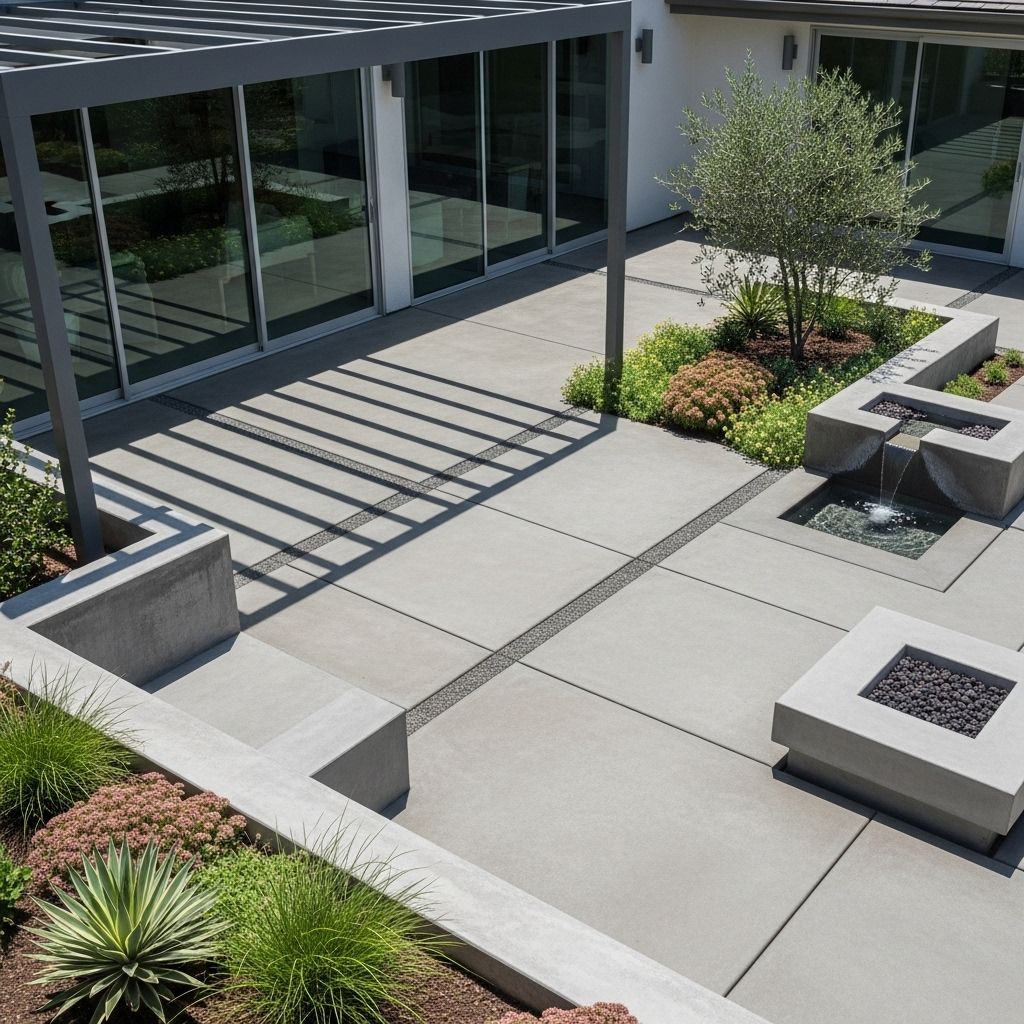
Poured-in-place concrete is the cornerstone of modern hardscaping, offering unmatched versatility and durability for both modest residential projects and expansive public spaces. Whether you’re designing a patio, retaining walls, pathways, or custom elements like benches and fire pits, understanding the details of poured concrete is essential to achieving a professional, long-lasting result.
What Is Poured-In-Place Concrete?
Poured-in-place concrete refers to the process of mixing, pouring, and curing concrete directly at the construction site, as opposed to using precast concrete elements fabricated elsewhere. This method enables complete customization in terms of size, shape, color, and finish, making it a popular choice for:
- Patios of any size or design
- Pathways and walkways that follow organic or geometric lines
- Retaining or garden walls in a variety of heights and lengths
- Driveways and parking pads
- Site-specific benches, fire pits, or water features
The flexibility of poured concrete allows it to seamlessly blend into modern, contemporary, or traditional landscape designs.
How Is Poured-In-Place Concrete Installed?
Installing poured-in-place concrete is a technical process that demands precision at every step. Below is an overview of the sequence most contractors follow:
1. Project Planning and Design
- Define the project’s purpose and dimensions.
- Determine thickness, reinforcement (typically rebar), and finish options.
- Decide on any patterning, stains, or integrated features.
2. Site Preparation
- Clear all vegetation, rocks, and debris to expose bare soil.
- Excavate to the necessary depth, typically 4″–8″ depending on load and location.
- Add and compact a stable base layer, often crushed stone or gravel, to prevent settling and promote drainage.
3. Formwork Construction
- Install robust forms—typically plywood or steel—firmly anchored with stakes to outline the shape and set the final elevation.
- Ensure forms are in excellent condition with smooth surfaces and tight joints for crisp concrete edges.
- Check for level and proper grading to direct drainage away from buildings.
4. Reinforcement Placement
- Lay steel rebar or welded wire mesh inside the forms as specified to increase strength and resist cracking.
- Position supports to keep reinforcement at the correct height within the slab or wall.
5. Pouring the Concrete
- Mix concrete to the desired specification (strength, workability, color).
- Pour concrete continuously into the forms; avoid cold joints for best performance.
- Work quickly but carefully, consolidating the mix with a hoe or rake to eliminate air pockets and ensure even fill.
- For walls, pour in stages if necessary, always maintaining a wet edge for structural integration.
6. Screeding, Leveling, and Finishing
- Strike off excess material with a screed board to achieve a flat surface.
- Float the surface for smoothness, using minimal passes to prevent excessive water rise (bleed water weakens the slab).
- After bleed water dissipates and the concrete is ‘thumbprint hard,’ apply the desired surface finish—broom, trowel, stamped, or exposed aggregate.
- Imprint decorative patterns or expansion joints as specified for aesthetics and crack control.
7. Curing
- Keep the concrete moist and protected for at least 3–7 days to ensure slow, even curing—critical for maximum strength and durability.
- Use curing blankets, plastic sheeting, or commercial curing compounds depending on weather conditions and project scale.
8. Form Removal and Final Touches
- After curing, carefully dismantle forms without damaging the new edges.
- Seal the surface with an acrylic or penetrating concrete sealer for added stain and weather protection.
- Backfill thin borders, edge treatments, or abutments as needed.
- Inspect for surface defects and perform touch-ups or correct minor imperfections.
Why Choose Poured-In-Place Concrete?
Concrete is one of the world’s oldest and most reliable building materials, renowned for its combination of practicality and design potential. Here’s why poured-in-place concrete is a standout choice for hardscaping:
| Advantage | Description |
|---|---|
| Custom Shapes | Forms can be made to fit any space, curve, elevation, or unique site feature. |
| Durability | With proper installation and maintenance, concrete lasts decades and resists weather, heavy traffic, and wear. |
| Low Maintenance | Regular cleaning and resealing every few years usually suffice. |
| Design Flexibility | Supports a variety of finishes, textures, and integrated color pigments, stains, or decorative aggregate. |
Potential Limitations
Despite its many strengths, poured-in-place concrete may not be the best fit for every project. Consider these drawbacks:
- Not DIY-Friendly: Professional skills and specialized tools are required; mistakes can be permanent and costly to repair.
- Expansion and Contraction: Without proper control joints, temperature shifts can lead to unsightly cracking.
- Heavyweight: Installing on unstable soils or near tree roots requires expert base preparation to prevent heaving or settling.
- Cost: Initial investment is often higher than alternatives, though it pays off in lifespan and reduced replacement.
Frequently Asked Questions (FAQs)
How is poured-in-place concrete different from precast concrete?
Poured-in-place concrete is mixed, reinforced, and cured directly at your site, allowing for total customization and integration with existing features. Precast concrete is factory-made, transported in sections, and generally limits flexibility to standard shapes and sizes.
Is poured concrete suitable for sloped or uneven ground?
Yes, one of its major benefits is the ability to adapt forms to sloped or contoured sites. Adequate base preparation and stepped formwork ensure stability and proper drainage, even on challenging terrain.
Can I pour concrete myself, or should I hire a pro?
While small slabs or borders can sometimes be handled by advanced DIYers, most poured-in-place projects require an experienced contractor. Incorrect setup, reinforcement, or pouring can lead to costly structural failures, drainage issues, or surface blemishes that are difficult to undo.
How do you prevent water problems with concrete walls?
Install weep holes or dedicated drainage behind retaining walls to allow water to escape. Proper waterproofing and grading are essential to minimize hydrostatic pressure and avoid cracks or bulging.
Does poured concrete need special maintenance?
Yes. Sweep regularly to remove debris, pressure-wash as needed, and reseal every 2–3 years to guard against stains, freeze-thaw cycles, and UV exposure. Address any cracks or chips immediately with compatible patch materials.
How long does poured-in-place concrete last?
High-quality, well-cured concrete installed on a stable base should perform for 30 to 50 years or more with basic care. Periodic maintenance is key to maximizing lifespan.
Tips for a Successful Project
- Start with a solid plan: Every successful project begins with detailed drawings, accurate measurements, and a realistic timeline.
- Choose the right contractor: Verify experience, references, and proper licensing before work begins.
- Don’t cut corners on base prep: Invest time in subgrade and base material compaction to prevent future settling and drainage issues.
- Double-check the forms: The forms define the final shape—ensure crisp lines and stable placement.
- Stay ahead of the weather: Schedule pours during dry, temperate conditions and avoid rain, extreme cold, or intense heat during curing.
Sealing and Surface Treatments
Choosing the right finish and surface treatment can enhance both the performance and appearance of poured concrete:
- Broom finish: Provides traction for walkways and prevents slipping.
- Stamped or patterned concrete: Mimics the look of stone, brick, or tile for a decorative effect.
- Polar aggregate: Exposes decorative gravel or colored stone for texture and interest.
- Colored pigments and stains: Customize your concrete’s hue to complement the surroundings.
- Sealers: Protects the surface from stains, weather, and fading.
Is Poured-In-Place Concrete Right for Your Hardscape?
Consider the intended use, expected traffic, environmental conditions, and design intent. When installed by professionals, poured concrete delivers a custom, long-lasting solution that elevates any landscape.
Conclusion
Poured-in-place concrete stands as a gold standard in hardscaping, delivering exceptional strength, adaptability, and design possibilities—provided it’s handled with professional expertise. With proper planning, site prep, and ongoing maintenance, it forms the backbone of lasting, beautiful outdoor spaces that weather the elements for generations.
References
- https://www.concretenetwork.com/install-concrete.html
- https://www.gardenista.com/posts/hardscaping-101-poured-in-place-concrete/
- https://barrowmixconcrete.com/pouring-concrete-over-soil-a-comprehensive-guide-for-diy-success/
- https://www.quikrete.com/athome/pouredborders.asp
- https://www.sakrete.com/project-guide/pouring-a-concrete-slab/
Read full bio of Sneha Tete


