How To Grow Paperwhites Indoors: Ultimate Winter Bloom Guide
Brighten chilly months with fragrant, easy-to-care bulbs that light up your space.
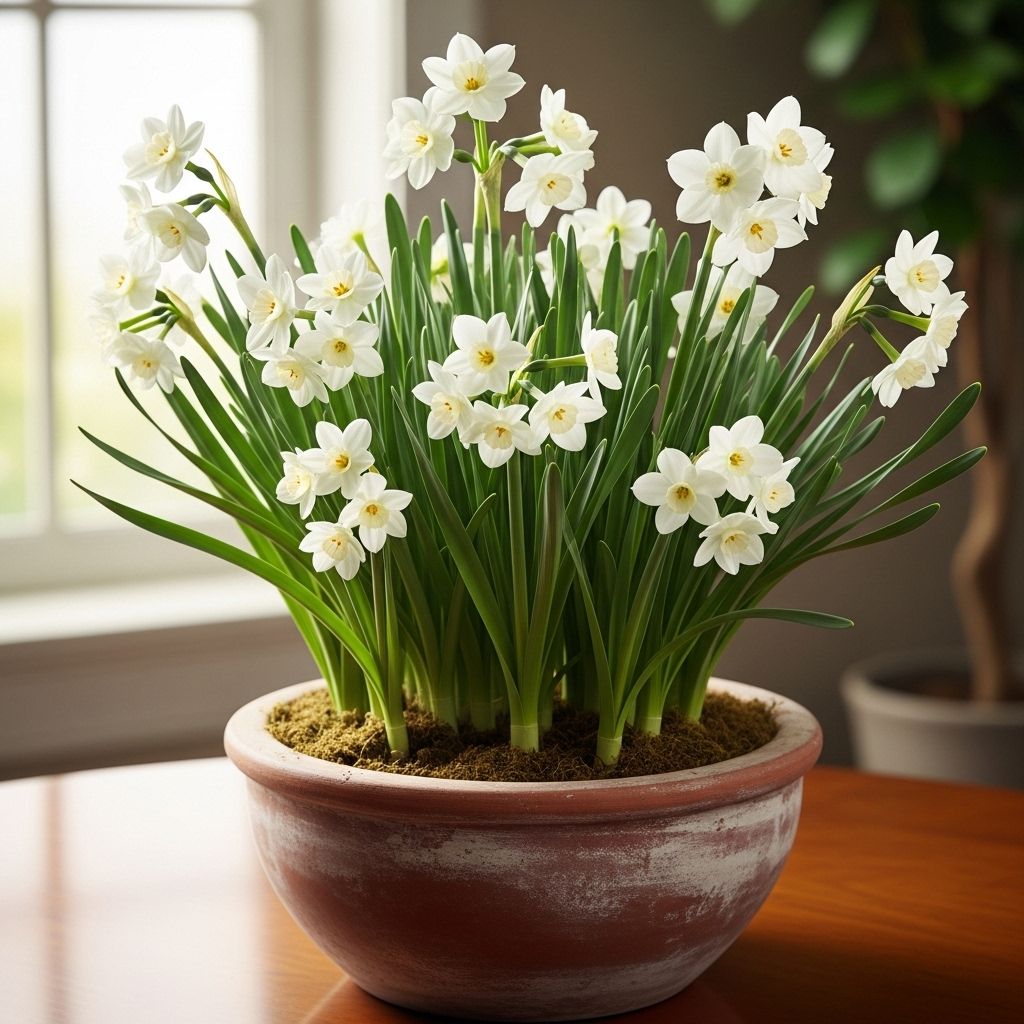
Image: HearthJunction Design Team
Growing Paperwhites: A Complete Guide to Indoor Winter Blooms
Paperwhites (Narcissus papyraceus) are popular indoor flowering bulbs that bring elegance and fragrance to homes during winter months. Unlike many spring-blooming bulbs that require a cold period, paperwhites bloom naturally in winter and can be easily forced indoors with minimal effort. Their star-shaped white blooms and sweet, sometimes powerful fragrance make them perfect for holiday decorating or brightening winter days.
These beloved members of the daffodil family offer a rewarding gardening project when outdoor growing has slowed. With proper care, you can enjoy these beautiful blooms 4-6 weeks after planting, creating a living display that evolves daily as stems grow taller and buds unfurl into delicate white flowers.
What Are Paperwhites?
Paperwhites are a type of narcissus native to the Mediterranean region. They produce clusters of small, fragrant, star-shaped white flowers on stems that typically grow 12-18 inches tall. Unlike their daffodil cousins, paperwhites don’t require a cold period (or “chilling hours”) to bloom, making them exceptionally easy to force indoors.
The bulbs are typically available from early fall through winter in garden centers, florist shops, and online retailers. For best results, select large, firm bulbs without soft spots, discoloration, or mold. Premium-sized bulbs generally produce more flower stems and create a more impressive display.
Planting Options for Paperwhites
Growing in Water
One of the most appealing aspects of paperwhites is that they can be grown without soil. This soilless method creates clean, elegant displays and allows you to watch the entire growing process, from root development to flowering.
To grow paperwhites in water:
- Choose a container at least 3-4 inches deep without drainage holes
- Add 1-2 inches of decorative stones, marbles, sea glass, or pebbles
- Place bulbs on the stone layer with pointed ends facing up
- Add more stones around the bulbs for stability, leaving the top third of the bulbs exposed
- Add water until it just reaches the base of the bulbs (but doesn’t cover them)
- Maintain this water level throughout the growing period
The key to success with water-grown paperwhites is ensuring the water level touches only the base of the bulbs. If bulbs sit in water, they may rot. Check water levels every few days and replenish as needed.
Growing in Soil
While growing in water is popular, paperwhites can also thrive in soil, which provides more stability for taller stems and may result in slightly longer-lasting blooms.
For soil planting:
- Select containers with drainage holes
- Fill pots about halfway with quality potting mix
- Place bulbs with pointed ends up, spacing them closely (almost touching)
- Add more soil, leaving the top quarter of each bulb exposed
- Water thoroughly and allow excess water to drain
Whether growing in soil or water, plant bulbs densely for the most dramatic display. Five to eight bulbs make an impressive showing in a 6-inch container, while three bulbs work well in smaller vessels.
Care and Maintenance
Light Requirements
After planting, place your paperwhite containers in a cool location (60-65°F) with bright, indirect light. Once shoots appear (typically within a week), move the containers to a sunny window. Rotate containers every few days to prevent stems from leaning toward the light source.
If paperwhites are growing in a warmer room (above 70°F), growth will be accelerated, potentially resulting in taller, floppier stems and a shorter blooming period. Cooler temperatures help maintain stronger stems and extend the flowering display.
Watering Needs
For water-grown paperwhites, maintain water levels so the liquid touches only the bottom of the bulbs. For soil-grown paperwhites, water when the top inch of soil feels dry. Be careful not to overwater, as this can lead to bulb rot. Proper drainage is essential for soil plantings.
Supporting Tall Stems
Paperwhite stems can grow quite tall and may become top-heavy once in bloom. To prevent toppling:
- Use decorative stakes and garden twine to create a supportive framework
- Place containers near walls or other structures that can provide support
- Group multiple containers together to allow stems to support each other
- Consider the “pickling” method (described below) to control stem height
The Alcohol Trick for Shorter Stems
Research from Cornell University’s Flower Bulb Research Program discovered that watering paperwhites with a dilute alcohol solution can reduce stem height by 30-50% without affecting bloom size or quality. This technique, sometimes called “pickling your paperwhites,” helps prevent the floppy stems that often plague indoor-grown paperwhites.
To implement this method:
- Allow bulbs to root and grow shoots about 1-2 inches tall using plain water
- Drain and replace with a solution of 1 part hard alcohol (vodka, gin, whiskey, rum) to 7 parts water
- Alternatively, use 1 part isopropyl alcohol to 10-11 parts water
- Continue to use this solution for all subsequent waterings
This technique works because alcohol limits water uptake, reducing stem elongation without affecting flower development. Do not use beer or wine, as their sugars can damage plants.
Timeline and Flowering
Understanding the growth timeline helps in planning your paperwhite displays:
- Days 1-3: Roots begin developing at the base of bulbs
- Days 5-7: Green shoots appear and begin growing upward
- Weeks 2-3: Stems elongate rapidly; flower buds form
- Weeks 4-6: Flowers open and bloom
- Weeks 6-8: Blooming period (lasts 1-2 weeks in warmer rooms, up to 4 weeks in cooler conditions)
For continuous paperwhite displays throughout winter, plant new batches every 2-3 weeks from November through February.
Creative Display Ideas
Paperwhites offer endless decorative possibilities for winter and holiday decorating:
Container Options
Almost any watertight container can showcase paperwhites, including:
- Glass hurricane vases or cylinders
- Vintage teacups (for single bulbs)
- Ceramic bowls or pottery
- Decorative bundt pans
- Small terrariums
- Antique silver or copper vessels
Decorative Touches
Enhance your paperwhite displays with these creative elements:
- Use colored glass beads, polished stones, or sea glass as growing medium
- Add small seasonal ornaments, pinecones, or dried berries among the stems
- Wrap containers with ribbon, twine, or decorative paper
- Nestle containers in wreaths or garlands for centerpiece displays
- Combine with other indoor plants like ivy or rosemary for mixed arrangements
Cutting and Arranging Paperwhites
While paperwhites make stunning potted displays, they also excel as cut flowers. For longest vase life, cut stems when individual flowers are just beginning to open. Like other narcissus varieties, paperwhites exude a sap that can be harmful to other flowers, so arrange them separately or give them their own vase.
When cutting for arrangements:
- Use sharp, clean scissors or pruning shears
- Cut stems at an angle to maximize water uptake
- Place immediately in clean water
- Change vase water every 2-3 days
- Keep arrangements away from ripening fruit, which releases ethylene gas that can shorten bloom life
After Blooming: What’s Next?
Unlike many spring bulbs, paperwhites forced indoors typically don’t have enough energy to bloom again. The forcing process depletes their reserves, and they rarely perform well in subsequent years. Most gardeners treat them as one-time displays and discard the bulbs after flowering.
If you live in mild-winter regions (USDA zones 8-11), you can try planting spent bulbs outdoors where they might eventually recover and bloom again. In colder zones, consider composting spent bulbs rather than attempting to save them.
Troubleshooting Common Issues
Yellowing Leaves
Yellowing foliage before flowering may indicate overwatering or bulb rot. Ensure proper drainage and avoid keeping bulbs too wet.
Leggy, Floppy Growth
Excessive stem elongation typically results from insufficient light or too-warm growing conditions. Provide bright light and cooler temperatures, or try the alcohol solution method described above.
Buds That Don’t Open
Flower buds that fail to open may indicate dry conditions, extreme temperature fluctuations, or bulbs that were damaged before planting. Maintain consistent moisture and growing conditions.
Offensive Odor
Some people find the fragrance of paperwhites overwhelming or unpleasant. If the scent is too strong, place containers in well-ventilated areas or rooms you don’t use constantly, such as entryways or guest rooms.
Frequently Asked Questions
Q: Can paperwhites be grown outdoors?
A: Yes, paperwhites can be grown outdoors in USDA hardiness zones 8-11. In these mild-winter regions, plant bulbs in fall for winter or early spring blooms.
Q: How many bulbs should I plant in one container?
A: For the most impressive display, plant bulbs closely together. A 6-inch container can accommodate 5-8 bulbs, while smaller containers might hold 3-5 bulbs.
Q: Why are my paperwhite stems falling over?
A: Paperwhites grown indoors often develop tall, weak stems, especially in warm rooms. Use the alcohol solution method to limit stem height, or provide support with decorative stakes.
Q: Can I reuse paperwhite bulbs after they’ve bloomed indoors?
A: Unlike some other bulbs, paperwhites forced indoors rarely have enough energy to bloom well again. In warm climates (zones 8-11), you can try planting them outdoors after blooming.
Q: How can I extend the blooming period of my paperwhites?
A: Keep blooming paperwhites in a cool location (60-65°F) away from heat sources. In these conditions, flowers may last up to three or four weeks.
Growing paperwhites indoors offers a rewarding way to enjoy beautiful, fragrant flowers during winter months. With minimal effort and materials, you can create elegant displays that evolve daily and bring a touch of nature’s beauty indoors when gardens outside lie dormant. Whether given as gifts or grown for personal enjoyment, these versatile bulbs deliver weeks of pleasure from planting through flowering, making them a cherished winter gardening tradition.
References
- https://twosistersflowerfarm.com/how-to-grow-paperwhites/
- https://www.bhg.com/gardening/flowers/bulbs/how-to-grow-paperwhites/
- https://www.southernliving.com/garden/guide-to-paperwhites-forcing-bulbs-planting-and-tips
- https://www.youtube.com/watch?v=Uigfnb8Lj3M
- https://garden.org/ideas/view/orchidgal/2121/Forcing-Perfect-Paperwhites/
Read full bio of Anjali Sayee


