11 Expert Tips for Growing Ranunculus Flowers in Pots
Proper soil mix, timing, and care unlock vibrant, long-lasting container blooms.
11 Tips for Growing Beautiful Ranunculus in Pots
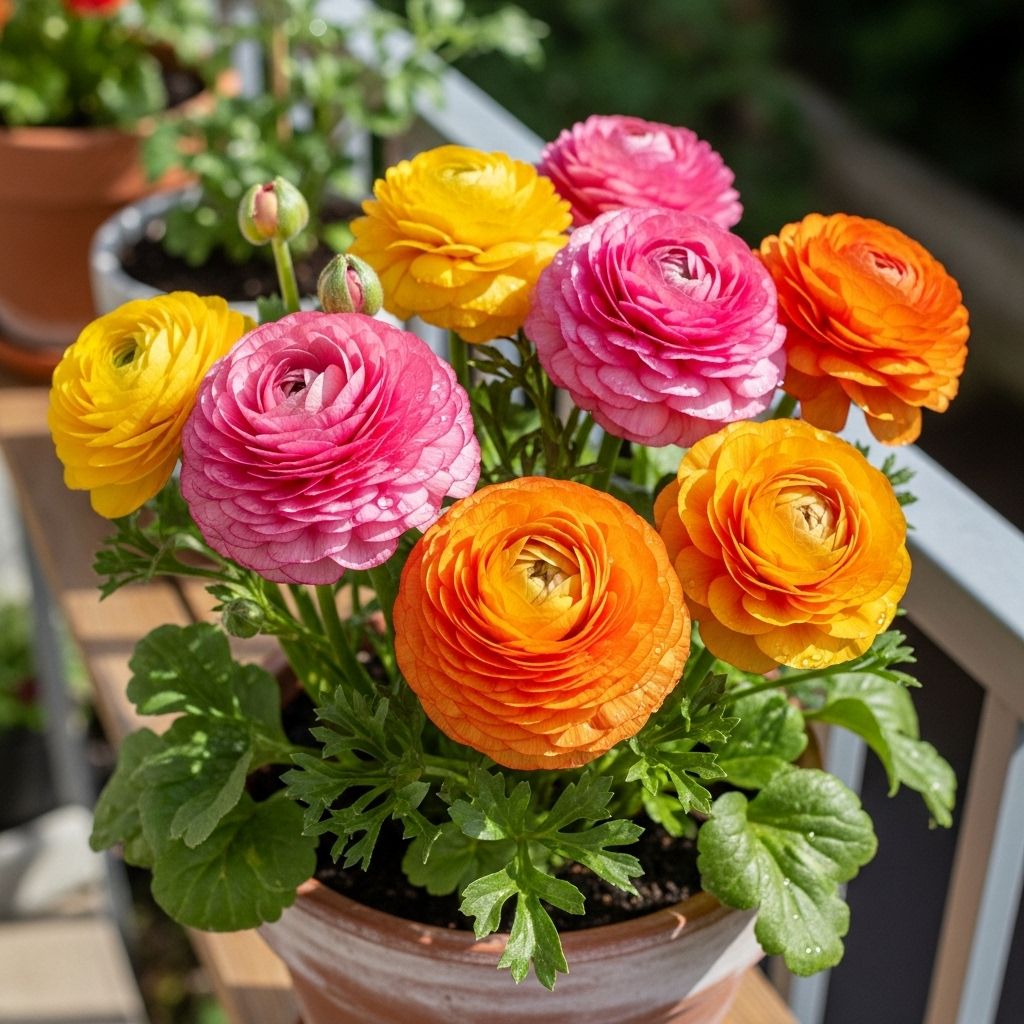
Ranunculus, cherished members of the buttercup family, stand out for their strikingly colorful layers and slender stems that make them favorites in both gardens and bouquets. Growing ranunculus in pots allows gardeners with any size space to enjoy these spectacular blooms. If you want to harness long-lasting flowers and healthy plants, follow these expert tips tailored specifically for container gardening.
Table of Contents
- Ranunculus Basics
- Choose the Right Pot
- Selecting Quality Soil
- Planting Corms Step-by-Step
- Watering & Drainage Needs
- Lighting & Temperature
- Fertilizing for Optimal Growth
- Extending the Bloom Season
- Managing Dormancy & Summer Care
- Common Pests and Problems
- Frequently Asked Questions
Ranunculus Basics
Ranunculus (Ranunculus asiaticus) are tender perennial plants noted for their luscious, multi-layered blooms in spring. Typically grown from corms (often referred to as bulbs or tubers), they provide a prolific display of colors ranging from white and yellow to pink, red, and orange. While known for their sensitivity to both cold and heat, ranunculus thrive in mild, temperate conditions, making container cultivation ideal for providing tailored care.
- Prefer cool conditions: Bloom in spring; stop when above 70°F (21°C).
- Finest for cut flowers due to lengthy stems and lasting blossoms.
- Excellent choice for patios, balconies, or as a featured indoor display.
Choose the Right Pot
Container selection plays a vital role in your ranunculus’s health. Since these plants have relatively shallow root systems, pot width is more important than depth.
| Pot Diameter | Corms per Pot |
|---|---|
| 8 inches | 1 corm |
| 12 inches | 2 corms |
| 18 inches | 3 corms |
- Drainage holes are essential to prevent root rot. Waterlogged root systems quickly succumb to fungus.
- Terracotta pots work exceptionally well: They wick excess moisture and help regulate soil humidity, reducing risk of fungal diseases.
- Avoid very deep pots; opt for a broader planter if you wish to plant lush clusters.
Selecting Quality Soil
For best results, chose a nutrient-rich, well-draining potting mix. Ranunculus are susceptible to root rot if left in soggy soil, so focus on a light, airy blend. Here’s a proven recipe:
- Mix 2/3 quality potting soil with 1/3 perlite or coarse sand to optimize drainage.
- Amend soil with compost or decomposed leaf mold to provide gentle nutrients for the developing corms.
- Avoid heavy garden soils; compacted mixtures prevent proper root growth.
Terracotta’s natural porosity pairs perfectly with this mix to further help excess water escape.
Planting Corms Step-by-Step
Ranunculus corms resemble little, dry claws. Planting at the right time and using correct technique ensures robust blooms.
- Pre-soak corms: Place dry corms in lukewarm water for 3–4 hours before planting. This wakes them from dormancy and speeds up sprouting.
- Pre-sprouting (optional): For even faster growth, wrap soaked corms in damp paper towels, place in a plastic bag, and set in a cool location for 3–5 days. Plant once you see tiny roots emerging.
- Plant in late fall or very early spring: In mild-winter climates, you can start outdoors in late fall. In colder regions, pre-sprout and set out when fear of frost passes.
- Planting depth: Place corms 2 inches (5 cm) deep, claws pointing downward.
- Spacing: Space corms 4–6 inches apart in large pots; maintain the recommended corms-per-pot ratio as above.
Gently cover with soil, water lightly, and set the pot in a bright, sheltered spot.
Watering & Drainage Needs
Ranunculus dislike wet feet but do require steady moisture during growth and bloom. Here’s what works:
- After initial planting, avoid overwatering—just keep soil lightly moist until shoots appear.
- When stems and leaves are growing rapidly, water when the top inch feels dry. Drain excess water promptly.
- Mulch surface lightly after sprouts emerge to help control moisture and temperature.
- Stop watering completely when leaves yellow and plants enter dormancy; water at this time can rot corms.
Lighting & Temperature
Lighting and temperature are crucial for encouraging abundant ranunculus flowers. Here’s what to aim for:
- Provide full sun for at least 6 hours daily. Ranunculus prefer bright locations with morning sun and light afternoon shade in regions with hot springs.
- Ideal daytime temperature: 50–65°F (10–18°C). Plants will flourish during these mild, cool conditions.
- Heat sensitivity: Once days regularly exceed 70°F (21°C), ranunculus stop blooming and leaves begin to yellow as they prepare for summer dormancy.
- If growing indoors or in a greenhouse, aim for regular light and moderate ventilation; avoid hot, stagnant conditions.
Fertilizing for Optimal Growth
Ranunculus respond well to gentle feeding in containers. Fertilizer supports root and stem development, ensuring plenty of blooms.
- Incorporate a slow-release organic fertilizer at planting time, such as bone meal or bulb food.
- Once shoots are visible, feed every 3–4 weeks with a dilute balanced liquid fertilizer, focusing on bloom-friendly formulas (higher phosphorus).
- Stop fertilizing once plants show signs of yellowing leaves and approach dormancy.
Be wary of over-fertilizing, which can result in lush leaves but reduced flowering.
Extending the Bloom Season
Strategic planting and care extend the ranunculus blooming period and maximize flower production.
- Stagger planting dates: Start some corms early (indoors or in protected spots), then add more outside just as frost ends.
- Pre-sprout for faster blooms: Early started corms yield flowers several weeks before direct-planted corms.
- Cool microclimates: Move pots to cooler spots when temperatures rise to extend blooming.
- Deadhead promptly: Removing spent blooms redirects energy into new flower production.
With ideal conditions and management, ranunculus may bloom for 6–8 weeks, far longer than their field-grown counterparts.
Managing Dormancy & Summer Care
As spring transitions into summer, ranunculus naturally go dormant. Proper transition care saves corms and sets the stage for next year’s growth.
- Cease watering once foliage browns and yellows; excess water at this stage may cause rot.
- Let corms dry in soil for a week, then dig out gently. Shake off excess dirt and inspect for damage or pathogens.
- Store healthy, dry corms in a well-ventilated, cool, dry place until fall.
- Every few years, divide tubers to increase plant stock and vigor. Larger clumps give more blooms.
Common Pests and Problems
Ranunculus are generally robust but have some vulnerabilities in pots. Watch for:
- Root rot: Almost always linked to poor drainage—avoid waterlogged soil and containers.
- Aphids and thrips: These tiny insects can mar blooms. Treat with insecticidal soap or remove by hand.
- Powdery mildew: More likely in damp, crowded containers. Ensure ventilation and avoid wetting leaves unnecessarily.
- Wilting after purchase: Ranunculus can wilt if moved suddenly to full sun or not acclimated after nursery conditions; gradually transition plants.
Frequently Asked Questions (FAQs)
Q: When should I plant ranunculus in pots?
A: In mild climates, plant outdoors in late fall so corms grow over winter. In cold climates, plant as soon as frost danger passes in spring, or start indoors for earlier blooms.
Q: How do I store ranunculus corms after blooming?
A: Allow foliage to yellow and dry, stop watering, dig up corms, and store in a cool, dry, ventilated place through summer.
Q: Can ranunculus bloom indoors?
A: Yes, provided they are grown in bright sunlight and cool conditions. High temperatures or low light will dramatically reduce flowering.
Q: My ranunculus wilted after transplanting; what went wrong?
A: Wilting can result from transplant shock, sun exposure changes, or overwatering. Acclimate plants slowly and maintain proper drainage.
Creative Container Arrangements
Ranunculus combine beautifully with other spring-blooming bulbs for mixed-pot displays.
- Mix with anemones, tulips, or pansies for layered color.
- Use shallow bowls or broad planters for stunning floral carpets.
- Choose pots with contrasting colors to highlight ranunculus tones.
Key Takeaways for Ranunculus in Pots
- Select wide, well-drained containers—one corm per 8 inches is ideal.
- Use light, compost-enriched soil for best bloom performance.
- Maintain regular, moderate watering during active growth, then cease entirely at dormancy.
- Fertilize lightly and deadhead flowers to keep plants blooming longer.
- Monitor for pests and address quickly to maintain healthy container gardens.
With these strategies, you can enjoy vibrant ranunculus blooms in containers year after year—whether you’re gardening in a sunny window or a sweeping backyard patio.
References
Read full bio of Srija Burman


