Phalaenopsis Orchid Care: Comprehensive Blooming Guide
Master the art of orchid care to enjoy stunning, long-lasting Phalaenopsis blooms year after year

Image: HearthJunction Design Team
Understanding Your Phalaenopsis Orchid
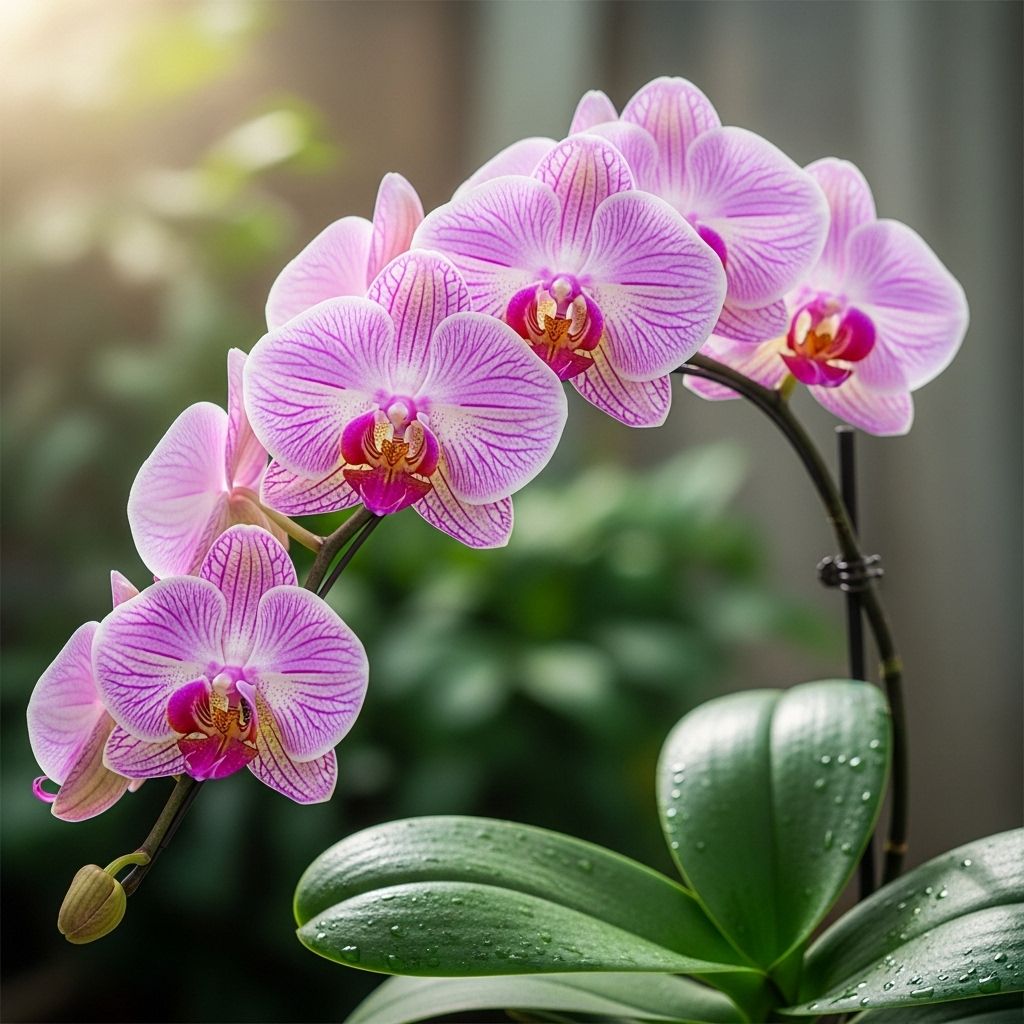
Phalaenopsis orchids, commonly known as moth orchids, are among the most popular houseplants due to their stunning, long-lasting blooms and relatively simple care requirements. These elegant plants can flower for months at a time, bringing a touch of tropical beauty to any indoor space. Native to tropical regions of Southeast Asia, Phalaenopsis orchids grow naturally as epiphytes, clinging to trees rather than growing in soil, which explains their unique care requirements.
With proper attention to their specific needs, these resilient plants can reward you with magnificent blooms year after year. Understanding the natural growth cycle of Phalaenopsis orchids is essential for encouraging them to flower again after their initial bloom has faded. Unlike many flowering houseplants, Phalaenopsis orchids don’t follow a strict seasonal schedule but instead respond to environmental cues that signal the right time to produce a bloom spike.
The Natural Blooming Cycle
Phalaenopsis orchids typically follow a predictable growth pattern when properly maintained. Each year, a healthy Phalaenopsis will grow one or two new leaves during its active growth phase, which usually occurs after flowering. Once the growth phase is complete, typically in the fall, the plant may initiate a bloom spike that emerges from the stem beneath the second or third leaf from the top.
In their natural habitat, Phalaenopsis orchids bloom in response to seasonal temperature changes, particularly cooler nighttime temperatures. This environmental trigger signals to the plant that it’s time to produce flowers. When kept in consistently warm indoor environments, Phalaenopsis may need some help recognizing these seasonal shifts.
The blooming cycle of a Phalaenopsis typically follows this pattern:
- Active growth phase (spring/summer) – producing new leaves and roots
- Bloom spike initiation (fall) – responding to temperature drops
- Flowering period (winter through spring) – blooms lasting 2-3 months
- Post-bloom rest and recovery – before beginning the cycle again
Creating the Perfect Environment for Blooming
Light Requirements
Phalaenopsis orchids thrive in bright, indirect light. Contrary to popular belief, these orchids can tolerate relatively low light conditions compared to other orchid varieties, which contributes to their success as houseplants. However, insufficient light is one of the most common reasons that a Phalaenopsis fails to rebloom.
The ideal location for your Phalaenopsis is near an east or north-facing window, where it will receive gentle morning sun and bright, indirect light throughout the day. A west-facing window can also work well if the intense afternoon sun is filtered through a sheer curtain. South-facing windows may provide too much direct sunlight, which can scorch the leaves and damage the plant.
If you notice your orchid’s leaves turning dark green, it likely indicates the plant isn’t receiving enough light to promote blooming. Conversely, reddish-tinged leaves suggest too much direct sunlight. The perfect balance produces bright green leaves with healthy yellow undertones.
Temperature Control
Temperature plays a crucial role in triggering the blooming cycle of Phalaenopsis orchids. These plants generally prefer daytime temperatures between 75°F and 85°F (24-29°C) and nighttime temperatures between 65°F and 75°F (18-24°C) during their growth phase. However, to initiate bloom spikes, they benefit from a period of cooler nighttime temperatures.
The key to encouraging your Phalaenopsis to bloom is providing a temperature differential between day and night. In the fall, allowing the plant to experience several nights with temperatures in the low 60s°F (around 15-16°C) can help trigger the development of a flower spike. This cooler period mimics the natural conditions that signal the plant to begin its flowering cycle.
Many orchid enthusiasts place their Phalaenopsis near a window during fall nights when temperatures drop, or even on a protected porch if outdoor temperatures are appropriate. This temperature drop is often the missing element that prevents indoor orchids from reblooming.
Humidity and Air Circulation
Phalaenopsis orchids appreciate humidity levels between 40% and 70%, which can be challenging to maintain in many homes, especially during winter when heating systems can dry the air. While these orchids are more tolerant of average home humidity than many other orchid varieties, providing additional humidity can enhance their overall health and blooming potential.
Several methods to increase humidity around your orchid include:
- Using a humidity tray (a shallow tray filled with pebbles and water)
- Grouping plants together to create a more humid microclimate
- Running a humidifier near your orchid collection
- Placing orchids in naturally humid areas of the home, such as kitchens or bathrooms (provided adequate light is available)
Equally important is ensuring good air circulation around your Phalaenopsis. Stagnant air can promote fungal and bacterial problems. A gentle fan or natural air movement from an open window (when temperatures permit) can help prevent these issues while strengthening the plant’s stems and overall structure.
Watering Practices That Promote Blooming
Proper watering is critical for the health and blooming success of Phalaenopsis orchids. These plants require a delicate balance – they need consistent moisture but can quickly succumb to rot if kept too wet. Their epiphytic nature means their roots are adapted to regular wetting followed by periods of drying.
The ideal watering routine involves thoroughly soaking the orchid medium until water runs freely from the drainage holes, then allowing it to dry substantially before watering again. For most home environments, this translates to watering every 7-10 days, though this can vary based on pot size, type of growing medium, humidity, and temperature.
Several methods can be used to determine when your Phalaenopsis needs water:
- Check the exposed roots – silvery-white roots indicate the plant needs water, while green roots suggest adequate hydration
- Insert a wooden skewer into the growing medium – if it comes out dry, it’s time to water
- Assess the weight of the pot – a lightweight pot indicates dry medium
- Look at the moss or bark medium – if it appears dry and light in color, watering is needed
Watering should be adjusted during different phases of the orchid’s growth cycle. During active growth, more frequent watering supports the development of new leaves and roots. As flowering begins, maintain consistent moisture but avoid overwatering, which can cause buds to blast (fail to open) or flowers to drop prematurely.
Fertilization Strategies for Maximum Blooms
Proper nutrition plays a significant role in a Phalaenopsis orchid’s ability to produce robust bloom spikes with numerous flowers. Since orchid growing media contain few nutrients, regular fertilization is necessary to support healthy growth and flowering.
For optimal results, use a balanced fertilizer formulated specifically for orchids. Many growers follow the “weekly, weakly” approach, applying fertilizer at one-quarter to one-half the recommended strength every week when watering. This provides a consistent supply of nutrients without risking fertilizer burn.
During the active growing season (spring through summer), a balanced fertilizer with equal amounts of nitrogen, phosphorus, and potassium (such as 20-20-20) supports overall plant health. As fall approaches and you’re encouraging bloom spike development, switching to a formula with higher phosphorus (such as 10-30-20) can promote better flowering.
It’s important to flush the growing medium with plain water monthly to prevent salt buildup from fertilizers, which can damage roots and inhibit blooming. Simply water thoroughly with plain water, allowing it to run through the pot for several minutes before resuming your regular fertilization schedule.
Post-Bloom Care: Setting the Stage for Reblooming
How you care for your Phalaenopsis after its flowers have faded significantly impacts its ability to bloom again. When the last flower drops, you have several options for the flower spike (or stem):
- Cut the spike just above the node where the first flower appeared – this may produce a secondary flower spike within a few months
- Cut the spike about an inch from its base – encouraging the plant to focus energy on vegetative growth before producing a completely new spike
- Leave the spike intact if it remains green – some spikes will continue to produce flowers over time
The decision should be based on the health of the plant and the condition of the spike. If the plant appears strong with healthy leaves and roots, leaving the spike to potentially rebloom or cutting it just above a node may work well. If the plant seems stressed or has expended considerable energy on a long blooming period, removing the entire spike allows it to recover and build strength for future blooming.
After the flowering period, focus on supporting vegetative growth by providing bright light, appropriate watering, and regular fertilization. This strengthens the plant and prepares it for its next blooming cycle. Many experienced growers use this post-bloom period to repot their Phalaenopsis if needed, as the plant will have time to establish itself before the next flowering period.
Repotting Considerations
Repotting is an important aspect of Phalaenopsis care that can significantly impact blooming. These orchids typically need repotting every 1-2 years, as the orchid bark or moss medium breaks down over time, becoming compacted and less hospitable to the roots. The best time to repot is just after flowering, when new growth begins.
Signs that your Phalaenopsis needs repotting include:
- Roots growing extensively outside the pot
- Decomposed or soggy potting medium
- The plant pushing itself up and out of the container
- Poor drainage or water retention
When repotting, choose a container only slightly larger than the previous one, as Phalaenopsis orchids bloom better when slightly root-bound. Use fresh orchid-specific potting medium, either bark-based or sphagnum moss, depending on your watering habits and home environment.
Troubleshooting Common Blooming Problems
Even with proper care, Phalaenopsis orchids sometimes encounter issues that prevent or affect blooming. Understanding these common problems can help you address them quickly and get your orchid back on track to produce beautiful flowers.
Failure to Produce Bloom Spikes
If your Phalaenopsis isn’t producing bloom spikes, consider these common causes:
- Insufficient light – move to a brighter location with indirect light
- Lack of temperature differential – provide cooler nights in fall
- Nutritional deficiencies – establish regular fertilizing routine
- Plant too young or small – some plants need time to mature before blooming
Bud Blast (Buds Dropping Before Opening)
When flower buds form but drop before opening, possible causes include:
- Dramatic temperature fluctuations
- Exposure to ethylene gas (from ripening fruit)
- Insufficient humidity
- Inconsistent watering
- Pest infestations
Premature Flower Drop
If flowers fall off sooner than expected, consider:
- Natural end of bloom cycle
- Environmental stress (temperature changes, drafts)
- Changes in light conditions
- Water quality issues
Seasonal Adjustments for Year-Round Care
Adjusting your Phalaenopsis care throughout the year helps mimic their natural growing conditions and encourages reliable blooming cycles. While these orchids are less strictly seasonal than many flowering plants, they do respond to the changing conditions of different seasons.
Spring and Summer Care
During the warmer months, Phalaenopsis orchids typically enter their active growth phase. Focus on:
- Protecting from intense direct sunlight
- Increasing watering frequency as needed
- Regular fertilization to support new growth
- Monitoring for increased pest activity
- Providing adequate humidity during hot, dry weather
Fall and Winter Care
As temperatures cool, adjust your care routine to:
- Provide the crucial temperature drop to initiate blooming
- Reduce watering frequency as growth slows
- Decrease fertilizer application
- Protect from cold drafts and heating vents
- Supplement humidity in dry, heated indoor environments
Frequently Asked Questions
Q: How long do Phalaenopsis orchid blooms typically last?
A: Phalaenopsis flowers can last anywhere from 2-3 months under optimal conditions, making them one of the longest-blooming houseplants available.
Q: Should I remove the flower spike after blooming?
A: It depends on the plant’s condition. You can either cut the spike just above a node to encourage a secondary bloom, remove it entirely to focus energy on growth, or leave it intact if it remains green and healthy.
Q: How often should I expect my Phalaenopsis to bloom?
A: With proper care, many Phalaenopsis orchids can bloom once a year, typically during winter or spring. Some particularly healthy specimens may bloom twice a year or produce sequential blooms on the same spike.
Q: Why are the leaves on my orchid wrinkled even though I’m watering it?
A: Wrinkled leaves often indicate dehydration, which can occur even with regular watering if the roots are damaged or the potting medium has broken down. Check root health and consider repotting if the medium is degraded.
Q: Can I place my Phalaenopsis outdoors?
A: Phalaenopsis orchids can benefit from spending summer outdoors in a sheltered, shady location when temperatures are consistently above 60°F (15°C). This often leads to more robust growth and better blooming, but they must be brought indoors before temperatures drop below 55°F (13°C).
References
- https://www.repotme.com/pages/phalaenopsis-care
- https://extension.umd.edu/resource/care-phalaenopsis-orchids-moth-orchids
- https://www.thesill.com/blogs/plants-101/orchids
- https://www.better-gro.com/orchid-blogs/how-to-produce-almost-never-ending-blooms-on-a-phalaenopsis
- https://www.thespruce.com/phalaenopsis-orchids-definition-1902866
Read full bio of Srija Burman


