DIY Christmas Tree Topper: 6 Steps To A Foraged Star
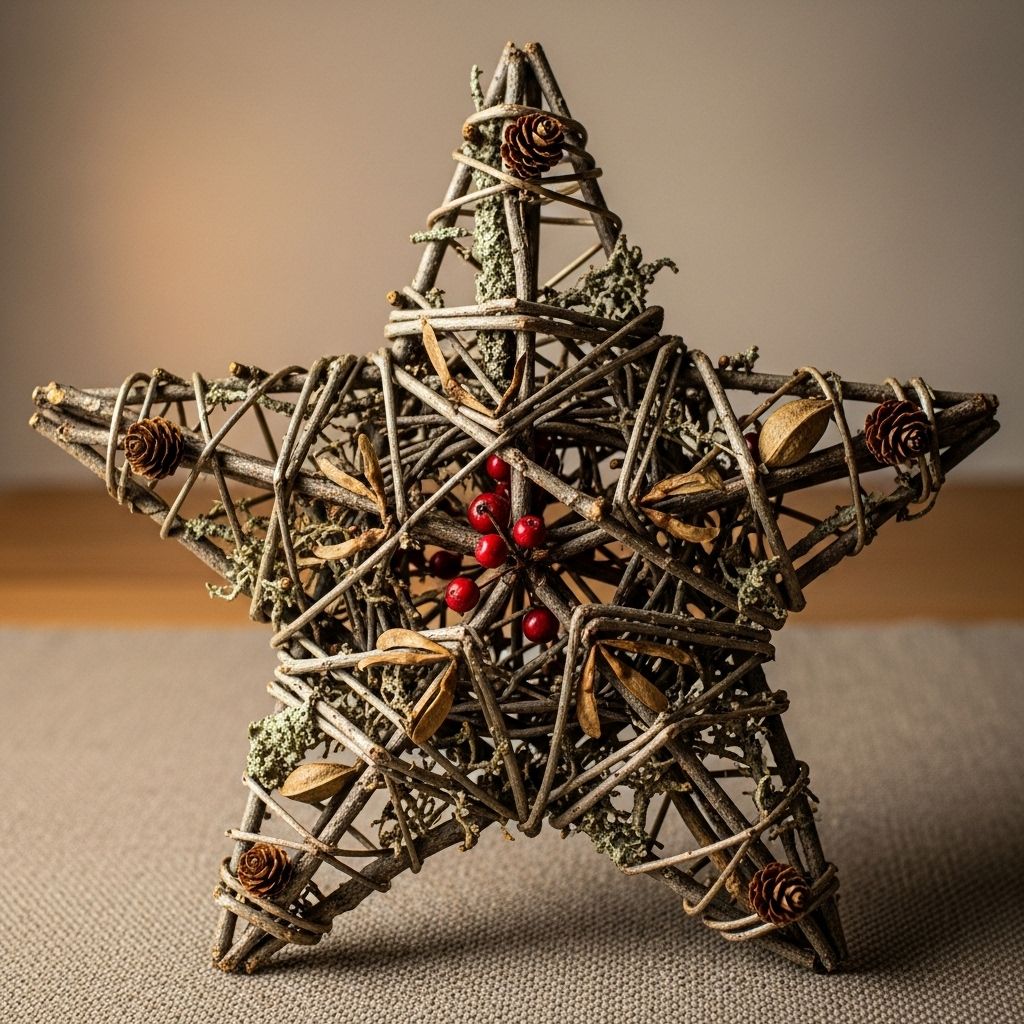
Create a simple, Scandinavian-inspired star tree topper using foraged larch boughs and natural materials.

Image: HearthJunction Design Team
A Star is Born: DIY Foraged Christmas Tree Topper
Every holiday season sparks the search for the perfect Christmas tree topper. Store-bought ornaments often feel out of place: too glittery, too heavy, overwhelmingly artificial, or simply overpriced. For those seeking simplicity with a nod to nature and Scandinavian style, creating your own star-shaped tree topper from foraged materials offers an elegant and sustainable solution. Not only does this project encourage creative expression, but it also results in a unique, meaningful piece that connects the beauty of the outdoors with cozy, indoor festivities.
Why Choose a DIY Foraged Tree Topper?
The charm of a homemade, foraged tree topper lies in its authenticity and natural allure. Scandinavians have long embraced minimalist, nature-inspired holiday decor that harmonizes with their environment. Crafting a topper from materials like larch boughs and twine embodies this tradition, blending rustic textures with understated elegance.
- Eco-Friendly: Utilizes foraged, biodegradable, or compostable materials.
- Budget-Conscious: Crafted with items sourced from nature and common household supplies.
- Customizable: Each star is unique and adjustable to fit any tree size or style.
- Satisfying Craft: Offers a hands-on, meditative break during the busy season.
Materials Needed
Before you begin, gather the following supplies:
- 6 straight larch branches (or any slender, flexible twigs)
- Natural jute or glittery metallic string
- Shears or garden clippers
- Scissors
- Optional: gold or silver spray paint, glitter
Step-by-Step Guide: Crafting the Foraged Star
1. Forage for Branches
Head outdoors to find long, slender larch branches, which are ideal for their straightness and subtle golden hue. If larch isn’t available, any pliable twig will do—aim for uniform length and thickness. Select six branches, each around 10 to 14 inches long, ensuring they are free of sap, excessive knots, or breakage.
- Larch offers golden needles that shimmer in the light, enhancing the festive flair.
- If foraging, always obtain permission and collect responsibly from fallen or trimmed branches.
2. Prepare the Twigs
Using shears, trim your branches to matching lengths. Remove any small offshoots or side twigs to achieve a clean, geometric look. Lining the twigs side-by-side can help measure and ensure consistency for a balanced star shape.
3. Lay Out the Star Shape
On a flat surface, arrange the six twigs into a classic six-pointed star (two interlocking triangles). If you prefer a five-pointed star, adjust the number of twigs accordingly and overlap the ends for a symmetrical design.
- Start by creating the first triangle, then overlay the second triangle in the opposite direction, forming a star.
- Adjust the angles until the points and intersections look even and harmonious.
4. Bind the Intersections
Cut segments of string (about 8 inches each) and tie the corners where the twigs meet. For a seamless look, wrap the twine several times around each intersection, knot securely, and trim excess string.
- Alternately, use a metallic or glitter string for added holiday sparkle.
- Ensure the structure is firm but avoid over-tightening, which may split delicate twigs.
5. Add Finishing Touches
For those who enjoy a bit of shimmer, lightly mist the finished star with gold or silver spray paint or add subtle touches of glitter to the string. However, the natural wood tones are beautiful on their own, especially when set against the green backdrop of a tree.
- A minimalist style works well for Scandinavian-inspired decor.
- Decorate further with a sprig of evergreen, a cluster of berries, or small bells if desired.
6. Attach to the Tree
To secure the star at the tree’s top, use a generous length of string. Loop it around the base of the topper and the uppermost branch, tying tightly to keep it stable and upright. For very lightweight stars, simply nestle it into the foliage.
Styling Tips: Making the Most of Your Tree Topper
- Keep it Light: Since the topper is made with thin twigs, it won’t weigh down the tree or require structural reinforcement.
- Natural Pairings: Match your topper with homemade garlands, dried citrus ornaments, and other foraged decorations for a cohesive theme.
- Minimal Ornaments: The simplicity of the star is striking on a tree with sparse, selective ornaments or even undecorated branches.
- Display Elsewhere: Use extra stars as window or wall decor, attach to wreaths, or string together for a festive garland.
Why Larch? The Scandinavian Aesthetic
Larch trees feature beautiful, golden-hued needles that shimmer in low winter light, making them ideal for natural decorations. Scandinavian holiday interiors favor muted palettes, clean lines, and simple forms—a star crafted from larch twigs reflects these ideals perfectly. Even if you don’t have access to larch, the spirit of minimalism and connection to local flora is easy to replicate with alternatives.
- Symbolism: The star represents hope, guidance, and the spirit of the season.
- Natural Beauty: The organic shape brings a touch of the forest indoors.
Frequently Asked Questions (FAQs)
Q: What if I can’t find larch boughs?
A: Any straight, slender twig will work for this project. Willow, birch, or dogwood are great alternatives. The key is finding uniform, flexible branches of similar thickness.
Q: Can I make a different shape, such as a five-pointed star?
A: Absolutely. Simply adjust the number of twigs and experiment with angles until your preferred star shape forms. The technique remains the same.
Q: Will the star last beyond one season?
A: If kept dry and stored gently, your foraged star can last for several years. Avoid exposure to moisture to prevent mold or decay.
Q: Is it safe for pets or children?
A: As with all natural decor, supervise children and pets around the topper. Small branches or glitter may pose a choking hazard if dislodged.
Q: How do I add more sparkle?
A: Wrap metallic string, add subtle glitter, or thread small bells or beads onto the twine. The design is flexible and easily personalized.
Alternative Tree Topper Ideas Using Foraged Materials
Expand your natural holiday repertoire with these creative variations:
- Mini Wreath Topper: Bend pliable twigs into a small circle and decorate with dried berries or tiny pinecones.
- Pinecone Cluster: Bundle a group of pinecones with a bright ribbon or twine and perch atop the tree.
- Herb Bundle: Tie together aromatic herbs like rosemary, sage, and thyme for a fragrant topper that fills the room with festive scents.
- Feather Accent: Incorporate found feathers with twigs and string for a light, wispy look.
- Dried Flower Star: Glue or tie dried flower heads to your twig star for soft color and texture.
Care and Storage for Foraged Decorations
Keep your hand-crafted topper looking its best year after year with these care tips:
- Store in a cool, dry place in a sturdy box to protect from crushing.
- If painted or glittered, wrap in tissue to prevent abrasion.
- Periodically check for signs of insects or decay, especially if using natural, untreated materials.
Embracing the Holiday Spirit: More Than Just a Tree Topper
Handmaking your Christmas tree topper from foraged finds isn’t just about decor—it’s about fostering a connection to nature and tradition. It offers a mindful pause in the rush of the season, an opportunity to step outside, gather, and create with intention. The finished star stands proudly atop your tree, shining not just with shimmering thread, but with the warmth of memory and the promise of tradition anew.
“With nothing more than some foraged larch boughs and glittery string, I crafted a simple, natural star that looks much more at home atop my Scandinavian tree.”
Project Recap: DIY Foraged Star Tree Topper
- Forage and trim 6 straight twigs (larch preferred, but any will do).
- Lay out two triangles to form a six-pointed star.
- Bind intersections with string or twine.
- Add optional finishing touches—paint, glitter, or berries.
- Secure to the tree using string, wire, or by nestling among branches.
DIY Tips for Natural Holiday Decor
- Work with what is locally available for a truly personal touch.
- Forage responsibly and sustainably—never strip living trees.
- Combine textures and colors for added interest (evergreen, berries, dried fruit).
- Embrace imperfections; the beauty of handmade decor lies in its individuality.
Conclusion
Decorating for the holidays doesn’t have to mean excess. With just a few foraged branches and a bit of creativity, you can craft a star tree topper that radiates natural beauty and reflects your own style. Embrace the art of simple, sustainable holiday crafting and let your tree shine with a story worth telling.
References
- https://www.gardenista.com/posts/a-star-is-born-diy-foraged-christmas-tree-topper/
- https://www.pinterest.com/pin/36451078223768047/
- https://www.thepondsfarmhouse.com/how-to-make-foraged-diy-christmas-topiaries/
- https://www.youtube.com/watch?v=p91bSfJa2ZQ
- https://sincerelycreativemom.com/how-to-make-a-christmas-tree-topper/
Read full bio of Srija Burman


