DIY Dried Fruit Garland for the Holidays: A Festive & Fragrant Decor Project
Transform fruit slices into aromatic, eco-friendly garlands that uplift seasonal decor.
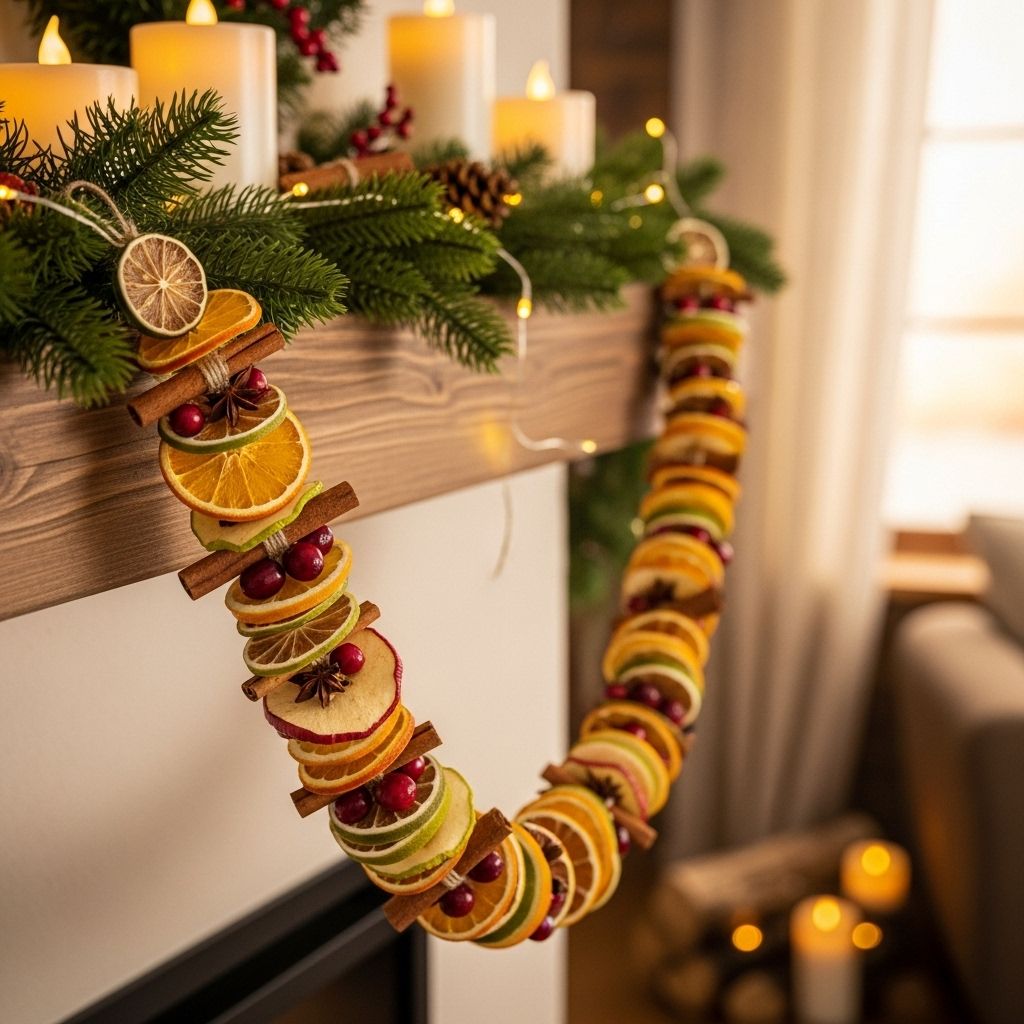
Image: HearthJunction Design Team
DIY Dried Fruit Garland for the Holidays
For anyone seeking a natural, delightfully aromatic, and elegantly simple way to decorate for the holidays, few crafts offer as much charm or versatility as the dried fruit garland. With their glowing citrus slices, rustic apple rings, and customizable accents of herbs and foliage, dried fruit garlands evoke the season’s warmth and nostalgia—without excess waste or glitter. This guide walks you through sourcing, drying, threading, and styling your own seasonal fruit garland. Get ready to fill your space with festive, all-natural beauty.
Why Choose a Dried Fruit Garland?
- Sustainable: Uses whole ingredients with minimal packaging; compostable after the holidays.
- Aromatic: Infuses living spaces with subtle scents of dried citrus and apples.
- Aesthetic: Offers a unique, organic alternative to traditional tinsel or plastic decor.
- Customizable: Pairs well with spices, herbs, or evergreen foliage for nuanced looks.
- Budget-Friendly: Uses easily accessible supermarket ingredients and basic supplies.
Table of Contents
- Materials You’ll Need
- Preparing and Drying the Fruit
- Assembling Your Garland
- Display & Decoration Tips
- Creative Variations & Enhancements
- Frequently Asked Questions
Materials You’ll Need
- Fresh fruit: Oranges, lemons, apples, pears, or other citrus (ripe, but not overripe)
- Sharp knife or mandoline: For thin, even slices
- Baking sheet & parchment paper: For oven-drying
- Paper towels: To blot excess moisture
- Thin wire or strong twine: Food-safe, unobtrusive for threading
- Large needle: For threading (if using twine)
- Optional accents: Bay leaves, fresh herbs (like rosemary), cinnamon sticks, or dried foliage
- Scissors: For trimming wire or twine
Preparing and Drying the Fruit
Drying fruit preserves its natural color and fragrance, making it the heart of a long-lasting seasonal garland. Here’s how to achieve the best, most vibrant results:
Step 1: Selecting and Slicing
- Choose ripe, firm fruit free of bruises or blemishes.
- Using a sharp chef’s knife or mandoline, slice fruit (like oranges, lemons, or apples) crosswise into rounds about 1/8 to 1/4-inch thick. Thinner slices dehydrate more evenly and quickly.
Step 2: Blotting Moisture
- Place slices between sheets of paper towel and gently press to remove excess juice. This minimizes sticking and speeds up drying.
Step 3: Drying Methods
| Method | Directions | Estimated Time | Notes |
|---|---|---|---|
| Oven Drying | Arrange slices in a single layer on parchment-lined trays. Bake at 175–200°F (80–95°C), flipping every 30–45 minutes. | 3–6 hours | Watch closely to prevent browning or burning. |
| Dehydrator | Place slices on dehydrator trays. Dry at 135°F (57°C) until crisp. | 6–8 hours | Yields uniform results and preserves fragrance. |
- Dry fruit until leathery but not brittle. Slight flexibility makes threading easier and prevents cracking.
- Let slices cool fully; they will firm further as they rest.
Assembling Your Garland
Once your fruit slices are dry, assembling a garland is straightforward—and leaves plenty of room for artistic flair.
Step 1: Planning Layout & Order
- Arrange your dried fruit, herbs, and other accents in a row, mimicking your final, desired pattern: a repeating sequence, color gradient, or random assortment all work beautifully.
Step 2: Choosing a Threading Method
- If using wire: Cut a length slightly longer than your intended display. Thin, bendable wire provides support and allows for easy shaping.
- If using twine or string: Cut to length and thread a large, sharp needle for easy piercing.
Step 3: Threading the Fruit
- Pierce each fruit slice near the center or edge as desired. Thread carefully to prevent tearing.
- Alternate fruit slices with herbs, foliage, or cinnamon sticks for texture and aroma.
- Slide items along as you build to evenly distribute weight and avoid bunching.
- Secure ends of the wire or twine with knots, loops, or a tight twist for easy hanging.
Display & Decoration Tips
Display creativity is one of the best parts of this project. Experiment with how and where you hang your new garland:
- Across a mantel: Classic placement, bringing vintage warmth to a living or dining room.
- Framing windows or doorways: The garland’s transparency lets sunlight illuminate each slice, raising their natural color to a stained-glass glow.
- Along banisters or open shelving: Add coziness and a festive touch to circulation spaces and kitchens.
- Mini garlands as ornaments: Create shorter lengths for decorating trees, gifts, or chair backs.
Creative Variations & Enhancements
A dried fruit garland’s elegance comes both from simplicity and potential for customization. Here are a few creative ideas to make your garland unique:
- Herbal Accents: Intertwine sprigs of rosemary, thyme, or bay leaves for greenery and fragrance.
- Spices: Thread in whole cinnamon sticks or star anise for visual interest and aromatic depth.
- Berry Sprigs: Add fresh or faux cranberries, juniper berries, or privet berries for subtle pops of red and blue.
- Evergreen Clippings: Mix in cut branches of pine, cedar, or fir for lushness and classic holiday greenery.
- Dried Flowers: Insert blossoms like statice or lavender for color and delicacy.
Feel free to experiment with monochromatic garlands (e.g., all citrus), geometric patterns, or completely randomized arrangements for rustic charm. The best part about this project is that there’s no wrong way to do it—your garland will be as unique as your holiday celebration.
Frequently Asked Questions (FAQs)
Q: How long does a dried fruit garland last?
A: With proper drying and storage, a dried fruit garland can last one to two holiday seasons. Keep away from humidity and direct sunlight to avoid mold or fading.
Q: Can I make the garland in advance?
A: Yes. You can dry fruit slices weeks in advance and assemble the garland days before decorating. Store dried fruit in an airtight container until use.
Q: How can I prevent my garland from attracting pests?
A: Fully dried fruit is less appealing to insects, but displaying the garland away from food preparation areas and storing in the off-season in sealed containers further discourages pests.
Q: Is the dried fruit still edible after the holidays?
A: The fruit used in garlands is primarily decorative. It may lose flavor and texture, so it’s best composted rather than eaten post-display.
Q: Will the fruit get moldy?
A: If slices are properly dried (leathery, not sticky or wet), mold is unlikely. Check before assembly and discard any with visible moisture.
Additional Tips for a Successful Garland
- Uniform Slices: Even thickness ensures more consistent dehydration and longer garland life.
- Low Oven Temperatures: Higher heat may bake rather than dry the fruit; use the lowest oven setting you have.
- Rotating & Checking: Flip slices regularly for even drying and check often towards the end of drying time.
- Child-Friendly Craft: Threading and arranging dried slices makes a wonderful family project—just supervise knife use and oven handling.
Conclusion: Celebrate the Season Naturally
Dried fruit garlands are a timeless, evocative craft that connects us to the simplicity of the season. Whether you hang yours proudly above the mantel or drape it along a kitchen shelf, the result is a signature piece that’s beautiful, fragrant, and full of festive spirit. Gather your favorite fruits and get started—your home will be aglow in no time.
References
- https://www.youtube.com/watch?v=7t617bwLaMA
- https://www.gardenista.com/posts/diy-video-holiday-garland/
- https://www.pinterest.com/pin/dried-fruit-garland-for-the-holidays–89720217556706168/
- https://www.gardenista.com/posts/diy-artful-botanical-garland-maurice-portland/
- https://readingmytealeaves.com/2013/11/dried-fruit-garland.html
Read full bio of Srija Burman


