How To Grow Paperwhites In Water: 5 Easy Steps
Brighten winter days by forcing paperwhite bulbs in water using antique bottles for a simple, cheerful indoor display.
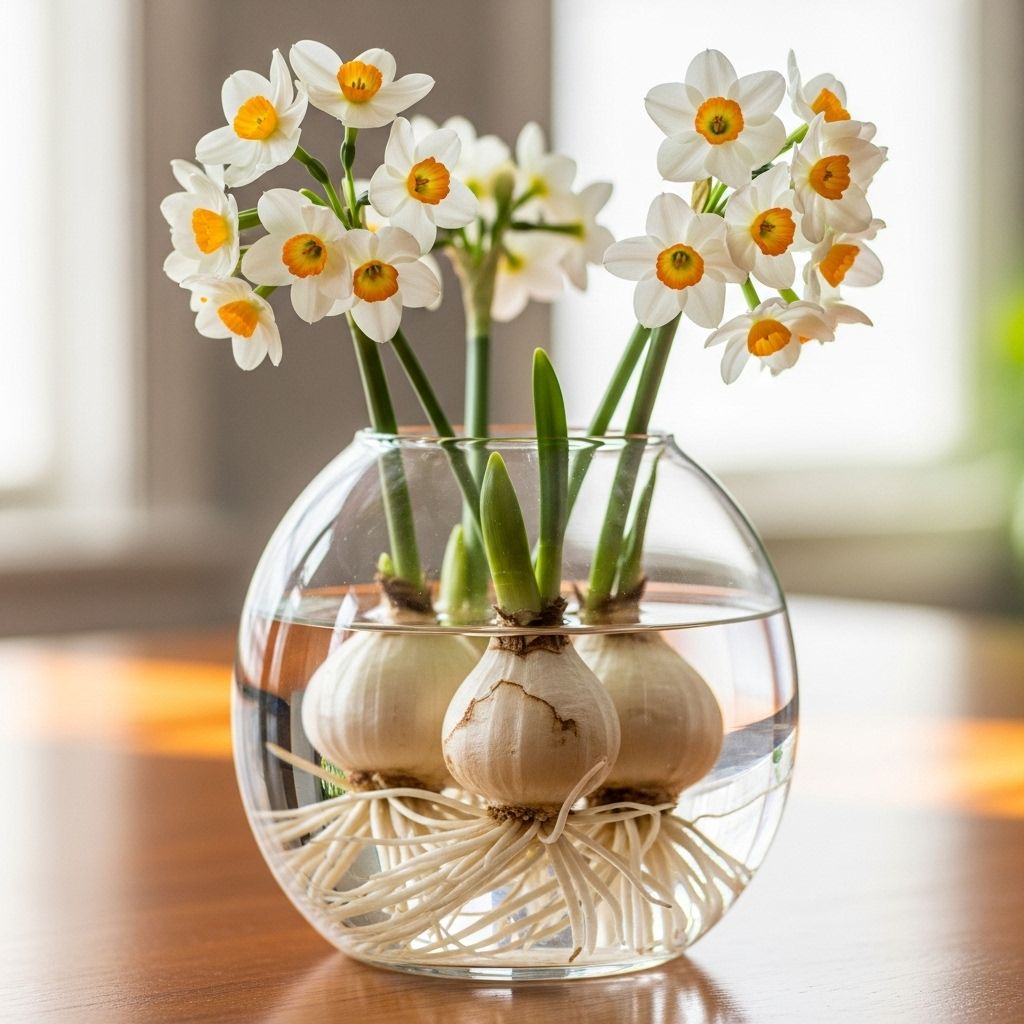
Image: HearthJunction Design Team
DIY Bottle-Fed Paperwhites: A Winter Indoor Gardening Project
Chilly weather often keeps us indoors, longing for signs of spring. One delightful way to combat winter’s monotony is by forcing paperwhites to bloom inside your home. This easy, satisfying project brings a burst of freshness and fragrance to the dullest January windowsill. This guide walks you through the process of growing paperwhites in water using antique or glass bottles—a striking alternative to the typical pot-and-stones method.
Why Force Paperwhites Indoors?
Paperwhite narcissus are among the simplest bulbs to force into bloom indoors. In just a few weeks, they produce delicate, sweet-smelling flowers. Unlike many other bulbs that require a chilling period, paperwhites can go straight from the shop to your bottle garden—no cold treatment needed. This ease makes them an excellent choice for wintertime gardeners seeking a quick reward.
Choosing the Right Bulbs
- Visit local suppliers: Flower shops and garden centers typically offer paperwhite bulbs from late fall through winter. Select bulbs that feel heavy, firm, and have no bruises or soft spots.
- Look for symmetry: Symmetrical bulbs are less likely to lean awkwardly as the shoots elongate.
- Alternatives: If paperwhites aren’t available locally, hyacinth bulbs are a suitable substitute for forcing indoors with similar method and visual effect.
Gathering Materials
One of the appealing aspects of this project is the opportunity to repurpose vintage and antique glass bottles. These containers provide both visual charm and practical function:
- Clear glass bottles: Bottles with narrow necks support the bulb above water for root growth while keeping the bulb itself dry. Try mixing and matching bottles for an eclectic display.
- Paperwhite bulbs: Enough for each bottle you plan to use.
- Water: Clean, room-temperature tap or filtered water works best.
Step-by-Step Instructions
1. Prepare Your Bottles
- Wash bottles thoroughly to remove dust or residue.
- Rinse well to ensure no soap lingers, as this could harm developing roots.
2. Position the Bulbs
- Place each bulb in the neck of a bottle so that it perches above the opening, with the bottom of the bulb almost touching the bottle’s interior.
- The roots will grow down into the bottle, supported by the narrow neck.
3. Add Water
- Pour water into each bottle until it just reaches the base of the bulb—aim to submerge only the developing root zone, not the bulb itself.
- It’s crucial to keep the bulb dry to prevent rotting, but ensure the root plate (the flat, basal end of the bulb) is in contact with the water to spur root growth.
4. Arrange for Sunlight
- Place your bottles on a sunny windowsill or another bright location.
- Paperwhites thrive in natural light but will tolerate lower-light conditions, growing more slowly as a result.
5. Monitor and Maintain
- Check water levels daily and top up as needed, keeping the roots submerged at all times.
- If the water becomes cloudy or develops an odor, change it to keep roots healthy.
- Rotate bottles occasionally to ensure even growth and prevent lean.
Benefits of the Bottle Method
- Root Visibility: Watching roots develop through clear glass adds an educational—and beautiful—element to the project.
- Support: The narrow neck of a bottle offers natural stem support, lessening the risk of drooping flowers.
- Decorative Impact: Bottles, especially vintage ones, become part of the display, contributing to a charming winter tableau.
- Minimal Mess: No soil or stones required, making cleanup and repositioning simple.
Troubleshooting Common Issues
- Bulb Rot: If the bulb itself is submerged in water, it can rot. Only the root area should touch water.
- Leggy Growth: Insufficient light or a too-warm spot leads to spindly stems. Move to the brightest available location and reduce room temperature if possible.
- Flopping Stems: Paperwhite flowers can be heavy. If stems lean, loosely tie them together with twine or use taller bottles for support.
- Odor: Change water regularly to prevent unpleasant smells and keep roots healthy.
Decorating with Bottle-Fed Paperwhites
Paperwhites bring instant life and elegance to winter interiors:
- Group bottles of varying heights on a windowsill, mantle, or dining table for a spontaneous flower arrangement.
- Add seasonal greenery—like pine, holly, or eucalyptus—around the base of the bottles for a wintery vignette.
- Mix in hyacinths or amaryllis bulbs for added color, variety, and fragrance.
Alternatives: Other Methods for Forcing Bulbs Indoors
While growing paperwhites in bottles is elegant and straightforward, there are other popular approaches:
| Method | Container | Medium | Key Points |
|---|---|---|---|
| Bottle Method | Antique/Glass Bottles | Water Only | Visible roots, easy cleanup, narrow neck supports stems |
| Pot & Stones | Shallow Pot | Small Stones + Water | Traditional look, easy to arrange multiple bulbs together |
| Soil Planting | Shallow Pot | Well-draining Soil | Natural growth, less frequent watering, messier indoors |
Paperwhites: A Field Guide
For more comprehensive advice on growing and caring for paperwhites, reference a field guide for details on:
- Ideal bloom timing for different cultivars
- Mixing bulbs and tubers for indoor displays
- Aftercare for bulbs post-bloom
Curious about adding other bulbs or tubers to your indoor garden? Hyacinths, tulips, and amaryllis all offer excellent results when forced indoors with similar methods.
Care and Maintenance for Lasting Blooms
- Keep bulbs away from heat sources and direct blasts of air.
- Paperwhites prefer cooler temperatures (60–65°F/15–18°C) for longer-lasting blooms.
- Snip off spent flowers to direct energy back into the bulbs or extend bloom life.
Reusing Bulbs and Bottles
- Bulbs: Most forced paperwhite bulbs are best composted after blooming, as they typically do not flower a second time indoors.
- Bottles: Wash and store your bottles for next year’s winter blooms or repurpose them for fresh cuttings or as single-flower vases in spring and summer.
Enhancing the Display: Creative Tips
- Wrap a band of jute, ribbon, or twine around the bottle necks for added color and texture.
- Paint the base of clear bottles for a frosted or colored effect.
- Arrange bottles on a rustic tray with moss or pebbles for a centerpiece.
Frequently Asked Questions (FAQs)
Q: How long does it take for paperwhites to bloom when forced indoors?
A: Paperwhites typically bloom in 3–5 weeks after being placed in water, depending on temperature and light.
Q: Why are my paperwhites leaning or flopping over?
A: They may be reaching for light or their stems are too long. Ensure bright, even light and use bottles with a narrow neck for support. You can also loosely tie stems together with twine.
Q: Can I reuse the bulbs after they flower?
A: Most forced paperwhites are best discarded after flowering because they seldom rebloom indoors. If you have a garden in a mild climate, you may experiment with planting spent bulbs outdoors to see if they naturalize the following year.
Q: Is it necessary to add fertilizer to the water?
A: No, paperwhite bulbs contain all the energy needed to bloom. Clean water and sunlight are sufficient for their brief growing cycle indoors.
Q: What if I can’t find paperwhite bulbs locally?
A: Try hyacinth bulbs or other easy-to-force bulbs, following the same bottle or water method for similar results.
Conclusion
Growing paperwhites indoors using bottles is a rewarding, low-maintenance way to banish the winter blues and enjoy vibrant, fragrant blooms. With just a few simple materials and steps, you can create evolving displays that capture the essence of spring well before the outdoor thaw. Experiment with bottles, bulbs, and arrangement styles—the result will always be a welcome dose of winter cheer.
References
- https://www.gardenista.com/posts/diy-bottle-fed-paperwhites/
- https://www.gardenista.com/posts/field-guide-paperwhites/
- https://www.pinterest.com/pin/diy-bottlefed-paperwhites-gardenista–508766089124429297/
- https://www.gardenista.com/garden-design-101/bulbs-and-tubers/paperwhite-narcissus-papyraceus/
- https://www.thetatteredpew.com/how-to-grow-and-use-paperwhites-in-your-winter-decor/
Read full bio of Anjali Sayee


