How To Build A Boardwalk: 4 Simple Steps For Your Off-Grid Cabin
A hands-on guide to creating a rustic, summer-camp-inspired boardwalk—finished in just one afternoon.

Image: HearthJunction Design Team
DIY Boardwalk at an Off-Grid Cabin: A Step-by-Step Guide
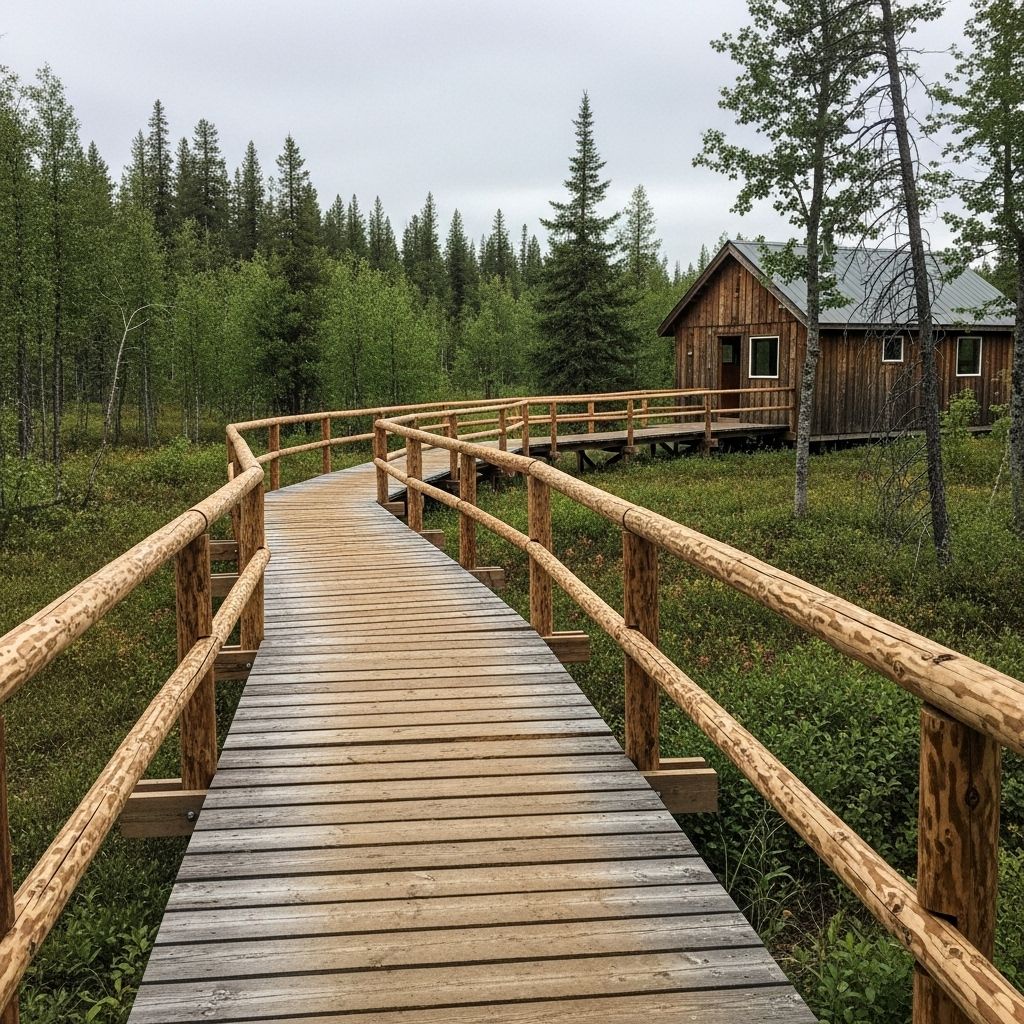
There is something timelessly appealing about a wooden boardwalk meandering through a slice of wild landscape. For one resourceful couple living off the grid, building a rustic, summer-camp-style walkway was a way to both preserve nature and enhance the everyday charm of their cabin getaway. Completed in just a single afternoon, this DIY project combines thoughtful land stewardship with practical carpentry—and proves that even the simplest additions can transform your connection with the land.
Why Build a Boardwalk?
A well-placed boardwalk not only adds structure and functionality to a property, but also acts as a gentle mediator between humans and the environment. Here are just a few reasons why a boardwalk project might appeal:
- Provides dry, stable footing over muddy or uneven terrain.
- Protects delicate plants and soil from compaction and foot traffic damage.
- Creates a clear and attractive path to cabins, gardens, or outdoor spaces.
- Evokes nostalgia, echoing childhood days at summer camps or lakeside retreats.
Planning the Project
Before picking up a single board, the couple took time to thoughtfully plan their pathway. Rather than imposing a rigid geometry, they allowed the shape and feel of the land to inspire a subtle curve. Their process began with careful site preparation and considered respect for the existing ecosystem.
Gently Create a Path
To minimize environmental disruption, the first step was to gently trace the new walkway’s course. The couple:
- Identified a natural route that hugged a large stump and followed the land’s contours.
- Carefully transplanted existing ferns and native plants out of harm’s way.
- Leveled the soil, smoothing out muddy patches by hand.
- Sawed back the roots and remnants of a stubborn stump so the boardwalk could curve gracefully around it.
The aim was not to erase the landscape, but to gently integrate the new structure into its surroundings, allowing the path to look as though it had always belonged there.
Gathering Materials the Local Way
With a clear path in mind, the next step was sourcing materials. Striving for sustainability and local engagement, the couple chose to avoid big box stores in favor of a regional lumber supplier. Their material list was short, simple, and selected for durability:
- Pressure-treated, ground-contact lumber: Essential for weather and soil resistance. They used 2×6″ boards for the structural beams and 5/4×6″ for the planking surface.
- Concrete deck blocks: These served as low-maintenance, stable foundations. A shallow trench allowed the blocks to sit flush with the ground for stability.
- Galvanized fasteners: Screws and nails resistant to rust and decay ensured longevity.
For inspiration, they browsed a range of online tutorials but ultimately designed their own plan, tailored to their site and skill level. Their approach was low-tech but effective, proving that even beginner carpenters can achieve impressive results with creativity and perseverance.
A Step-by-Step Boardwalk Build
With tools and lumber in hand, the couple dove into construction. The following steps outline their process from foundation to finishing touches:
1. Prepare the Foundation
- Dig shallow recesses along the planned path just deep enough for the concrete deck blocks to nestle securely.
- Space blocks at regular intervals (approx. every 4 feet) to provide steady support.
- Adjust blocks to ensure that the top surfaces are level with each other. This creates a straight, even base for the beams.
2. Lay Down Support Beams
- Cut 2×6″ pressure-treated boards to the length of your path.
- Place the beams directly onto the concrete deck blocks, following the gentle curve mapped out earlier.
- If the path bends, miter joints can be used to allow beams to change direction smoothly.
3. Attach Decking Planks
- Perpendicular to the beams, lay the 5/4×6″ planks and secure using galvanized deck screws.
- Leave narrow gaps (about 1/8 inch) between planks to allow for water drainage and wood expansion.
- Trim the ends of the planks with a circular saw for a clean, uniform edge, or let them overhang for a rustic effect.
4. Finishing Touches
- Walk the full path to ensure stability and address any rocking or unevenness.
- Replant ferns and native plants along the sides of the boardwalk to soften its edges and quickly reintegrate it with the natural landscape.
- Optionally, brush on a coat of weatherproof sealant for added durability, depending on the climate and type of wood used.
Tips for Success
- Work with the landscape, not against it: Allow the path to curve naturally and follow the rise and fall of the ground.
- Get creative: Use locally sourced or reclaimed wood for a unique look and reduced environmental impact.
- Keep it simple: Minimalist construction means fewer materials, less expense, and increased harmony with nature.
- Emphasize teamwork: The couple found that clear communication and shared vision were essential to completing the project efficiently and enjoyably.
Alternative Walkway Inspirations
If you’re considering a similar project, there are many ways to adapt the boardwalk concept to your terrain and aesthetics. Options include:
- Roll-out wooden walkways: Prefab slatted paths made from pine, fir, cedar, or bamboo can be unrolled for instant access and stored away at the end of the season.
- Composite decking: Low-maintenance and resistant to rot or insects, composite boards are ideal for rainy climates.
- Japanese-style stepping stones: For a subtler look, intersperse wide wooden planks with gravel or native ground cover.
Boardwalk Maintenance and Longevity
Durability is key when building in exposed natural settings. Here are some crucial maintenance tips to keep your boardwalk safe and beautiful for years to come:
- Regularly check for loose or warped boards and tighten or replace as needed.
- Keep the walkway clear of debris and fallen leaves, which can trap moisture and accelerate decay.
- Inspect for signs of rot or insect activity each spring and fall.
- Reapply sealant every few years if your walkway is exposed to heavy precipitation.
Cost and Time Considerations
One of the most appealing aspects of this boardwalk project is its affordability and quick turnaround. Since the couple used locally sourced materials, relied on basic carpentry skills, and limited the size to essentials, they built the walkway in a single afternoon at modest cost. Key factors influencing price and labor include:
- Choice of wood (pressure-treated pine is cost-effective; cedar and hardwoods are pricier).
- Local versus big-box sourcing: small-scale lumber suppliers may offer more eco-friendly options.
- Path length and width: a narrow walkway for foot traffic will require fewer materials than a wide deck.
- Site preparation: heavily sloped or marshy terrain can demand extra footings or leveling work.
Boardwalk Inspiration Gallery
From classic New England dune paths to modern city gardens, boardwalks take many forms:
- Pine and cedar rollout paths for seasonal gardens.
- Ipe wood walkways in rooftop urban sanctuaries.
- Wide, plank-style walkways winding through fern-carpeted understories.
- Bamboo mats for Japanese-inspired retreats.
Regardless of style, a wood boardwalk instantly brings a sense of nostalgia and comfort—inviting bare feet and slow strolls all summer long.
Frequently Asked Questions (FAQs)
Q: How long does it take to build a DIY boardwalk?
A: With the right materials prepared ahead of time, a basic boardwalk can be built by two people in just a single afternoon.
Q: What type of wood is best for an outdoor boardwalk?
A: Pressure-treated pine is a practical, affordable choice. Cedar or tropical hardwoods like ipe offer greater natural resistance to rot but come at a higher cost.
Q: Is it necessary to use concrete deck blocks?
A: Concrete deck blocks provide a stable, low-maintenance foundation that keeps wood off the soil and helps prevent rot. In some cases, large stones or gravel footings may also work.
Q: Can I build a curved boardwalk if I am a beginner?
A: Yes! By gently angling the support beams and planks, even novice builders can achieve subtle curves. No advanced carpentry is required.
Q: What’s the best way to maintain a wooden boardwalk?
A: Regularly check for loose boards, clear debris, and reseal the wood every few years. Address any standing water or drainage issues to prolong the life of the walkway.
Conclusion
This hands-on DIY boardwalk project showcases the power of teamwork, resourcefulness, and respect for nature. By sourcing local materials, working with the land, and keeping the build simple, the couple demonstrated that you don’t need elaborate plans—or expertise—to create a lasting, beautiful path. In just a few hours, they transformed a muddy track into a charming, functional boardwalk that will bring joy and convenience for years to come.
References
- https://www.gardenista.com/posts/diy-boardwalk-off-grid-couple/
- https://nz.pinterest.com/pin/a-diy-boardwalk-at-an-offthegrid-cabin-that-only-took-one-afternoon-gardenista–36451078223178592/
- https://www.gardenista.com/tag/decks-patios/
- https://www.instagram.com/p/C8ezsa9NXVs/
- https://www.gardenista.com/posts/10-easy-pieces-wooden-walkways/
Read full bio of Anjali Sayee


