Bottom Watering Seed Starts: Step-by-Step Guide for Stronger Seedlings
Capillary action preserves delicate sprouts while keeping your planting area tidy.
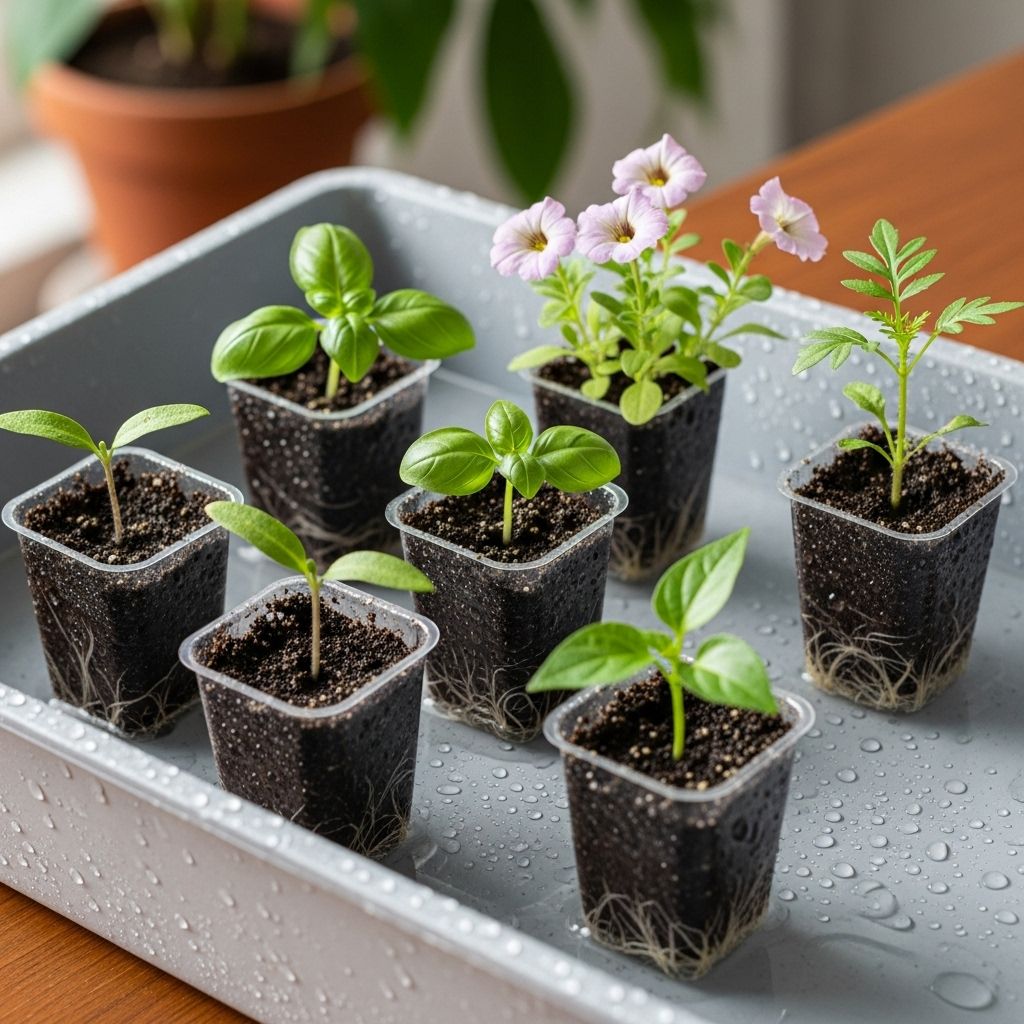
When starting seeds indoors, watering technique is critical for seedling health and success. Bottom watering is the preferred method among horticultural experts for producing vigorous, disease-free seedlings with minimal mess. This comprehensive guide covers the principles, benefits, gear, and practical steps for bottom watering, so your seedlings thrive from the moment they germinate.
Why Bottom Watering Seedlings?
Watering from below has gained popularity among home gardeners as the optimal way to start seeds. Unlike top watering, bottom watering allows water to be absorbed through the base of the tray or pot, encouraging downward root growth and providing a consistent supply of moisture. This technique keeps foliage dry, reduces the risk of disease, and fosters resilient, well-structured root systems.
- Promotes Deep Root Growth: Moisture is drawn up through capillary action, incentivizing roots to extend downward in search of water.
- Reduces Damping-Off Disease: Leaves and stems remain dry, helping prevent common seedling diseases fostered by excess moisture on top.
- Prevents Overwatering and Mess: Water is contained in the tray, minimizing spills and keeping your workspace tidy.
- Ensures Uniform Moisture: All cells receive water at the same rate, eliminating uneven patches that can occur with overhead watering.
Understanding Common Seedling Watering Issues
Conventional watering methods can sometimes harm young plants. Top watering may create mushy, waterlogged soil or splash bacteria and fungi onto vulnerable leaves, increasing the risk of disease. Uneven watering can stress seedlings, causing poor root formation or wilting.
Bottom watering addresses these obstacles by providing the following advantages:
- Delicate Roots Stay Intact: Gentle upward wicking prevents disturbance and damage to fragile sprouting roots.
- Controlled Moisture Level: Excess water can be drained after absorption, reducing over-saturation risks.
- Cleaner Working Area: Since water remains in the tray, you avoid mud and spillage on benches and floors.
Bottom Watering: What You Need
To bottom water successfully, prepare your setup with the right equipment and growing medium. Here are the essentials:
- Cell Trays or Pots: These hold seedlings and have drainage holes at the bottom.
- Universal Bottom Tray: A flat, solid tray beneath the cell trays collects and holds water. For example, the Epic Universal Bottom Tray is spacious, BPA-free, and stackable for efficient storage (can hold 12 6-cell trays, eight 4-cell trays, or eight 5-inch pots).
- Seed Starting Mix: Use a fine-particulate, soilless medium designed for seed germination. Avoid chunky or woody potting mixes to ensure even wicking.
- Room Temperature Water: Cold or hot water can shock seedlings. Keep water at ambient indoor temperature.
- Optional Gear: Humidity domes (for early stages), heat mats (to promote germination), and air-pruning trays may further aid root health.
How to Bottom Water Seedlings in 5 Easy Steps
Follow these five simple steps to bottom water seedlings for reliable, repeatable results:
- Fill and Moisten Your Seed Starting Mix
- Begin with a fine-particulate seed starting soil. Pre-moisten the mix so it is damp but not dripping before filling your trays or pots .
- This ensures quick wicking and even moisture distribution from the start.
- Set Up Seedling Cell Trays
- Fill each cell or pot with your prepared medium. Sow seeds according to recommended depth.
- Place these filled trays or pots into the Universal Bottom Tray.
- Pour Room Temperature Water Into the Bottom Tray
- Pour enough water into the bottom tray to create a shallow pool—about half to one inch deep is sufficient. For larger setups, use up to an inch.
- Ensure the water does not rise above the base of the cell trays or pots—roots should wick water, not sit submerged.
- Allow Seedlings to Wick Water
- Leave trays to soak for 30 minutes. The seed starting mix will absorb water via capillary action .
- Check after the allotted time: If the surface feels evenly moist, your seedlings have received enough water.
- Drain Excess Water
- After 30 minutes, pour off leftover water to prevent soil over-saturation.
- The emptied tray allows for free drainage if trays were slightly over-saturated.
Repeat bottom watering only as needed. Observe the weight and color of the soil: dry medium looks lighter and pulls away from the pot edge, while moist soil is darker and heavier.
Optimizing Your Seedling Setup: Trays, Mixes, and Accessories
Choosing the right gear will make bottom watering more effective and convenient.
- Universal Bottom Tray: Durable, recyclable, and easy to clean. Designed for mess-free watering and efficient space management.
- Cell Trays with Air-Pruning: Slits in tray sides introduce air to root zones, naturally “pruning” roots and preventing circling, fostering stronger plants .
- Heat Mats: Place under the bottom tray to encourage germination in cooler conditions.
- Humidity Domes: Ideal for retaining moisture and warmth in early germination stages, then remove once most seeds have sprouted.
Seed Starting Mix: What to Use
The best seed starting soil is finely textured, moisture-retentive, and sterile to minimize disease risk. Avoid chunky, woody ingredients that can impede moisture uptake. Popular mixes combine peat moss or coco coir with fine perlite or vermiculite. Pre-moisten your mix for the most effective bottom watering.
Top Tips to Avoid Common Pitfalls
- Never Leave Trays Sitting in Water Constantly: Prolonged exposure invites mold or root rot.
- Monitor Moisture Levels: Over-saturated media suffocates roots. Only bottom water when the medium begins to dry.
- Use Clean Water: If using tap water, allow it to stand until chlorine dissipates. Non-chlorinated water is best for delicate seedlings.
- Start Bottom Watering After Germination: Some seeds prefer humidity and top watering initially; switch to bottom watering once sprouts are established.
How Often Should You Bottom Water Seedlings?
Watering frequency depends on the plant type, growing medium, temperature, humidity, and container size. In general:
- Check soil moisture daily by touch or soil color.
- Bottom water only when the upper half of the cell feels dry—avoid letting seedlings wilt.
- Expect to water every 2–5 days during early growth, adjusting as conditions change.
Seedlings that are more established, or those growing in larger trays, may require less frequent watering than new sprouts in smaller cells. Always err on the side of caution—roots require oxygen as much as water.
Bottom Watering vs. Top Watering: A Quick Table Comparison
| Feature | Bottom Watering | Top Watering |
|---|---|---|
| Root Health | Encourages deep downward growth | Can lead to shallow or circling roots |
| Disease Risk | Lower (dry leaves and stems) | Higher (foliage stays wet) |
| Watering Mess | Minimal; water contained | Possible splashing, soil displacement |
| Uniformity | Water distributed evenly to all cells | Uneven watering can occur |
| Convenience | Less frequent watering needed | Requires careful attention, risk of overwatering |
Frequently Asked Questions (FAQs)
Q: Is bottom watering suitable for all seed types?
A: Most seeds benefit from bottom watering after germination, but those with very hard, thick shells (like sunflower or corn) may need soaking or top watering initially before transitioning .
Q: Can I use bottom watering with soil blocks or peat pellets?
A: Yes, as long as the medium can wick water from beneath. Some soil blocks perform best with periodic misting in addition to bottom watering.
Q: What is the risk of root rot?
A: Root rot typically results from constant wet conditions. Always drain excess water after bottom watering and avoid continuously soaked trays.
Q: How do I know when seedlings are hydrated?
A: Properly watered seedlings have evenly moist growing medium and perked-up leaves. Dry soil feels light, looks pale, and pulls away from tray edges.
Q: Do I need to fertilize seedlings if I bottom water?
A: Yes, once true leaves appear, begin light fertilizer applications. Water-soluble fertilizers can be mixed with the bottom water for easy uptake.
Expert Tips for Healthier, More Productive Seedlings
- Transition to Bottom Watering Gradually: Start with top watering during germination, then switch once most sprouts are visible.
- Keep Trays Clean: Clean trays and replace water regularly to prevent algae, mold, or bacterial buildup.
- Monitor Growth: Healthy seedlings develop sturdy stems, lush leaves, and visible roots at cell edges.
- Use Air-Pruning Trays: These encourage powerful, non-circling root growth by exposing roots to air outside tray walls.
- Label Everything: Keep track of varieties and watering dates to optimize care routines.
Bottom Watering Seedlings: Summary of Benefits
- Stronger, Deeper Roots
- Cleaner and Easier Watering Routine
- Reduced Disease and Fungi Risk
- Improved Seedling Survival and Performance
- Optimized Moisture Levels for All Cells
- Efficient Resource Use
Recommended Products & Resources
- Universal Bottom Trays (Epic Gardening brand)
- Seed starting cell trays with air pruning features
- Fine-particulate seed starting mix
- Humidity domes and heat mats for early germination
Final Thoughts
Bottom watering is a transformative technique for gardeners who want robust, healthy seedlings and a tidy seed starting environment. By following these steps and adopting the right products, even beginners can grow healthy, hassle-free plants from seed, ready to thrive in the garden or containers. Integrate bottom watering into your seed starting routine and maximize your gardening success.
References
Read full bio of Anjali Sayee

