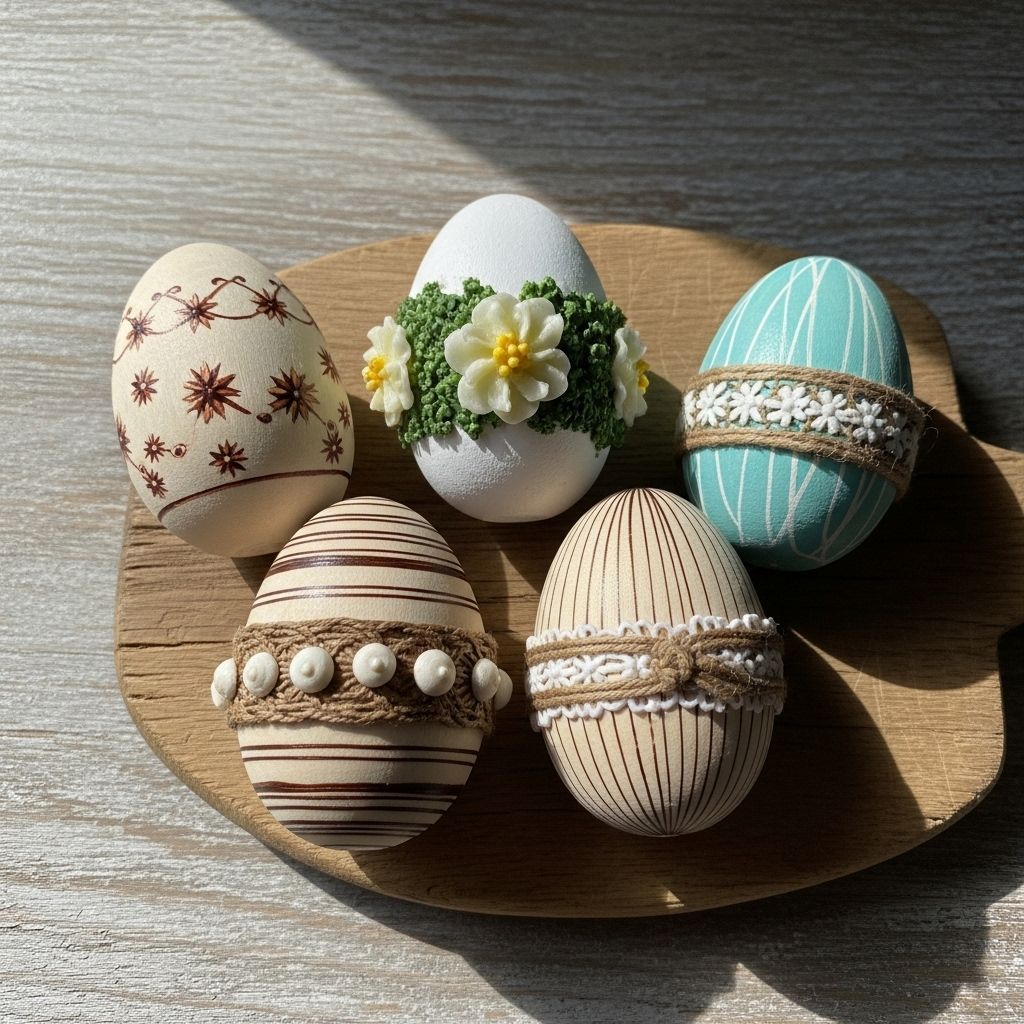
Creative Wooden Easter Egg Decorating: Ideas, Techniques, and Inspiration
From vibrant pastel ombré to intricate folk patterns, these crafts bring spring to life.

Decorating eggs is one of the most cherished traditions of the Easter holiday—a joyful craft that bridges artistry, tradition, and family fun. While real eggs deliver nostalgia, wooden Easter eggs offer a reusable, mess-free, and lasting alternative for crafters of all ages. Discover a world of ideas for painting, dyeing, and embellishing wooden eggs to create unique seasonal décor, cherished keepsakes, or memorable gifts.
Why Choose Wooden Easter Eggs?
Wooden eggs are an excellent blank canvas for creative expression and provide several advantages over traditional egg decorating:
- Durability: Wooden eggs don’t crack or spoil, so your decorations last beyond the holiday season.
- Allergy-Free: No risk of food sensitivity issues, making them safe for everyone.
- Reusable: Enjoy your favorite designs year after year, or repaint for a fresh look each spring.
- Customizable: Perfect for all kinds of designs—from simple to intricate folk patterns.
- Mess-Free: No boiling, blowing out, or fragile shells—just pure creative fun.
Wooden Egg Basics: Preparing to Decorate
Before you unleash your creativity, ensure the best possible outcome by preparing your wooden eggs properly:
- Sanding: Lightly sand the eggs with fine-grit sandpaper to remove any rough spots.
- Cleaning: Wipe eggs with a damp, lint-free cloth to remove dust. Let dry thoroughly.
- Priming (Optional): If painting with light colors or intricate designs, apply a coat of white acrylic gesso to enhance vibrancy and smoothness.
- Setting Up: Use an egg stand, an empty egg carton, or insert a toothpick/stick at the flat base for hands-free decorating and easy drying.
Wooden Easter Egg Decorating Techniques
The versatility of wooden eggs means nearly any craft technique applies—from painting and dyeing to decoupage and folk-inspired wax resist. Here are time-tested methods and fresh ideas for all skill levels:
1. Painted Wooden Easter Eggs
Simple acrylic paint is a go-to for wooden egg decorating. With endless color choices and finishes—from matte to glossy—painting allows for bold, colorful, or delicate results.
- Solid Colors: Apply paint evenly with a foam brush or sponge for flawless coverage. Let dry, then add additional coats as needed for opacity.
- Pastel Ombre: For on-trend ombre effects, blend two or more analogous pastel shades together while the base coat is still wet.
- Speckled and Splatter: Flick paint from a loaded brush over a dry base color for natural-looking speckles reminiscent of robin’s eggs.
- Brushstroke Art: Use a small brush for delicate motifs—think florals, polka dots, stripes, or geometric shapes.
- Personalized Messages: Paint or hand-letter names, initials, or Easter wishes for personalized table settings or gifts.
2. Folk Art and Wax-Resist Techniques
Draw inspiration from centuries-old egg decorating traditions such as Lithuanian Margučiai or Ukrainian Pysanky and adapt them to wooden eggs:
- Scratch Art: Paint eggs in dark vibrant hues; once dry, gently scratch in designs (lines, dots, or folk patterns) using a stylus or craft knife to reveal the wood beneath for beautiful contrast.
- Wax-Resist (Batik): Using melted beeswax and a stylus (kistka), draw lines and shapes on the egg. Dye over the wax, let dry, then remove the wax to reveal striking patterns. On wooden eggs, you may use water-based dyes or stains for best results.
- Layered Patterns: Emulate Slavic and Baltic motifs—triangles for the Trinity, lines for eternity, flowers for nature—layering colors and designs for depth and symbolism.
3. Decoupage Wooden Eggs
For intricate patterns and vibrant motifs with minimal painting skill, decoupage is a wonderful technique:
- Materials: Use paper napkins, printed tissue, or rice paper with spring and Easter designs.
- Application: Cut out your designs, apply a thin layer of decoupage glue to the egg, gently smooth paper on, then seal with additional glue for a glossy, durable finish.
- Floral, Botanical, or Illustrated Themes: Layer cutouts for custom looks—delicate wildflowers, bright tulips, vintage bunnies, or whimsical patterns.
4. Dyed Wooden Eggs
While natural wood won’t absorb dye like a real eggshell, you can still achieve vibrant hues using specially formulated wood dye, liquid watercolor, or diluted acrylic washes:
- Staining: Brush wood dye directly onto unfinished eggs for a transparent tinted finish that reveals wood grain.
- Dip-Dye: Submerge half the egg for a dipped effect or layer colors for beautiful gradients.
- Resist Design: Apply painter’s tape or rubber bands before dyeing to block off sections, resulting in crisp lines and triangles when removed.
5. Embellished Wooden Eggs
Add texture and dimension with glued-on elements or special finishes:
- Glitter & Metallics: Coat your egg in acrylic paint, then immediately sprinkle with fine glitter. For shimmer, use metallic paint or foil applications.
- Pressed Botanicals: Seal tiny flowers or leaves with a coat of resin or gloss medium for an organic, nature-inspired touch.
- Bows & Ribbons: Wrap the egg with pretty ribbons or baker’s twine for color and festive flair.
- Jewels & Beads: Adorn eggs with adhesive gems, pearls, or beadwork for luxury appeal.
Step-by-Step Guide: Painting Polished Wooden Easter Eggs
Follow these basic steps for a foolproof wooden egg painting session suitable for all ages:
- Gather Supplies: Wooden eggs, acrylic paint, assorted paintbrushes or sponges, water cup, palette, paper towel, drying rack, optional sealer.
- Prepare Surface: Lightly sand and wipe eggs clean if needed. Set up your workspace with eggs on an egg carton or toothpick holder.
- Apply Base Coat: Use a wide brush or foam sponge to apply a base color; let dry thoroughly.
- Add Designs: Switch to smaller brushes for decorative details, freehand motifs, or patterns using stencils or tape as necessary.
- Dry Completely: Let each color layer dry before applying additional coats or embellishments.
- Seal (Optional): For extra durability, finish with a clear acrylic sealant in gloss, satin, or matte.
Creative Display Ideas for Wooden Easter Eggs
Showcase your decorated wooden eggs as centerpiece décor, personalized place settings, or thoughtful gifts:
- Arrange eggs in woven baskets with Easter grass for a classic look.
- Nestle painted eggs in vintage teacups, egg cups, or ramekins for individual displays.
- Hang ribboned eggs on branches for an enchanting Ostereierbaum (Easter egg tree).
- Create an egg garland by threading a ribbon through pre-drilled holes.
- Stack eggs in glass jars or hurricane vases for a colorful, modern accent.
- Package a set as a homemade Easter gift, finished with a tag or handpainted message.
Wooden vs. Traditional Decorated Eggs: At a Glance
| Feature | Wooden Easter Eggs | Traditional Eggs (Chicken Shell) |
|---|---|---|
| Durability | Multiple years; reusable | Fragile; often single-use |
| Mess Level | Minimal | Requires boiling or blowing out; messy dyes |
| Surface | Ideal for paint, decoupage, mixed media | Can crack; susceptible to dye runs |
| Safety | No food risks or allergens | Possible shell shards; egg spoilage risk |
| Tradition | Modern craft, but can emulate folk styles | Deeply rooted in folk traditions worldwide |
Tips for Success with Wooden Egg Decorating
- Allow for Drying: Propping eggs upright with toothpicks or skewers ensures they don’t stick to the table as they dry.
- Work in Layers: Let each color or embellishment fully dry before applying another.
- Experiment: Wooden eggs accept nearly every craft supply, so test techniques like watercolor washes, stencils, or stamping.
- Involve Kids: Use washable paints, markers, and stickers for family-friendly projects that let creativity shine.
- Finish with Sealer: For long-lasting results—especially when using chalky or matte paints—apply a clear topcoat.
Inspiration Gallery: Fresh Ideas to Try
- Minimalist Monochrome: Paint eggs in shades of white, beige, and taupe with thin graphic lines in gold or black.
- Vintage Florals: Use pressed botanical elements or decoupage with retro flower prints.
- Scandinavian Motifs: Combine bare wood and painted crosses or hearts for classic Nordic appeal.
- Marbled Pastels: Swirl paint with a toothpick before applying for an elegant marble effect.
- Modern Abstract: Layer bold splashes of vivid color over stark white eggs for a contemporary look.
Frequently Asked Questions (FAQ)
How do you keep paint from peeling or chipping on wooden eggs?
Use a high-quality acrylic or craft paint designed for wood surfaces. Sand and prime unfinished eggs for best paint adhesion, and always seal with clear varnish or mod podge once dry.
Can you use regular Easter egg dye on wooden eggs?
Standard egg dye rarely works well on wood as it’s formulated for porous eggshells. Instead, use wood stains, concentrated liquid watercolors, or diluted acrylic paint washes for rich, lasting color.
What’s the best way to hang wooden eggs for display?
Pre-drill a small hole at the top of each egg and thread a ribbon or wire through. Secure with a knot inside the egg, or use a small screw eye for extra sturdiness.
Are there safe options for young children?
Absolutely! Opt for smooth, sanded wooden eggs and pair with non-toxic, washable paints or crayons. Avoid embellishments that could pose choking hazards for very young children.
Do you need to finish decorated eggs with a sealant?
While not strictly necessary, a clear sealant (such as water-based polyurethane, acrylic sealer, or mod podge) will protect designs and make them wipe-clean. Especially recommended for eggs that will be handled frequently or displayed in humid areas.
Conclusion: Your New Favorite Easter Tradition
Wooden Easter eggs offer a modern twist on the beloved springtime craft of egg decorating. Whether you’re drawn to minimalist paint, layered folk patterns, or whimsical embellishments, they’re the perfect canvas for celebrating both tradition and contemporary creativity. Gather your materials, invite your family and friends, and start crafting beautiful egg art that’s sure to become an Easter tradition for years to come!
References
- https://ltfai.org/lithuanian-folk-art/easter-eggs-marguciai/
- https://www.thepioneerwoman.com/holidays-celebrations/a43295019/ukrainian-pysanky-eggs/
- https://en.wikipedia.org/wiki/Egg_decorating_in_Slavic_culture
- https://www.heirloomartco.com/blogs/journal/easter-eggs-the-origins-of-the-tradition
- https://crees.ku.edu/eggs
- http://www.polishamericancenter.org/Pisanki.htm
- https://culture.pl/en/article/discover-the-world-of-pisanki-or-polish-easter-eggs
- https://www.scandinaviastandard.com/origins-of-easter-eggs-how-did-they-become-a-tradition/
- https://www.designandpaper.com/the-tradition-of-decorating-easter-eggs-a-diy-delight/
Read full bio of Sneha Tete


