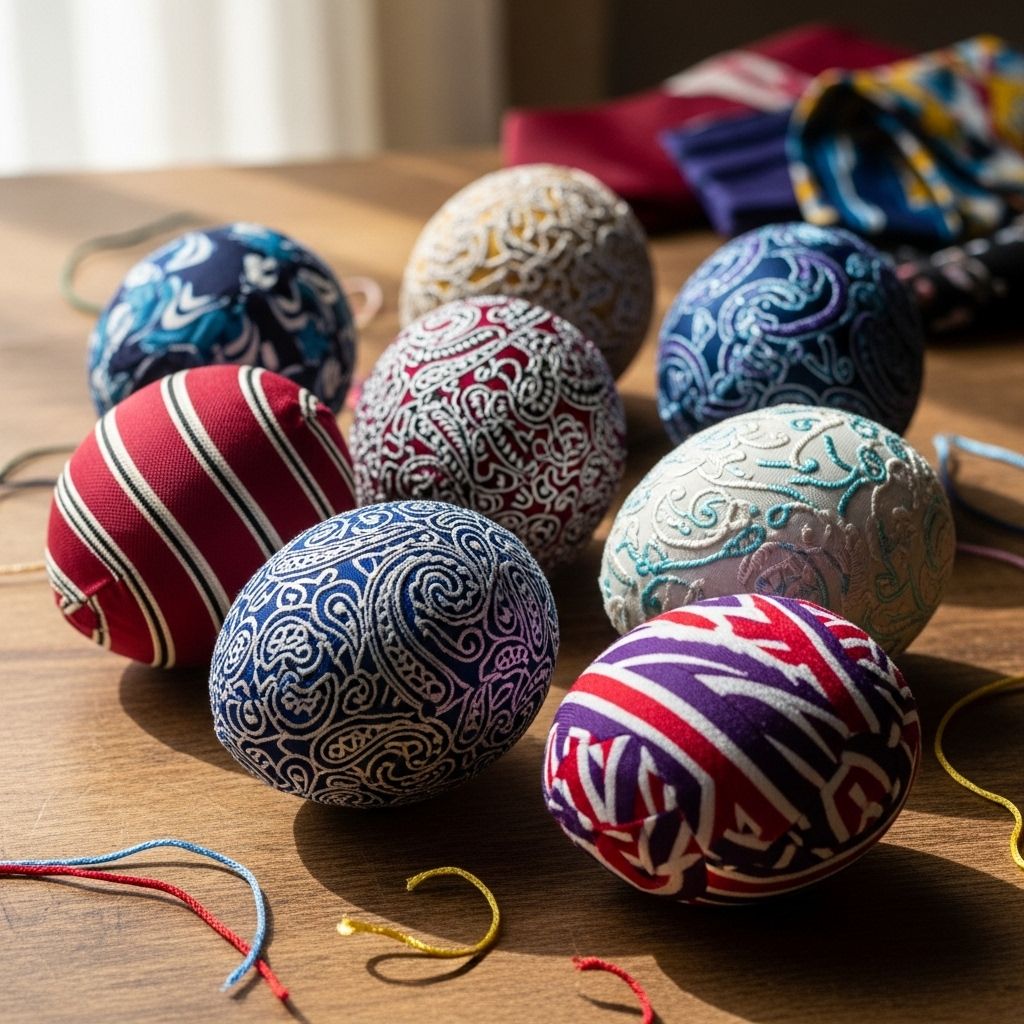
Silk Tie Easter Eggs: Creative DIY Egg Decorating with Vintage Flair
Vintage ties become vibrant keepsakes that brighten spring celebrations.

Silk Tie Easter Eggs: Transforming Vintage Fabric into Artful Holiday Keepsakes
Create a dazzling set of Easter eggs with patterns and colors far more intricate than anything you can achieve with standard dyes. Using 100% silk ties and a little household know-how, these eggs become memorable centerpieces, perfect for family traditions or creative holiday gifting.
Why Silk Tie Eggs?
- Intricate Patterns: Get detailed prints impossible with regular dyes.
- Eco-Friendly Upcycling: Give new life to old silk ties from thrift shops.
- Family-Friendly Activity: Safe and fun for all ages, with opportunities for creative expression.
- Conversation Pieces: No two eggs are ever the same.
Materials Needed for Silk Tie Easter Eggs
- Raw eggs (white shells yield the most vibrant results)
- 100% silk ties or silk fabric scraps (check labels to ensure they are not polyester or stain-resistant for best dye transfer)
- Scissors or seam ripper
- Plain white cotton (old pillowcase or bedsheet for outer wrapping)
- Thread (or twist ties)
- White vinegar
- Large pot suitable for boiling (preferably reserved for crafts, as dyes may not be food-safe)
- Water
- Optional: Gloves, tongs, and tray for cooling
Step-by-Step Guide: Silk Tie Easter Egg Dyeing
Step 1: Prepare Your Silk Fabric
Begin by selecting bold and colorful silk ties. The wackier the print, the more striking the egg. Use a seam ripper or small scissors to carefully open up the ties, removing any tags, lining, or interfacing. You only need enough silk for a square about 7×7 inches per egg.
Step 2: Cut Silk and Outer Wrapping
Cut your silk and cotton fabric into squares large enough to fully wrap each egg. Aim for a snug fit to maximize color transfer. For standard-sized eggs, 7×7 inches works well.
Step 3: Wrap the Egg
- Place the raw egg in the center of the silk square (patterned side facing the egg).
- Pull the silk up around the egg, twisting tightly and tying off any excess with thread or a twist tie. Ensure the fabric is in direct contact with the shell for best results.
- Next, wrap the already silk-wrapped egg in a square of plain cotton fabric. This protects the silk and further secures your wrap.
Step 4: Boiling the Eggs
- Fill your pot with enough water to cover all eggs, adding 1/4 cup of white vinegar per quart of water.
- Gently place your wrapped eggs in the pot. Bring to a gentle boil, then lower heat and simmer for 20-30 minutes. The timing ensures deep color penetration while hard-boiling the eggs.
- Using an old or dedicated pot is recommended, as silk dyes may not be safe for food preparation.
Step 5: Cooling and Revealing the Eggs
- Remove the eggs with tongs and let them cool completely.
- Carefully unwind the outer cotton, then the silk wrap, to reveal your egg’s unique pattern.
- For added shine, wipe the eggs with a dab of bacon fat or vegetable oil.
Expert Tips for Stunning Silk Tie Eggs
- Fabric Selection: Only 100% silk releases vibrant dyes. Avoid polyester or stain-resistant materials, which yield faint or inconsistent results.
- Eggshell Contact: Smooth silk against the egg for crisp pattern transfer; wrinkles can cause smudging or blurred spots.
- Color and Print: Deep, saturated prints yield the brightest eggs. Don’t shy away from bold, even gaudy flea market ties.
- Kids’ Participation: Children can help with wrapping and choosing patterns. Adult supervision during boiling is required.
Safety and Troubleshooting
- Food Safety: Silk dyes are not food-grade. While eggs are hard-boiled, it’s safer to use these eggs for decoration only, not for consumption.
- Pot Selection: Dedicate a pot for crafts to avoid cross-contamination.
- Stain-Resistant Fabrics: Labels like “stain-resistant” or blended textiles can prevent dye transfer. Test ties on a small sample if unsure.
- Cracked Eggs: Wrap eggs gently; cracks may distort the pattern and cause leakage during boiling.
Creative Variations: Expand Your Silk Tie Egg Art
- Fabric Scraps: Use silk scarves, blouses, or pocket squares for larger eggs or diverse patterns.
- Natural vs. Synthetic: Blend silk prints with natural dyes (onion skins, spinach, turmeric) for a two-tone effect.
- Easter Basket Displays: Mix silk tie eggs with painted, decoupaged, and naturally dyed eggs for showstopping baskets.
- Personalized Gifts: Wrap eggs with silk from sentimental items—grandpa’s tie, your wedding scarf—and gift as keepsakes.
- Egg Blowing: For permanent keepsakes, blow out raw eggs before dyeing so the finished shells last year after year.
Frequently Asked Questions (FAQs)
Q: Does this method work with store-bought colored eggs?
A: No, the silk dye transfer technique requires raw or hard-boiled white eggs for best pattern visibility.
Q: Can I eat the eggs dyed with silk ties?
A: While the eggs are hard-boiled, many crafters recommend keeping dyed eggs strictly for decoration since textile dyes are not food-safe.
Q: Why didn’t my egg take up enough color?
A: If your egg is pale or spotty, the fabric may have been stain-resistant or not completely silk. Ensure tight, smooth wrapping and double-check material labels.
Q: Can children help with this craft?
A: Yes! Kids can help choose fabric, wrap eggs, and open the finished product. Adults should handle boiling for safety.
Q: How long do silk tie eggs last?
A: Hard-boiled eggs are best used as decor for a week in the fridge; blown egg shells (with the contents emptied) last indefinitely.
Table: Quick Reference – Silk Tie Egg Dyeing Steps
| Step | Action | Tips |
|---|---|---|
| 1 | Open silk tie, cut to size | Ensure 7×7 inch squares, confirm 100% silk label |
| 2 | Wrap egg with silk, then cotton | Use thread/twist tie for snug wrapping |
| 3 | Boil eggs in water & vinegar | Simmer for 20-30 mins in dedicated craft pot |
| 4 | Cool & unwrap | Reveal pattern, add shine with oil if desired |
| 5 | Display, gift, or store eggs | Use blown eggs for permanent keepsakes; refrigerate hard-boiled eggs |
Eco-Friendly Tips and Advanced Uses
- Scout thrift shops for silk ties, giving old fashion a new holiday purpose.
- Mix silk dye with natural dyes for multi-colored eggs.
- Preserve the decorated eggs by blowing out the contents before dyeing.
- Compost the cotton and silk remnants after the holiday.
- Showcase eggs in baskets, glass jars, and tabletop centerpieces for maximal effect.
Conclusion: The Art of Upcycled Easter Eggs
Silk tie Easter eggs make the perfect union of creativity, tradition, and sustainability, offering a captivating holiday project for all ages. By repurposing vintage fabric and household items, you transform simple eggshells into miniature masterpieces—ready to brighten any home, delight kids and adults, and create lifelong memories. Whether placed in a basket, given as gifts, or saved year-round, each patterned egg tells a story only made possible by the blend of thrifted elegance and DIY ingenuity.
References
Read full bio of medha deb


