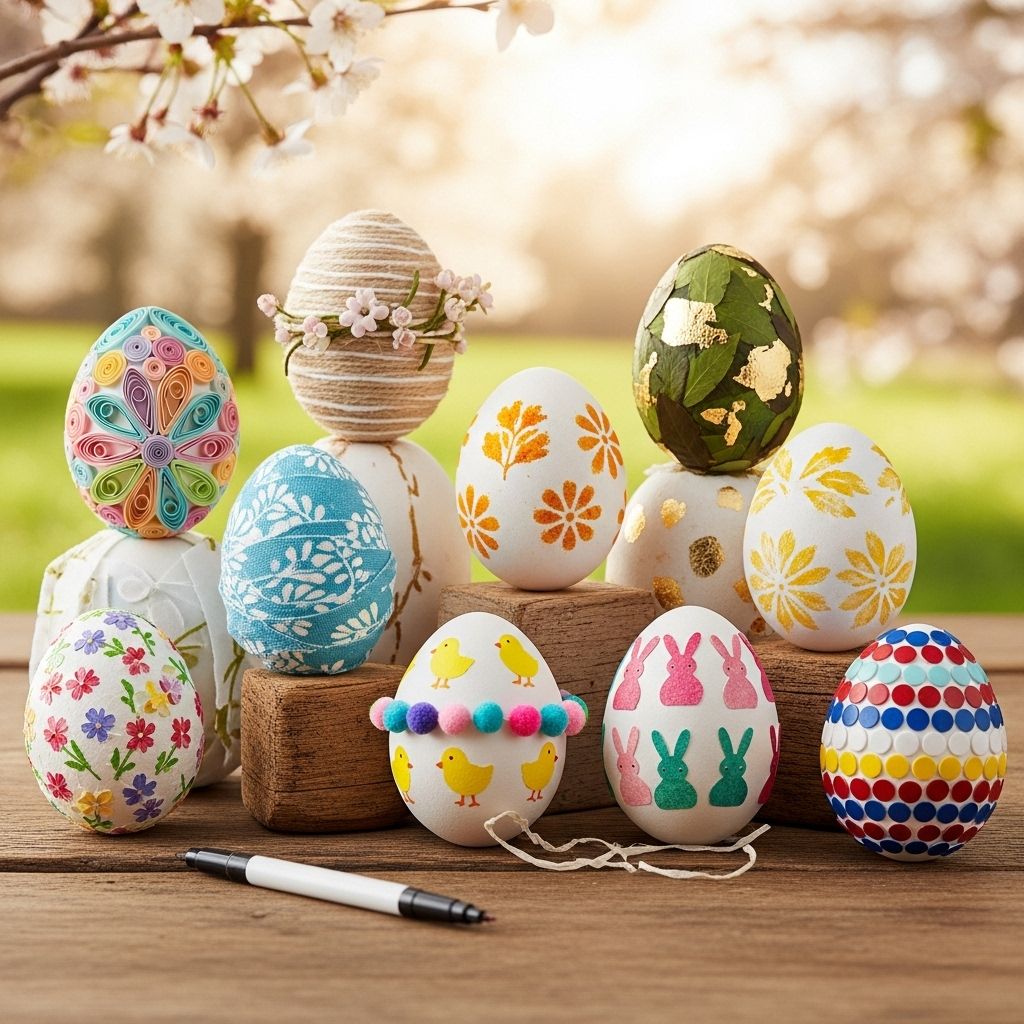
Creative No-Dye Easter Egg Decorating Ideas for a Stunning Spring
Transform craft scraps into vibrant, stain-free decorations that burst with personality.

Avoid the mess of traditional egg dyeing this year and try your hand at no-dye Easter egg decorations. These creative techniques use easy-to-find craft supplies, offering beautiful results without the stains or harsh chemicals. From nature-inspired textures to sparkling accents, discover ways to make your Easter eggs stand out using items you already have at home.
Why Choose No-Dye Easter Eggs?
While coloring eggs with dye kits is a beloved tradition, no-dye decorating is growing in popularity for several reasons:
- Less Mess: No risk of staining hands, clothes, or kitchen counters.
- Kid-Friendly: Many methods use non-toxic materials and simple tools, making them ideal for younger children.
- Creative Variety: Opens the door to unique textures, patterns, and finishes not possible with dyes alone.
- Supplies on Hand: Most projects require only basic crafting materials.
- Safer Eggs: No risk of the shell absorbing dye—especially good for edible hard-boiled eggs.
Essential Materials and Preparation
Before starting your projects, gather the following:
- Hard-boiled or blown eggs (white or brown)
- Glue or mod podge
- Markers (permanent or paint pens)
- Removable temporary tattoos
- Colorful fabrics, decorative paper, or washi tape
- Stickers or stamps
- Feathers, felt, pipe cleaners, googly eyes
- Glitter and sequins
- Spray paint (optional; for adults only)
- Small paint brushes or foam applicators
Use hard-boiled eggs for temporary displays you’ll eat soon, or blown eggs for decorations you’ll keep.
1. Tattooed Easter Eggs
Temporary tattoos aren’t just for skin—they transfer beautifully onto eggs! Kids and adults alike love this simple, modern twist.
- Choose temporary tattoos with your favorite designs or spring motifs.
- Cut out the tattoo, remove the plastic, and place it face down on a dry egg.
- Hold a damp cloth over the backing for about 30 seconds.
- Peel away gently to reveal the tattooed design.
- Combine multiple tattoos for a full-coverage look, or highlight with a single striking image.
Tip: Unlike stickers, tattoos are flexible and adhere smoothly to the egg’s curved surface, providing a seamless ‘painted-on’ finish.
2. Stamped and Fingerprint Easter Eggs
Turn bare shells into tiny works of art using ink pads, stamps, and fingerprints:
- Press your finger into a colored ink pad and apply prints to egg shells.
- Use a fine-tip marker to turn fingerprints into cute animals, flowers, or faces.
- Rubber stamps with permanent ink can also add patterns and borders.
- Let kids experiment with different colors and stamp shapes for whimsical designs.
Fingerprint art makes each egg unique and is perfect for younger children developing fine motor skills.
3. DIY Easter Character Eggs
Create adorable Easter bunny and spring chick eggs using felt, pipe cleaners, googly eyes, and more. These 3D character eggs make charming table displays or party favors.
- Bunny: Attach pipe cleaner ears, felt nose, and glue on eyes. Draw a mouth and add a fluffy cotton tail.
- Chick: Glue on a tuft of feathers, felt or cardstock beak, and stick-on wiggle eyes for personality.
Note: Use hot glue for attaching materials to ensure they stick securely, but supervise children.
4. Glitter & Sparkle Easter Eggs
For those who love shimmer, glitter eggs bring glamour to any Easter display. There are two main ways to create the effect:
- Solid Glitter: Coat the entire egg with a thin layer of glue using a brush, then roll or sprinkle glitter over it. Allow to dry before repeating on the other side.
- Polka Dot Glitter: Apply glue dots randomly to the shell, dust with glitter, and shake off excess. Brush away loose glitter to reveal a patterned effect.
Tip: Place a tray or paper underneath to collect excess glitter for reuse. Consider using fine or chunky glitter for different looks.
5. Natural and Botanical Easter Eggs
Celebrate spring by decorating eggs with items found in nature. Use pressed flowers, small leaves, or herbs to create delicate, vintage-inspired eggs:
- Press and dry flowers or leaves ahead of time.
- Brush a thin layer of mod podge onto the egg, place botanical elements, then gently seal over them with more glue.
- Allow to dry completely before handling.
Natural eggs look beautiful in rustic centerpieces or baskets, especially when paired with raffia and twine accents.
6. Washi Tape and Decorative Paper Eggs
Washi tape and patterned paper let you add bold colors, patterns, and geometric designs without any drying time:
- Cut strips or shapes of washi tape and apply along the egg’s curves.
- Overlap different patterns for a patchwork effect or create stripes and chevrons.
- Decoupage with scrapbooking paper, napkins, or tissue paper using mod podge for seamless surface coverage.
These eggs are a fantastic way to use up leftover craft supplies.
7. Hand-Drawn and Calligraphy Easter Eggs
Channel your inner artist by decorating eggs with permanent markers, metallic pens, or paint pens:
- Draw florals, geometric shapes, or doodle faces directly onto white or brown eggs.
- Use gold or silver pens for elegant accents.
- Add personalized names or messages for a heartfelt touch.
- Try minimalist designs—sometimes less is more!
This is a mess-free option and boasts instant results, perfect for last-minute decorating.
8. Fabric-Wrapped and Embellished Easter Eggs
Fabric scraps, lace, and ribbon can turn simple shells into soft, textured treasures:
- Cut small rectangles of fabric, wrap around eggs, and secure with mod podge.
- Create bold contrasts using lace overlays or metallic ribbons.
- Tie a bow or wrap with twine for a farmhouse-inspired finish.
These are ideal for displays, garlands, or decorative baskets.
9. Spray Paint and Metallic Leaf Easter Eggs (Adults Only)
Gold, silver, and metallic paint give eggs a regal, modern look. Always paint in a ventilated area and let dry fully before handling.
- Wear gloves to keep shells clean.
- Hold eggs with a skewer or on a cardboard base, spray lightly in even motions.
- Optionally, adhere gold leaf for added luxury.
Tip: Metallic eggs don’t need much extra decoration—display them with greenery for impact.
10. Unique and Mixed-Media Easter Egg Ideas
- Sequin Eggs: Pin or glue sequins in overlapping patterns for dazzling shimmer.
- Chalkboard Eggs: Paint eggs with chalkboard paint and write messages with chalk.
- Button Art: Glue colorful buttons for playful, tactile designs.
- Yarn or Twine Wrap: Wrap eggs neatly with colored yarn or rustic twine for boho style.
Methods Comparison Table
| Technique | Skill Level | Ideal For | Special Tools Needed? |
|---|---|---|---|
| Temporary Tattoos | Easy | All ages | No |
| Stamped/Fingerprint | Easy | Kids, groups | Stamp pad/Sharpie |
| 3D Character | Moderate | Crafters, kids (with help) | Glue gun, felt, craft supplies |
| Glitter | Easy-Moderate | Fans of sparkle | Glitter, glue |
| Metallic Spray | Moderate | Adults | Spray paint |
| Fabric/Decoupage | Moderate | Decorators | Fabric, mod podge, brush |
Displaying Your No-Dye Easter Eggs
- Arrange in a decorative basket with shredded paper or real grass.
- Display on an egg tree or in an egg cup centerpiece.
- Place in clear glass vases with flowers for a spring vibe.
- Hang from ribbons or faux branches for a whimsical look.
- Use coordinating colors, patterns, or character themes for a unified display.
Frequently Asked Questions
Do these no-dye methods work on both real and faux eggs?
Yes, all these techniques work beautifully on real eggs (hard-boiled or blown) as well as plastic, wooden, or ceramic eggs, though glue-based methods adhere best to natural shells.
Is it safe to eat eggs decorated with these materials?
If you decorate hard-boiled eggs with food-safe markers or simple washi tape, and avoid ingesting any external materials, they are typically safe. For inedible craft supplies (glitter, glue, etc.), use blown-out or faux eggs and do not consume.
How far in advance can I make no-dye Easter eggs?
Blown eggs and faux eggs will last for years. Hard-boiled eggs should be used within a week and always kept refrigerated until display.
Can I combine multiple techniques on one egg?
Absolutely! Mix and match methods for a personalized, eclectic collection.
What’s the best way to get kids involved?
Set up a crafting station with simple tools and plenty of eggs. Supervise with hot glue or small objects and let creativity run wild with stamps, stickers, tape, and markers.
Final Tips for Picture-Perfect Easter Eggs
- Test techniques on a spare egg before decorating your favorites.
- Keep work surfaces covered for easy cleanup—especially with glitter or paint.
- Layer ideas for eggs that truly shine: try tattoos + marker doodles or fabric + lace trim.
- Snap photos and share your creations—no-dye eggs are always Instagram-worthy!
Celebrate Easter with Creativity and Color
There’s no need for dye to have a vibrant and memorable Easter. With these no-dye decorating ideas, you can craft eggs that sparkle with personality and charm—all while encouraging imagination and quality family time. Happy crafting, and may your spring be filled with colorful creations!
Read full bio of Sneha Tete


