How to Make Crystal Clear Cocktail Ice at Home
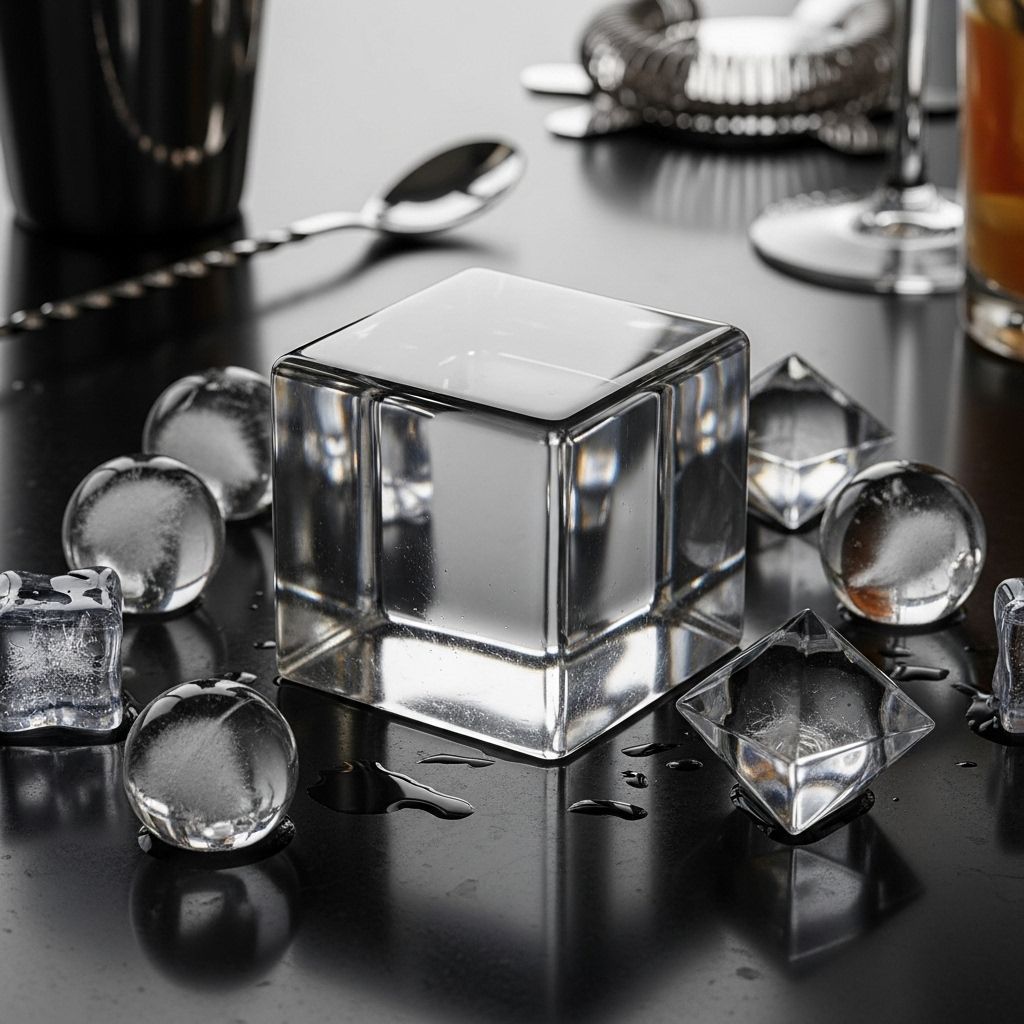
See-through blocks melt slowly to chill drinks without watering down vibrant flavors.

Whether you’re a passionate home bartender or an aspirant mixologist, mastering the art of crystal clear cocktail ice can drastically elevate your drinks. Cloudy, cracked cubes hardly do justice to expertly crafted cocktails. Luckily, crystal-clear ice isn’t a luxury restricted to craft cocktail bars—it’s achievable in your own kitchen, with no special ingredients. Here’s the science, the tools, and tested methods behind creating high-grade cocktail ice, along with step-by-step guides, troubleshooting, and expert tips for perfection.
Why Does Cocktail Ice Matter?
Clear ice is much more than a mark of presentation—its physical properties directly affect the taste and dilution of your drink. Here’s why:
- Slower Melting: Large, clear ice melts more slowly than small, cloudy home ice, keeping cocktails cool without watering them down rapidly.
- Purity: Expelling air and impurities leads to crystal-clear ice that’s visually stunning and flavor-neutral, so the true character of your cocktail shines through.
- Visual Appeal: Nothing matches the allure of a flawless ice cube refracting light and color inside an elegant glass.
What Causes Regular Ice to Be Cloudy?
Standard ice cubes from tray freezers are rarely clear. The cloudiness and cracks arise from:
- Trapped Air Bubbles: Water at home isn’t airless; as it freezes, the air is forced into the center, making ice opaque.
- Impurities and Minerals: Dissolved minerals, microscopic debris, and water hardness add to the cloudiness.
- Rapid Freezing: When ice freezes quickly from all directions, bubbles and particles have nowhere to go.
The Science: Directional Freezing
Professional clear ice is made with a method called directional freezing. Instead of freezing water in all directions at once, you freeze it from one side only—usually top-down or bottom-up. This technique:
- Pushes air and impurities toward the last portion of water to freeze.
- Leaves the bulk of the finished cube crystal clear after trimming off the final cloudy bit.
Step-by-Step Guide: Making Clear Ice at Home
What You’ll Need
- Insulated Cooler: A small, hard-sided or soft-sided cooler that fits in your freezer.
- Filtered or Distilled Water: While you can use tap water, filtration removes a portion of impurities.
- Freezer: With enough space to lay the cooler flat.
- Large Knife or Serrated Knife, Mallet/Hammer: For cutting the ice block into cubes or spears.
- Towel: To steady your ice as you cut.
- Optional: Ice molds (for specific shapes)
The Method: Directional Freezing in a Cooler
- Fill the Cooler: Fill your small insulated cooler two-thirds to three-quarters with filtered or distilled water. The top should remain open; don’t use the cooler lid.
- Place in Freezer: Put the cooler in your freezer with the top uncovered. Ensure there’s enough space above so nothing touches the surface.
- Allow to Freeze: Let it freeze for 18 to 24 hours, depending on the size. Don’t freeze until solid—the goal is for the ice to freeze from the top down, leaving an unfrozen layer at the bottom (where cloudy ice and bubbles accumulate).
- Remove and Invert: Remove the cooler and turn it upside-down over a towel or sink. After a few minutes, the ice block will slide out, with a cloudy layer at the bottom.
- Trim the Cloudy Portion: Using a serrated knife, mallet, or large spoon, break off the thinnest, cloudy section. The remainder is your crystal-clear ice block.
- Shape the Ice: Work quickly to cut the clear block into desired shapes (cubes, spheres, or spears). Wear gloves to prevent sticking and protect your hands.
- Store Properly: Keep clear cubes in a sealed plastic bag or airtight container in your freezer until ready to use.
FAQ: Key Questions About Clear Cocktail Ice
Is boiled water necessary for clear ice?
Boiling water removes some air but is not the primary driver of clear ice. Directional freezing matters much more for clarity.
Can distilled water make ice clearer than tap water?
Distilled water has fewer minerals, but clarity largely depends on the freezing method, not just water source.
Do insulated coolers really work for clear ice at home?
Yes. Insulation slows freezing from the sides and bottom, ensuring top-down (directional) freezing and pushing air downward.
How do I prevent cracks in my ice block?
Allow your cooler to temper briefly at room temperature after removing from the freezer before cutting. This helps reduce severe cracks due to thermal shock.
What if the cubes are cloudy after using the cooler method?
If significant cloudiness remains, try removing the ice a bit earlier—once about 85–90% frozen—so the remaining water has not yet frozen and holds the impurities below the block.
Comparing Methods: Traditional vs. Clear Ice Techniques
| Method | Required Tools | Ice Quality | Time Needed |
|---|---|---|---|
| Regular Tray Freezing | Ice tray, any water | Cloudy, often cracked | 4-10 hours |
| Directional Freezing in Cooler | Insulated cooler, filtered water | Crystal-clear (after trimming) | 18-24 hours |
| Silicone Mold in Cooler | Silicone mold and cooler | Clear, specific shapes possible | 18-24 hours |
| Commercial Clear Ice Machine | Countertop appliance | Crystal-clear, minimal effort | 2-4 hours (per batch) |
Advanced Tips for Perfect Clear Ice
- Work Quickly: Once the ice is out, it’ll start to crack with temperature changes. Cut and bag cubes fast.
- Use Sharp Tools: Serrated knives or ice saws work best. For intricate shapes, a mallet works for splitting, while cookie cutters can yield fun results.
- Avoid Excess Handling: Oils and dirt from hands can dull surface clarity—wear clean gloves if possible.
- Store Correctly: Prevent freezer odors and frost by storing cubes in tightly sealed bags or boxes.
- Try Silicone Ice Sphere Molds: For round ice, set the mold atop the ice block, letting water freeze into the mold from below using the same top-down freezing strategy.
Common Mistakes and Troubleshooting
- Fully Freezing the Cooler: If the block is rock-solid, the bottom portion will be milky. Stop the freeze when the bottom inch or so remains liquid.
- Using Covered Cooler: Always leave the cooler uncovered to ensure slow top-down freezing.
- Trying to Rush Cutting: Let the block temper for several minutes at room temp; rushing can cause shattering and injury.
- Neglecting to Filter Water: Not mandatory for clarity, but filtering removes much of the odor and taste that can spoil cubes.
Expert Insights: The Science Behind Superior Cocktail Ice
Leading mixologists and ice researchers agree: clarity and density are key for exceptional cocktail ice. Large cubes—2 inches or bigger—stay cold longer and minimize dilution. High-end cocktail bars often use commercial block freezers employing the same directional freezing method on a larger scale. For the home hobbyist, a kitchen freezer and $10 cooler achieve nearly identical results, with slightly more hands-on work.
Ultimately, perfecting ice is about attention to process and timing. With practice, cutting and shaping clear cubes becomes quick and satisfying—and elevates every drink you make.
Frequently Asked Questions (FAQs) on Clear Cocktail Ice
Q: Can you refreeze cloudy leftover portions to make them clear?
A: No—the impurities and air are trapped; refreezing will not make them clear. Use them for chilling, not display.
Q: Is there any way to make clear ice without a cooler?
A: Standard trays or molds won’t achieve true clarity. An insulated vessel is essential for controlled, directional freezing.
Q: How long does clear ice last in the freezer?
A: Stored in airtight packaging, clear ice can last weeks, but may begin to pick up freezer odors after a month or more—use soon for best flavor and clarity.
Q: Are commercial clear-ice machines worth the investment?
A: For heavy entertaining or high-end bar programs, yes. For most home bartenders, the cooler method delivers outstanding results at a fraction of the cost.
Summary: Elevate Your Cocktails with Clear Ice
Clear cocktail ice is a hallmark of serious home bartending. By understanding the science of directional freezing and following the steps outlined above, you can reliably produce stunning, slow-melting ice cubes that make every cocktail feel like an occasion. With a little patience and the right tools, flawless ice is well within reach of any enthusiast’s freezer.
Key Takeaways for Home Clear Ice
- Use a small, insulated cooler for best results.
- Freeze water uncovered for 18-24 hours and trim off cloudy base.
- Cut and store clear cubes quickly to preserve clarity.
- Keep ice in airtight packaging to protect flavor and texture.
- Enjoy professional-level cocktails at home, starting with the ice!
Read full bio of Sneha Tete


