How to Poach an Egg Perfectly Every Time: Step-by-Step Guide
Master the art of poaching eggs with simple steps, pro tips, and solutions to every poaching problem.
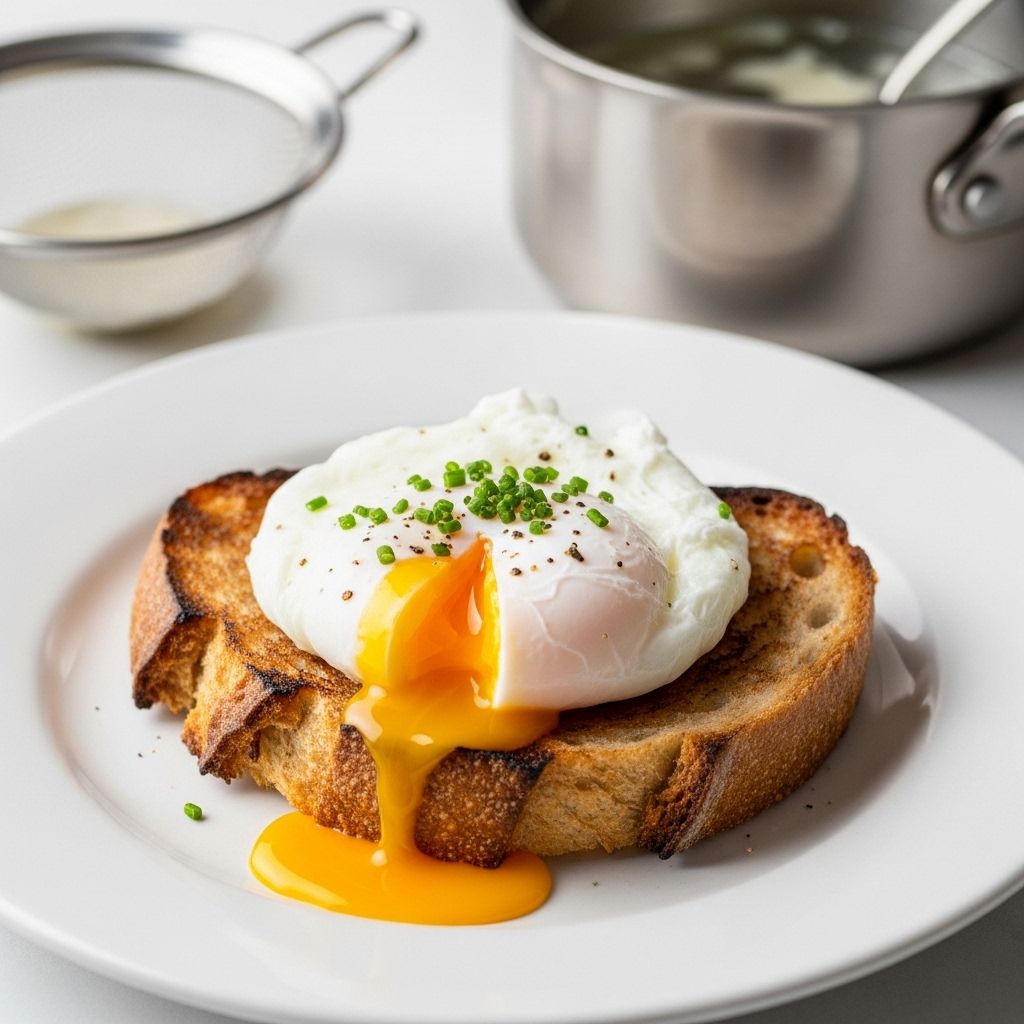
How to Poach an Egg Perfectly Every Time
Poached eggs are a staple in gourmet breakfasts, yet many home cooks are intimidated by them. With the right technique and understanding, anyone can achieve the delicate, oozy-centered perfection that defines a well-poached egg. This thorough guide walks you through every part of the process, addresses common pitfalls, and offers creative ideas to elevate your poached eggs from a humble breakfast to a restaurant-worthy meal.
Why Poach an Egg?
Poaching eggs isn’t just about sophistication—it’s about taste and nutrition. Unlike frying, poaching doesn’t require oil or butter, making it one of the healthiest cooking methods. The result is a creamy yolk encased in tender, silky whites with unparalleled flavor and texture.
- Retains Nutrients: Minimal cooking fat keeps the egg light and nutritious.
- Versatile: Perfect for topping salads, toast, grains, vegetables, or classic Eggs Benedict.
- Elegant Presentation: Beautiful, neat eggs elevate the appearance of many dishes.
Essential Equipment
Before starting, gather the following tools for effective and stress-free egg poaching:
- Large pot or deep frying pan: Must be wide enough for eggs to float without crowding. 1.5 to 2 inches of water depth is ideal.
- Slotted spoon: For gently removing eggs from hot water while leaving the liquid behind.
- Small ramekin or cup: Makes transferring the raw egg to water a breeze.
- Paper towels or clean dish towel: To gently blot off excess water after poaching.
- Fine mesh sieve (optional): Removes runny whites so your eggs are neater.
Choosing the Right Eggs
The fresher the egg, the better it will poach. Fresher eggs hold together with plump yolks and tight whites, producing rounder, more compact poached eggs. Eggs that have been in the fridge for longer tend to spread more in the water, resulting in loose, frilly whites.
- Buy from reputable sources: Local or farm-fresh eggs deliver the best results.
- Store properly: Keep eggs in the main fridge body, not the door—this maintains a cooler, consistent temperature.
Classic Poached Egg Method: Step-by-Step
The following approach balances classic kitchen wisdom and proven tricks for consistent results.
- Bring Water to a Simmer
Fill your pot with 1.5 to 2 inches of water. Bring to a boil, then reduce to a low simmer, aiming for about 180°F (82°C). The water should have gentle bubbles—not a rolling boil, which can break up the eggs. - Add Vinegar (Optional)
Stir in 1 tablespoon of white vinegar for every 4 cups of water. Vinegar helps the proteins in egg whites coagulate quickly, forming a neater oval. The taste is not noticeable if you use the right amount. - Prep Your Egg
Crack the egg into a small ramekin or cup. For extra neatness, you can pour the raw egg through a fine mesh sieve to remove the watery part of the white—this keeps poached eggs tight and compact. - Create a Water Vortex (Optional)
Stir the water in circles with a spoon until a gentle whirlpool forms in the pot’s center, then quickly slide the egg from the ramekin into the middle of the swirling water. This helps wrap the white around the yolk, creating a rounder, neater poached egg. If you’re poaching multiple eggs, skip the vortex and just add them one by one near the surface. - Time Your Poach
Let the egg cook undisturbed:
- 3 minutes: Soft whites, runny yolk (classic poach)
- 4–5 minutes: Firmer whites, jammy to set yolk
Use a slotted spoon to gently lift the egg from the water. Dab carefully on a folded paper towel or dish towel to remove excess moisture.
Transfer to a plate, toast, or prepared dish. Season to taste with salt, pepper, or optional garnishes like herbs.
Alternative Stove-Top Methods
Shallow Skillet Poaching
Some cooks use a deep frying pan or skillet with a lid and only 1–1.5 inches of gently simmering water. This method works especially well for poaching several eggs simultaneously, minimizing spreading and making it easier to keep track of which went in first. After all eggs are in, turn off the heat and cover the skillet. Let sit for 3–5 minutes, checking them periodically to achieve your desired doneness.
Troubleshooting: Solving Common Poaching Problems
- Wispy or feathered whites: The water may be too hot, the egg too old, or not enough vinegar added. Try lowering the water temperature and choosing fresher eggs.
- Egg whites spread too much: Be sure to bring the water to just a bare simmer, and try pouring the egg closer to the water’s surface. Removing watery whites with a sieve helps control this.
- Overcooked yolks: Reduce cooking time and check frequently. Remember, the eggs continue to set slightly after being removed from the hot water.
- Eggs stick together: Give each egg its space—poach one at a time or use a larger pan for batch poaching.
Batch Poaching and Meal Prep
Poached eggs can be made ahead for stress-free entertaining or quick breakfasts during the week.
- Ice Bath Method: After poaching, transfer eggs to a bowl of ice water to stop the cooking process and prevent overcooking.
- Refrigeration: You can store poached eggs in the fridge (in water) for up to 2 days. When ready to serve, heat them in simmering water for 20–45 seconds.
Serving Ideas and Recipes with Poached Eggs
Poached eggs star in much more than just Eggs Benedict. Creative cooks add them to a variety of dishes for an extra punch of flavor and nutrition.
- Avocado Toast: Top toasted sourdough with smashed avocado, a poached egg, red pepper flakes, and a squeeze of lemon.
- Salads: Use poached eggs to elevate a spinach salad, Niçoise, or roasted vegetable dish.
- Grain Bowls: Add to brown rice, quinoa, or farro bowls with roasted veggies, greens, and a drizzle of tahini.
- Turkish Eggs (Çılbır): Nestle poached eggs on garlicky yogurt, drizzled with spicy butter and fresh dill.
- Sweet Potato Toast: Layer poached eggs with avocado, smoked salmon, or wilted greens for a protein-rich breakfast.
Expert Tips for Perfect Poached Eggs
- Temperature is Key: Keep the water at a gentle simmer, never a rolling boil.
- Egg Quality Matters: Fresh eggs yield the neatest poaches.
- Add Vinegar: A small splash speeds up coagulation for perfectly formed eggs. Use light-colored vinegar to avoid discoloration.
- Spooning the Egg In: Slip eggs close to the water surface to preserve their shape and minimize feathering.
- Practice Makes Perfect: Poaching skills improve with repetition—don’t be discouraged by early attempts.
Frequently Asked Questions (FAQs)
Q: Do I have to use vinegar to poach eggs?
A: No, vinegar is optional. It helps egg whites set faster but isn’t required—many chefs skip it, especially if using fresh eggs.
Q: Can I poach more than one egg at a time?
A: Yes! You can poach 2–4 eggs at once in a large pan. Add each egg gently one at a time, spaced apart, and remove in the order added.
Q: How do I keep poached eggs warm if serving a crowd?
A: Hold poached eggs in an ice bath after cooking, then reheat for 20–45 seconds in hot water just before serving. This technique is used in restaurants for service efficiency.
Q: Why do my poached eggs look ragged or loose?
A: This often results from older eggs or water that is too hot. For best results, use the freshest eggs and ensure a gentle simmer.
Q: Can poached eggs be made ahead?
A: Absolutely. After poaching, transfer to ice water and store in the fridge. Reheat in simmering water before serving, and enjoy at your convenience!
Quick Reference Table: Egg Poaching Timing and Texture
| Poaching Time | Egg White | Yolk |
|---|---|---|
| 3 minutes | Set, tender | Runny |
| 4 minutes | Firm | Soft, slightly runny |
| 5 minutes | Very firm | Jammy to firm |
Final Thoughts
Poaching eggs can be a transformative skill for your home kitchen, delivering restaurant-level results in minutes. Armed with these pro techniques, troubleshooting guidance, and serving ideas, you’ll be ready to enjoy beautiful poached eggs for breakfast, brunch, or beyond—whenever the craving strikes.
References
Read full bio of Sneha Tete

