How to Build a Homemade Hydroelectric Generator from Plastic Bottles
Harnessing renewable energy at home: easy DIY hydroelectric generator project using simple recycled materials.

Homemade Hydroelectric Generator: Turning Plastic Bottles into Clean Power
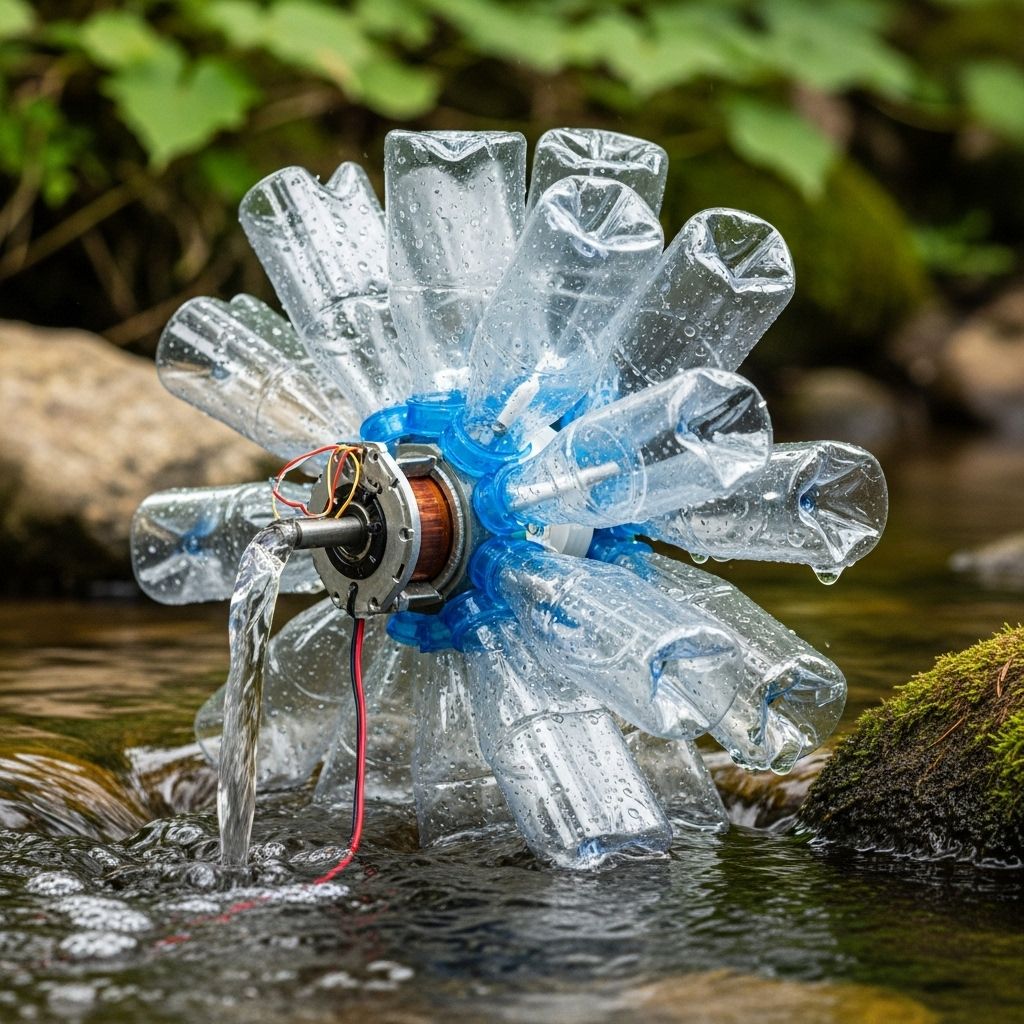
Hydroelectric power has long played a crucial role in producing clean, renewable energy across the globe. While commercial hydroelectric plants require large infrastructure, the same basic principles can be replicated at home with simple, everyday materials. This guide explores how plastic bottles and household items can be transformed into a functional hydroelectric generator, illustrating vital concepts in renewable energy, sustainability, and kinetic-to-electric energy conversion.
Table of Contents
- Overview: Hydroelectric Power and Its Potential
- Why Build a DIY Hydroelectric Generator?
- Materials and Tools Required
- Step-by-Step Assembly Guide
- Understanding Energy Conversion and Principles
- Optimizing and Testing Your Generator
- Applications and Benefits
- Troubleshooting and Safety Tips
- Frequently Asked Questions (FAQs)
- Going Further: Scaling Up and Experimenting
Overview: Hydroelectric Power and Its Potential
Hydroelectric power is a form of renewable energy that converts the movement of water into electricity by utilizing turbines or water wheels. The process relies on water’s kinetic energy to turn mechanical components, which then drive an electric generator. While industrial hydroelectric facilities are massive installations that harness rivers or dams, the same kinetic principles apply on a small scale, making it possible for individuals to build their own generators for demonstration or practical purposes.
- Renewability: Hydroelectric power does not consume water; it simply leverages the energy inherent in moving water.
- Clean Energy: No fossil fuels or emissions involved—this is one of the cleanest power sources available.
- Educational Value: Model generators can demonstrate key scientific concepts in physics, engineering, and sustainability.
Why Build a DIY Hydroelectric Generator?
Creating a homemade hydroelectric generator is an engaging and practical way to understand the basics of renewable energy. DIY projects like this develop:
- Hands-on Learning: Experience the transformation of physical energy into electrical output.
- Environmental Awareness: Reusing household items, such as plastic bottles, helps mitigate plastic pollution and raises sustainability consciousness.
- STEM Skills: Building and experimenting with energy systems cultivates problem-solving, design, and engineering skills.
Current Trends: Repurposing Plastic for Clean Energy
This project offers a creative solution for two major environmental challenges:
- Plastic Waste Reduction: Reuse plastic bottles as essential components.
- Renewable Power Education: Demonstrates an alternative to fossil-fuel-based electricity and inspires future innovations.
Materials and Tools Required
The beauty of this project lies in its simplicity. Most items required can be found at home, reused, or inexpensively sourced:
- 2–4 plastic bottles (500ml to 1L size, cleaned and dry)
- 2 plastic or paper plates
- 6 plastic bottle caps
- 2 plastic rulers (for supports)
- Wooden skewer or strong straw (axle)
- Sticky tack or reusable putty
- Duct tape or strong glue
- Jug or container (for pouring water)
- Small DC motor (from toys or gadgets; optional, for electricity generation)
- LED or small bulb (to demonstrate electrical output; optional)
- Wires and basic connectors (if using a motor)
- Large bowl or tray (to contain water and support setup)
- Scissors, marker, and possibly nail/hole punch (for assembly)
- Adult supervision recommended, especially when using sharp tools or working with electricity.
Suggested Alternatives
- Cardboard for sides instead of plates
- Metal or sturdy wooden skewer as axle (for larger builds)
- Additional recycled plastics for paddles/fins
Step-by-Step Assembly Guide
Follow these clearly structured steps to assemble your homemade hydroelectric generator:
- Prepare Bottles and Caps:
Cut the plastic bottles to form paddles or fins. Bottle caps will serve as additional paddles—glue or tape them securely around the edge of one plate so that each cap faces outward. - Assemble the Wheel:
Sandwich the bottle caps and cut bottle pieces between two plates (one on either side), creating a sturdy water wheel held together with glue or duct tape. - Install the Axle:
Pierce the center of the plate assembly with a skewer or straw to form the wheel’s axle. Ensure the axle rotates smoothly and is centered for balanced turning. - Set Up Supports:
Place two rulers across the width of the bowl or tray, using sticky tack or putty to hold them in place. Lay the axle (with wheel attached) on the rulers so it can freely spin. - Mount Motor and Wiring (Optional):
If electricity generation is desired, attach the motor to the end of the axle so the wheel’s rotation causes the motor’s shaft to turn. Connect wires from the motor to an LED or small bulb. - Secure Everything:
Double check all connections and supports to ensure safety and stability. The setup should be able to withstand splashing water and spinning motion. - Test the Wheel:
Pour water gently onto the top paddles or caps, observing as the wheel begins to spin. Adjust the flow to optimize rotation speed.
Illustrative Table: Materials vs. Purpose
| Material | Purpose |
|---|---|
| Plastic bottles/caps | Paddles (capture water’s kinetic energy) |
| Plates/cardboard | Wheel sides (hold paddles together) |
| Rulers | Supports for axle and wheel |
| Skewer/straw | Axle (rotation point for wheel) |
| Glue/tape | Assembly and structural integrity |
| Motor/wires | Electric generator, demonstration |
Understanding Energy Conversion and Principles
This DIY generator is more than a fun project—it teaches core principles of physics and renewable energy:
- Potential Energy: Water held in the jug or reservoir possesses potential energy due to gravity.
- Kinetic Energy: As water is released, its movement converts potential energy into kinetic energy.
- Mechanical Energy: The water pushes the paddles on the wheel, causing it to rotate—this is mechanical energy in action.
- Electromagnetic Energy (Electricity): If the rotating wheel turns a motor, mechanical energy is converted to electrical energy, which can light an LED or power a small device.
In commercial hydroelectric plants, this conversion powers cities. In DIY setups, it’s enough to illuminate LEDs and demonstrate vital scientific processes.
Optimizing and Testing Your Generator
After basic assembly, adjustments can improve efficiency and learning:
- Angle of paddles: Experiment by tilting paddles slightly to better catch water flow.
- Water flow rate: Pour water slowly, then rapidly, noting the speed of rotation and how it affects the generated electricity.
- Balance: Ensure each paddle is equally spaced for a smooth spin and minimal wobble.
- Motor connection: Test different motors (toy motors, stepper motors). Compare voltage and current output.
Record findings to reinforce scientific thinking and foster curiosity.
Applications and Benefits
This project, while simple, demonstrates several real-world applications:
- Classroom Education: Brings textbook physics lessons to life with visual demonstrations.
- Prototype Development: Provides foundational knowledge for scaling up to community or off-grid energy solutions.
- Environmental Stewardship: Highlights plastic recycling and responsible use of resources.
- Accessible Innovation: Low cost, widely available materials mean nearly anyone can build and learn from it.
Comparing Commercial vs. Homemade Hydroelectric Systems
| Feature | Commercial Hydroelectric | Homemade Model |
|---|---|---|
| Scale | Massive, city-level | Small, educational/hobbyist |
| Materials | Steel, concrete, heavy turbines | Plastic bottles, household items |
| Output | Megawatts | Milliamps (small bulbs/LEDs) |
| Cost | Millions (infrastructure) | Dollars (or free) |
| Impact | Major renewable energy contributor | Educational and demonstrative |
Troubleshooting and Safety Tips
- Wheel doesn’t turn: Check paddles and supports for looseness; ensure axle is not too tight.
- Unstable setup: Reinforce rulers and wheel connections with more tape or putty.
- No electricity generated: Verify motor connection, try spinning faster, or swap out the motor for another type.
- Water leaks: Test in a contained area; don’t use near electronics not meant to get wet.
- Sharp edges: Sand down cut bottle edges and handle tools carefully under adult supervision.
Frequently Asked Questions (FAQs)
Q: How does pouring water make the wheel spin?
A: The force of flowing water applies pressure on the paddles. This pressure pushes the paddles and causes the wheel to rotate, converting kinetic energy to mechanical movement.
Q: Can this generator power household devices?
A: Homemade hydroelectric generators like this produce very little electricity—enough for small LEDs or low-power demonstration, not enough to power appliances.
Q: What’s the purpose of using plastic bottles?
A: Plastic bottles are lightweight, recyclable, and readily available, making them ideal paddles for the water wheel and an opportunity to reuse waste material.
Q: Is it safe to build this project?
A: Yes, provided that sharp tools are used under supervision and water exposure is controlled to prevent slips or electrical hazards.
Q: How can I increase the amount of electricity generated?
A: Increase wheel size, number of paddles, water flow rate, and use a more efficient generator motor. For larger setups, deeper water sources and scaled-up materials are needed.
Going Further: Scaling Up and Experimenting
Once the basic generator has been built and tested, there are many ways to extend and scale up the project:
- Add a rectifier circuit: To convert generated AC to DC for more stable output.
- Experiment with different paddle materials: Try wooden, metal, or larger plastic paddles to compare effectiveness.
- Connect multiple wheels: Chain two or more wheels to study combined power output.
- Monitor real-time output: Use a voltmeter or ammeter to measure electrical production.
- Challenge yourself to power small gadgets: Radios, calculators, and other low-power devices.
The principle behind this project—harnessing kinetic energy from flowing water—is a foundation of global renewable energy solutions. By constructing your own water wheel generator from plastic bottles and common supplies, you’re not only learning by doing, but contributing to a culture of environmental stewardship and innovation.
References
- https://ourfuture.energy/teacher-zone/make-your-own-water-wheel/
- https://www.youtube.com/watch?v=b-SudYEvkG0
- https://www.instructables.com/Free-Homemade-Water-Wheel-1/
- https://www.youtube.com/watch?v=GT8X31XHy9Q
- https://www.youtube.com/watch?v=0CkzBvg3ZBk
- https://www.teachengineering.org/activities/view/cub_energy2_lesson08_activity2
- https://www.youtube.com/watch?v=F1PPYhDwjwI
Read full bio of Sneha Tete


