DIY Anaerobic Digesters: Understanding Biogas and Making Your Own
Learn how to produce renewable biogas at home and build your own anaerobic digester with simple materials and step-by-step guidance.

Biogas offers an innovative, accessible way for people to turn organic waste into usable energy at home. This guide will walk you through the basics of biogas, explain how anaerobic digesters function, and show you how to create your own DIY system using readily available materials. Whether you’re passionate about sustainability or simply curious about renewable energy, developing a small-scale biogas digester is a practical project that provides clean fuel and valuable byproducts.
What is Biogas?
Biogas is a renewable fuel created by the breakdown of organic materials—such as food scraps, manure, or agricultural waste—through a process called anaerobic digestion. This process takes place in the absence of oxygen, where naturally occurring bacteria decompose the materials and release a gaseous mixture primarily composed of:
- Methane (CH4) – Around 50–75%, the main energy component
- Carbon Dioxide (CO2) – 25–50%
- Traces of Hydrogen Sulfide (H2S) and water vapor
This energy-rich gas can be collected and used for cooking, heating, electricity generation, or even as a clean vehicle fuel in more advanced applications. The leftover material, called digestate, is a nutrient-rich fertilizer.
Benefits of Producing Biogas
- Reduced Greenhouse Gas Emissions: Capturing methane from waste prevents it from escaping into the atmosphere, significantly lowering your carbon footprint.
- Waste Management: Converts kitchen scraps, garden material, and animal manure into valuable resources, reducing landfill use.
- Renewable Energy: Provides a sustainable, continuous source of fuel all year round.
- Byproducts: Produces high-quality organic fertilizer that enriches soil.
- Energy Independence: Lowers dependence on fossil fuels and grid electricity.
Understanding Anaerobic Digestion
Anaerobic digestion is the controlled breakdown of organic matter by microbes in the absence of oxygen. Here’s how the process works inside a digester:
- Feedstock Input: Organic material—like food waste or manure—is added to a sealed container (the digester).
- Anaerobic Breakdown: Microorganisms digest the material, producing biogas and digestate.
- Biogas Collection: The generated gas rises and is captured in a storage tank or flexible reservoir.
- Digestate Removal: The remaining material is removed, often through an overflow outlet, and can be used as fertilizer.
| Stage | Process | Main Output |
|---|---|---|
| Hydrolysis | Complex organics → simple sugars, amino acids | Sugars, acids |
| Acidogenesis | Sugars → Volatile fatty acids | Acids, H2, CO2 |
| Acetogenesis | Acids → Acetate, CO2, H2 | Acetate |
| Methanogenesis | Acetate & H2 used by methanogens | Methane (CH4), CO2 |
Designing a DIY Biogas Digester
Building your own anaerobic digester is more accessible than ever, with many people adapting domestic barrels, inexpensive plumbing parts, and a bit of DIY spirit. Below, you’ll find an overview of a typical small-scale biogas digester suitable for home and educational use. The methods and materials may vary, but the process fundamentally remains the same.
Common Materials for a Basic DIY Digester
- Plastic barrel or drums (30–55 gallons, preferably food-grade HDPE)
- PVC piping and fittings (2-inch, 1/2-inch, 3/4-inch as needed for connections)
- Ball valves (for controlling flows in and out)
- Flexible tubing (for gas outlet connections)
- Funnels, tank connectors, sockets, T-fittings, and threaded adapters
- Epoxy clay, silicone sealant, and PVC cement
- Old tire inner tube or a gas bag (for biogas collection)
- Basic power tools (drill with hole saw attachments, utility knife)
Step-by-Step: Building Your Own Anaerobic Digester
- Drill Entry and Exit Points:
- Mark and drill holes in the lid and body of the drum for an inlet, outlet, gas outlet, and overflow/drainage.
- Inlet and outlet pipes are usually 2 inches; gas outlets may be 1/2 inch in diameter.
- Fit Tank Connectors:
- Insert tank connectors (with washers and plastic nuts) into each drilled hole for airtight, secure pipe fittings.
- Seal All Joints:
- Use two-part epoxy clay and silicone to seal every joint, focusing on airtightness to prevent gas leakage.
- Assemble Pipework:
- Construct inlet and outlet pipes with socket connectors, ball valves (for control), and necessary elbows. The inlet typically sits higher than the outlet to ensure proper flow.
- Build a gas outlet on the lid, attaching a gas valve and flexible hose leading to a storage bag (like a tire tube or gas bag).
- Install Gas Collection System:
- Use a flexible reservoir (old tire inner tube) or a floating drum system to collect the generated biogas.
- Mount the collector reservoir slightly above the digester, securing it to allow easy gas transfer.
- Test for Leaks:
- Before use, fill with water and check for leaks at every joint. Apply additional sealant where needed.
- Final Positioning:
- Set up the digester outside, ideally in a warm, sunny spot. Secure the inlet funnel and arrange the outlet over a catchment container for digestate.
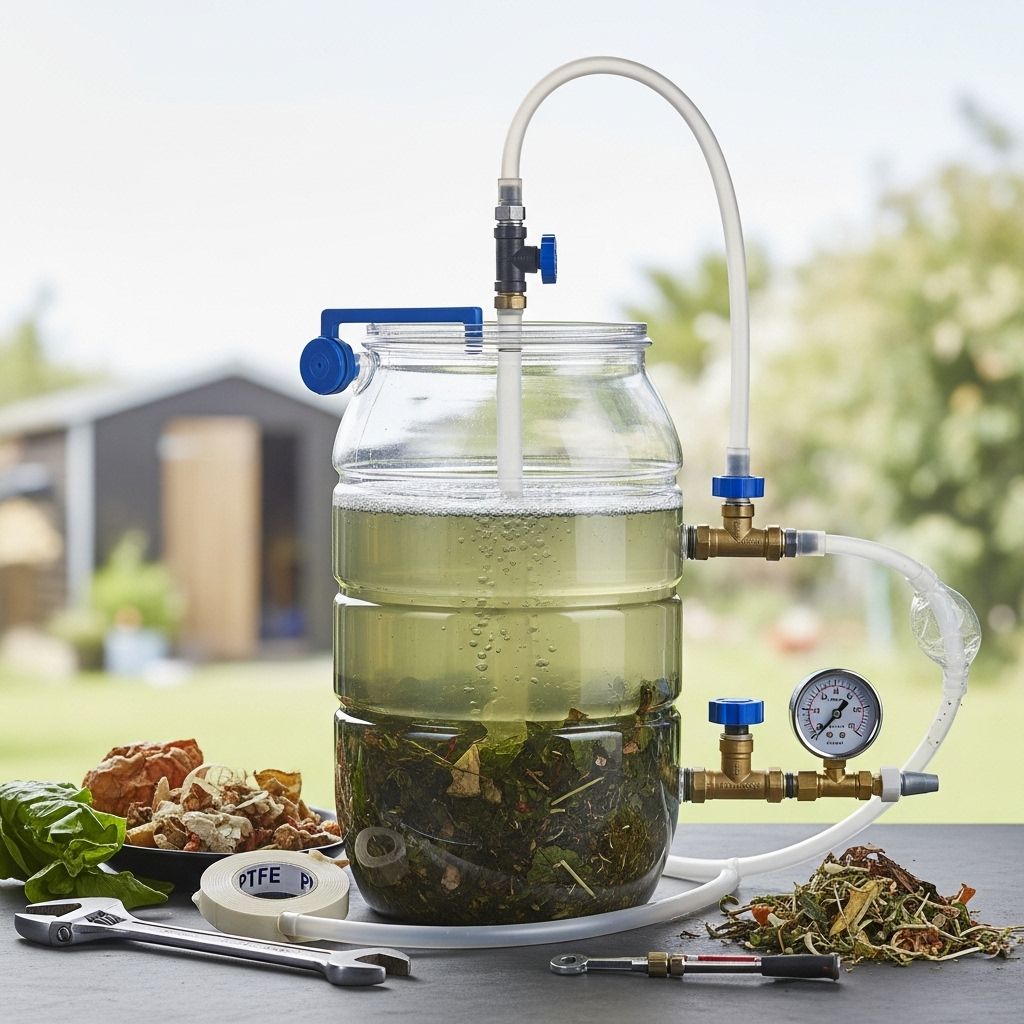
Visual Overview: Typical DIY Digester Set-Up
- Barrel: Sealed drum serving as the digestion chamber.
- Inlet Pipe: For adding feedstock (food waste, manure).
- Outlet Pipe: For removing digestate fertilizer.
- Gas Outlet: For transferring biogas to storage.
- Flexible Gas Storage: Such as an inner tube, kept above the digester to collect rising gas.
What Can You Feed a Home Biogas Digester?
Feedstock selection is crucial for effective biogas production. You can add a wide range of organic materials, but some digest more efficiently and safely than others.
- Best Options:
- Vegetable and fruit scraps
- Animal manure (from herbivores, especially cows)
- Coffee grounds, tea leaves, eggshells (crushed)
- Grains and bread (in moderation)
- Yard clippings (avoid woody or tough stalks)
- Avoid Adding:
- Meat and dairy (increase odor, risk of pathogens, low digestibility)
- Large volumes of fats or oils
- Synthetic or chemically treated materials
Operating Tips for Best Results
- Maintain the digester at warm temperatures (30–40°C / 85–105°F) for optimal microbial activity.
- Feed little and often, rather than infrequent large loads—this ensures steady gas production.
- Keep added materials moist but not waterlogged; too much water can wash out active microbes.
- Monitor for signs of leaks and reseal as necessary.
- Stir or agitate the mixture periodically to prevent settling and create even digestion.
- Use produced biogas as soon as possible for cooking or heating; store in gas-tight bags if saving for later use.
Frequently Asked Questions (FAQs)
Q: How much gas can I expect from a small home digester?
A small DIY digester (50–200 liters) fed daily with around 1–2 kg of food waste can typically provide enough biogas to fuel a single-burner stove for 30–90 minutes per day, depending on feedstock and temperature.
Q: Is the process safe? Is there any risk of explosion or toxic gas exposure?
Properly built and maintained digesters are quite safe. The main risks stem from leaks, which, if detected early, can be easily repaired. Methane is flammable but non-toxic at low concentrations. Ensure the system is vented and all connections are airtight. Avoid storing large amounts of raw biogas indoors.
Q: Can I use human waste in my digester?
While technically possible, processing human waste (“blackwater”) requires additional precautions to reduce health risks and may not be legal in all areas. Focus on plant-based scraps and manure from herbivores for beginner systems.
Q: How often do I need to empty the digester?
Digestate can be withdrawn whenever the volume builds up—this might be every few weeks for a small system. Use the nutrient-rich liquid or sludge as fertilizer on non-edible plants or compost it further if desired.
Q: Does the digester smell?
When functioning correctly (airtight and properly loaded), there is very little smell. Odors usually occur if the system leaks or is overloaded with difficult-to-digest waste.
Environmental Impact and Further Learning
Home-scale biogas digesters not only help reduce household waste but encourage sustainable living and renewable energy innovation. While they may not fully replace grid energy, they offer tangible educational and practical benefits—empowering individuals and communities to reduce their ecological footprint.
- Responsibly handle all waste and gas outputs.
- Join local or online groups to share experiences and tips.
- Scale up gradually, starting with basic materials and simple construction methods.
Conclusion
Building and running a DIY anaerobic digester is an engaging project for anyone interested in renewable energy, sustainability, and waste reduction. With practical planning and careful construction, you can harness the natural power of microbes to generate clean biogas and valuable fertilizer—all from kitchen scraps and garden waste.
References
- https://www.youtube.com/watch?v=La6yXYwVq3A
- https://www.instructables.com/Biogas-Digester/
- https://attra.ncat.org/publication/micro-scale-biogas-production-a-beginners-guide/
- https://www.motherearthnews.com/diy/biogas-digester-construction-zm0z23zkgar/
- https://www.epa.gov/sites/default/files/2020-11/documents/agstar-operator-guidebook.pdf
- https://extension.psu.edu/agricultural-anaerobic-digesters-design-and-operation/
- https://www.build-a-biogas-plant.com/PDF/Micro-Scale%20Biogas%20Production.pdf
- https://permies.com/t/58511/composting/Building-domestic-anaerobic-digester-composter
Read full bio of medha deb


