How to Master the Natural Stitch Bun: The Ultimate Guide
Master the art of the natural stitch bun—your complete guide to gorgeous, structured, and protective styling for every occasion.

The Rising Trend: Embracing the Natural Stitch Bun
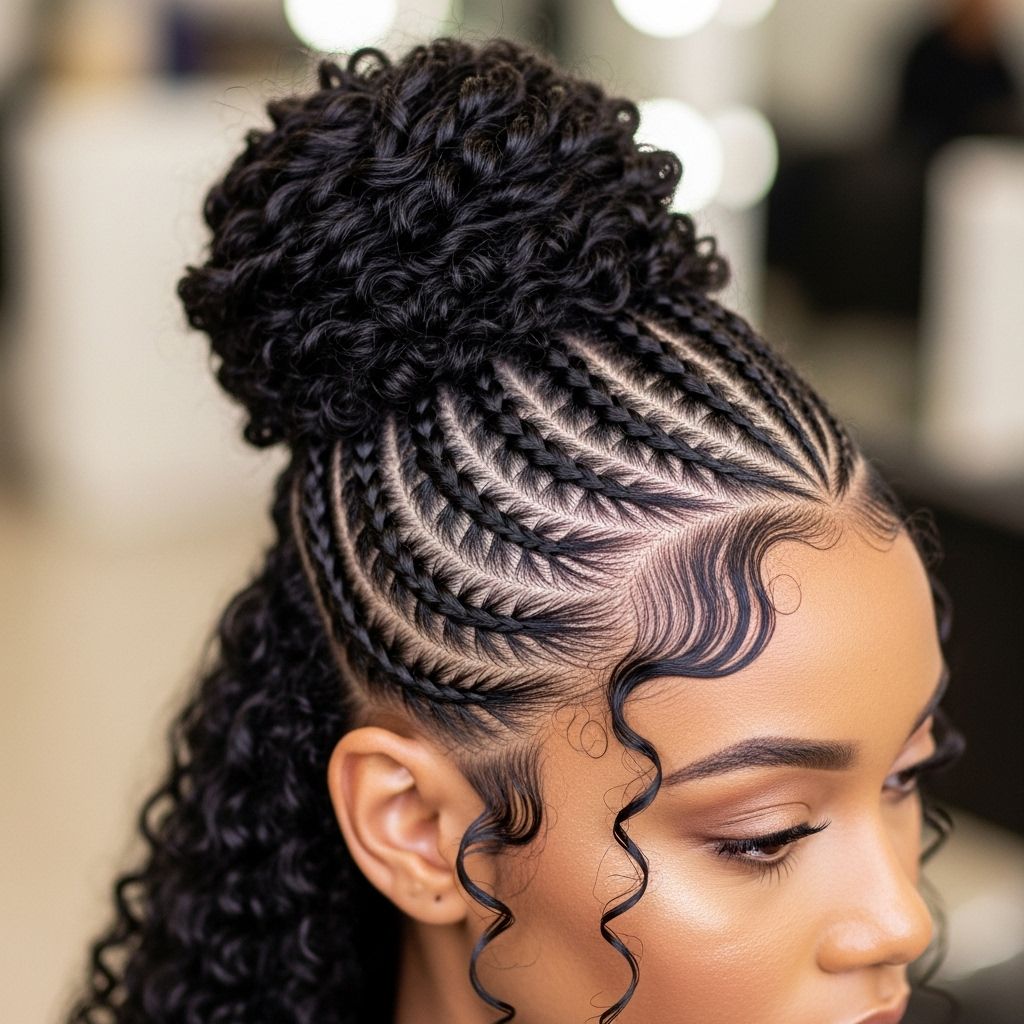
In recent years, the natural stitch bun has taken the hairstyling world by storm, becoming a go-to look for natural hair enthusiasts, style icons, and professional stylists. Celebrated for its beautifully defined sections, sleek braids, and versatile, protective bun, the stitch bun is more than a fleeting trend—it’s an empowering means of expression and a testament to the artistry of textured hair. In this guide, learn everything you need to master the stitch bun: why it matters, how to do it, and tips to make your version truly stand out.
Why the Stitch Bun is a Must-Try Protective Style
The stitch bun uniquely blends functionality and style, making it a staple in the world of protective hairstyles. Here’s why so many are falling in love with this look:
- Protects Natural Hair: Shields the ends of your hair, reducing breakage and promoting growth.
- Maintains Moisture: Braided sections keep strands secure, helping retain moisture and minimizing frizz.
- Versatile Beauty: Suitable for casual, professional, and special occasions—dress it up or down with your favorite hair accessories.
- Low Maintenance: Once installed, a stitch bun can last for days with minimal effort, perfect for busy schedules or protective styling routines.
What Exactly is a Stitch Bun?
A stitch bun combines:
- Stitch braids: These are crafted by parting the hair into evenly spaced rows or ‘stitches’, then braiding each section with crisp, defined lines.
- A bun: The braided sections are gathered—traditionally at the crown or back of the head—then twisted or wrapped into a neat bun, securing the look and tucking away ends.
The result is a chic, geometric style that highlights the beauty of clean parting and the sophistication of structured braiding. The stitching technique (using fingers, a rat-tail comb, or a braiding tool) creates the signature look of parallel ‘stitches’, setting this style apart from conventional cornrows or feed-in braids.
Tools & Products: What You’ll Need for the Perfect Stitch Bun
Preparation is key for achieving professional-looking results. Gather these essential tools and products before you start:
- Rat-tail comb (for precise parting and sectioning)
- Braiding gel or edge control (for a sleek, frizz-free look and clean lines)
- Clips or hair ties (to hold sections and keep parts neat)
- Paddle brush or detangling brush (essential for smooth, tangle-free hair)
- Elastic bands (small and snag-free, for holding the bun and sections)
- Hair extensions, if desired (adds length, volume, or extra flair)
- Edge brush or toothbrush (for perfecting edges and baby hairs)
Preparation: How to Get Your Hair Ready
Your results will depend on how well you prepare your hair. Start with freshly washed, conditioned, and detangled hair to ensure a smooth styling process:
- Wash and deep condition: Use a gentle, sulfate-free shampoo and a nourishing conditioner for moisture and detangling.
- Detangle thoroughly: Use a wide-tooth comb or detangling brush, starting at the ends and working upward.
- Moisturize: Apply a leave-in conditioner or a lightweight oil to seal in hydration.
- Blow dry or stretch (optional): For a sleeker look, stretch your hair with low heat or by braiding/twisting it overnight.
Step-By-Step: How to Do a Natural Stitch Bun
Step 1: Sectioning Your Hair
This first stage is crucial—you want crisp, clean lines for the signature ‘stitch’ effect.
- Part your hair: Use the rat-tail comb to part your hair into rows from front hairline to nape or according to the desired bun placement.
- Control frizz: Apply braiding gel or edge control along each part as you go for sharp definition.
- Clip sections: Secure each completed section away with clips or small bands to keep your workspace tidy.
- For a symmetrical bun, ensure your sections are even in size and parallel to one another. Adjust with the comb as needed.
Step 2: Mastering the Stitch Braid Technique
The ‘stitch’ in a stitch bun comes from the way each section is braided. Here’s how to get those ultra-defined stitches:
- Start at the hairline: Pinch a small section at the root, then use your index finger or comb to pull a horizontal line, creating a crisp ‘stitch.’
- Braid and add: As you braid, use your index finger to section off and add a bit more hair to each ‘stitch.’ This method gives the braid its signature look—clear, horizontal separations within each braid.
- Continue the feed-in method, adding hair as you braid for some volume and a seamless effect.
- Repeat until all sections are neatly stitched into braids, leading toward the spot where you want the bun placed.
Step 3: Creating the Bun
This is where the look comes together. Gather the braided ends and follow these steps:
- Set the bun location: Decide whether your bun will be top, middle, or low. Gather all braid ends at that point.
- Secure the base: Use a strong elastic or scrunchie to hold the braids together.
- Form the bun: Twist or wrap the braided hair into a spiral shape. Tuck the ends under or around the base for security.
- Finishing touches: If you prefer, add hair extensions for a larger or more dramatic bun.
- Secure with pins: Use bobby pins to anchor the bun—make sure it feels stable and comfortable.
Expert Tips for a Flawless Stitch Bun
- For Clean Parts: Pause and re-section as needed—symmetrical, crisp lines are key to the look.
- Braiding Gel Matters: Choose a firm-hold gel that’s residue-free for a perfectly smooth base.
- Tension Control: Keep tension consistent for even stitches, but don’t braid so tightly that it hurts your scalp.
- Edge Styling: Use an edge brush and control gel to lay your baby hairs for an extra polished finish.
- Don’t Rush: Especially if trying this for the first time. Take your time on each braid for the sharpest results.
How to Keep Your Stitch Bun Fresh
To get the most from your beautiful new style and promote healthy hair beneath, follow these simple maintenance tips:
- Night Protection: Wrap your hair in a silk or satin scarf or bonnet before bed to prevent frizz and breakage.
- Refresh Edges: Every few days, lightly reapply edge control and use a damp cloth to smooth baby hairs.
- Moisturize: Use a light oil mist along your scalp and braids to avoid dryness.
- Avoid Heavy Styling Products: Build-up can make the braids look dull or stiff—keep styling products to a minimum.
- Redo As Needed: The stitch bun can last up to a week or more, but redo sections if frizz develops or the style feels loose.
Popular Variations: Customizing Your Stitch Bun
The stitch bun is highly customizable. Here are some favorite variations to make the look yours:
- Feed-in Extensions: For added volume, length, or color that blends naturally with your own hair.
- Stitch Ponytail: Instead of a bun, try assembling the braids into a sleek ponytail for a dramatic effect.
- Braided Designs: Incorporate zig-zag parts, swirls, or accent braids for a unique touch.
- Half-Up Stitch Bun: Braid just the top half of your hair into stitches and bun, leaving the rest loose or curly.
- Accessorize: Add cuffs, beads, or decorative pins for festival-ready flair.
Frequently Asked Questions
Q: How long does a stitch bun last?
A: With proper night protection and minimal manipulation, a stitch bun can last up to 7-10 days before needing a refresh.
Q: Is this style safe for all hair textures?
A: Yes! The stitch bun can be tailored for a wide range of natural hair types, from 3A curls to 4C coils—just adjust product use and tension as needed.
Q: Do I have to use extensions?
A: Not at all. Extensions add fullness or length but are optional. The style works beautifully on natural hair alone.
Q: Can the stitch bun cause hair damage?
A: Not when done properly. Avoid braiding too tightly and give your scalp breaks between installations for healthy, thriving hair.
Q: What if I don’t get the sections right on my first try?
A: No worries—just undo and re-part until you’re satisfied. Even professionals take their time to achieve neat sections!
Bonus Section: Quick Troubleshooting Guide
- Frizzy Braids: Apply a bit more gel and smooth gently. Wrap with a scarf for 10-15 minutes.
- Loose Bun: Reinforce the base with an extra elastic and more pins.
- Sensitive Scalp: Loosen the braids or bun slightly, and avoid over-tightening during installation.
- Dull Finish: Mist with a lightweight oil spray for instant sheen.
Final Words: Make It Your Own!
The natural stitch bun is as much about personal style as it is about technique. Every bun tells its own story—yours can be practical, artistic, understated, or bold. With a bit of patience and creativity, you’ll master a look that turns heads while nurturing your natural crown. So gather your tools, set aside some time, and enjoy the journey to your best stitch bun yet.
References
Read full bio of Sneha Tete


