Mastering Freestyle Feed-In Braids: The Ultimate Guide to Creative Protective Styling
Unlock your creativity and learn how to achieve flawless, personalized freestyle feed-in braids with expert-backed tips and pro techniques.
Freestyle Feed-In Braids: Where Artistry Meets Protection
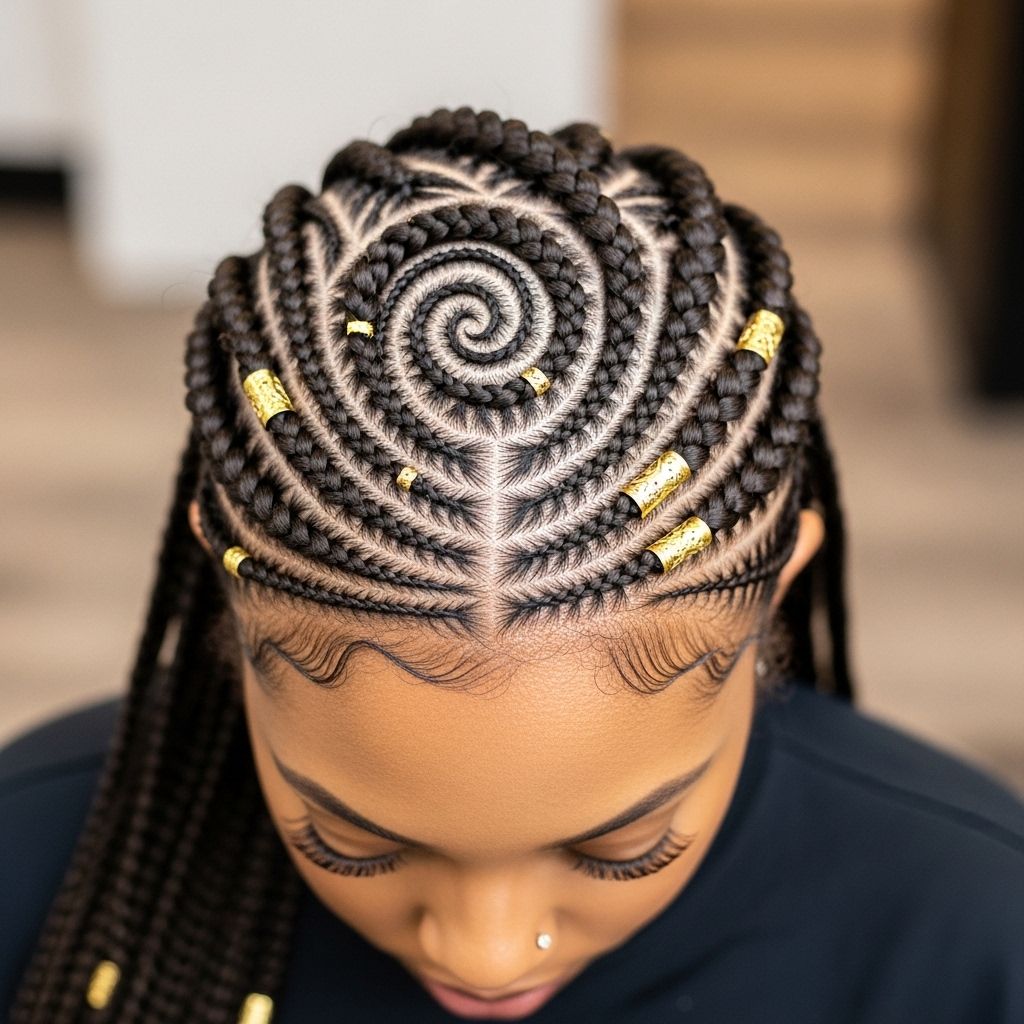
If you crave a protective style that’s as customizable as it is head-turning, look no further than freestyle feed-in braids. The beauty of this technique lies in its absolutely no-rules approach—switch up your parting, vary the texture, experiment with shapes or length, and invent whatever pattern comes to mind. This guide will empower you to master freestyle feed-in braids through expert advice, from hair prep to standout finishing details, all while keeping your natural hair healthy and happy.
What Are Freestyle Feed-In Braids?
Feed-in braiding creates seamless, natural-looking plaits by gradually adding synthetic hair as you braid. What sets freestyle apart? There’s no single pattern or formula—each style is unique, shaped by the hands and imagination of the braider. You can:
- Play with parting styles: straight, zigzag, curved, geometric, or totally random.
- Vary thickness and length of braids for eye-catching dimension.
- Incorporate creative shapes and patterns: hearts, triangles, waves, and swirls are all on the menu.
- Mix in accessories: cuffs, beads, and even vibrant colors for a custom finish.
Because the synthetic hair isn’t added until after you start each braid, feed-ins create a lighter, more natural look and place less tension on your edges—making them the go-to for comfortable, protective styling.
Why Choose Freestyle Feed-In Braids?
- Unlimited creativity: Shape is limited only by your imagination—symmetrical or mismatched, intricate or minimalist.
- Protective benefits: When done correctly, feed-in braids minimize stress on the hairline and help shield your strands from daily wear and tear.
- Lower tension: Because braiding hair is fed in gradually, you can avoid the heavy, tight feeling often associated with traditional braids.
- Long-lasting style: With the right prep and maintenance, enjoy your freestyle feed-in braids for weeks on end.
Ready to unlock your creativity and try this look yourself? Follow the steps below to achieve flawless results, straight from the pros.
The Step-by-Step Freestyle Feed-In Braids Tutorial
Whether you’re a seasoned braider or a curious newbie, a little preparation and practice go a long way. Here’s how to get started:
1. Start with Detangled, Clean, and Stretched Hair
First things first: detangle and blow-dry your hair thoroughly. This makes parting crystal-clear and ensures every braid is smooth from root to tip. Skipping this step can mean painful knots and wonky lines—trust us, it’s worth the effort.
- Wash and condition your hair for a clean canvas.
- Apply a leave-in conditioner or detangler for maximum slip.
- Use a wide-tooth comb or detangling brush to remove knots gently.
- Blow-dry with a comb attachment to stretch your strands, or stretch using heatless methods if preferred.
2. Plan Your Design—or Don’t!
One of the joys of freestyle is improvisation, but a little inspiration can go a long way. If you prefer some structure, sketch a quick map or browse images for reference. Decide if you want:
- Precise geometric shapes versus flowing, organic lines.
- Symmetry (matching both sides) or an abstract, freestyle effect.
- One focal braid with supporting accents, or evenly spaced designs throughout.
3. Section and Part with Precision
Use a rat-tail comb to carve out neat sections, working from front to back. Clean parting helps the final look pop—especially if your style relies on sharp geometric shapes or negative space. Secure sections you’re not working on with clips or hair ties.
4. Mastering the Feed-In Technique
This signature technique is the secret to seamless, natural-looking braids. Here’s how to nail it:
- Start each braid with just your natural hair—braid two or three crosses before adding any synthetic hair.
- Gradually feed in small pieces of braiding hair as you go, adding more with each stitch. This creates a tapered effect and avoids telltale “bulges” at the base.
- For complex patterns (like hearts or swirls), closely follow your parting, and adjust hand tension for sharp angles or curves.
- Keep the added hair smooth and tangle-free by pre-sectioning it before you start.
- Work slowly—precision trumps speed!
5. Get Creative with Shapes and Patterns
Freestyle feed-in braids are the ultimate canvas for hair art. Popular shapes include:
| Shape | Styling Tips |
|---|---|
| Heart | Part into a classic half-lobe shape, braid along the outline, then finish with beads on the ends for emphasis. |
| Triangle | Sharp, geometric triangles break up a braided pattern and look bold in updos. |
| Square | Perfect for creating a grid effect or mixing with other angular designs. |
| Swirl/Zigzag | Follow undulating lines for a softer, flowy finish; ideal for adding movement and dimension. |
6. Add the Finishing Touches
- Mousse: Apply a generous amount to set your braids, minimize flyaways, and give a clean finish.
- Edge Control: Slick down baby hairs for a polished, professional look.
- Accessories: Accent your braids with cuffs, beads, or ribbon for personality and sparkle.
- Bantu knots or twists: Add to the ends for flair and to protect hair tips.
7. Maintain and Protect Your Style
- Wrap braids with a silk or satin scarf at night to prevent frizz and prolong style.
- Refresh with mousse or braid spray as needed.
- Keep scalp hydrated with lightweight oil or serum for optimal hair health.
- Avoid leaving braids in longer than 6–8 weeks to protect your roots and prevent matting.
Expert Tips and Tricks from Pro Stylists
Get the inside scoop from the pros who set braid trends every season. Thomas Schuyles, a featured stylist, shares game-changing advice for gorgeous, healthy braids every time:
- Don’t skip the prep: Detangled, stretched hair guarantees clean parts and refined style.
- Take your time with parting: Symmetry elevates the look, especially for geometric designs.
- Be gentle on edges: The feed-in technique is ideal for maintaining a healthy hairline, so avoid tight knots and heavy tension near your edges.
- Mix textures and sizes: Don’t hesitate to pair chunky and petite braids for striking emphasis.
- Trust your instincts: Sometimes the best designs happen spontaneously—don’t be afraid to improvise.
Frequently Asked Questions (FAQs) About Freestyle Feed-In Braids
How long do freestyle feed-in braids last?
With careful installation and nightly maintenance, your braids can last up to 6–8 weeks without significant frizz or matting. Individual results may vary depending on hair type, product use, and routine care.
What’s the difference between feed-in braids and regular braids?
Feed-in braids utilize a gradual hair-adding technique for a seamless size transition and less tension at the roots. Regular braids often incorporate extensions from the very start, which may feel heavier and look bulkier at the base.
Can you do freestyle feed-in braids on short hair?
Yes! As long as you have enough length to grip and start the braid (about 2–3 inches), you can achieve great results by feeding in extensions gradually for the desired thickness and length.
Which products are best for prepping my hair?
- Moisturizing shampoo and conditioner: Healthy hair is key to long-lasting braids.
- Detangling spray or leave-in conditioner: Makes sectioning and braiding a breeze.
- Braid mousse: Locks in moisture and tames frizz.
- Edge control gel: For crisp baby hairs and a sleek finish.
How can I protect my edges during the braiding process?
Use the feed-in technique to avoid excessive tension, skip heavy products around the hairline, and never braid edges too tightly. Maintain moisture and use a satin scarf when sleeping to keep edges smooth.
Trending Ideas and Advanced Advice
- Mix colors: Add vibrant extensions in highlights or peekaboo streaks for a playful pop.
- Blend techniques: Combine cornrows, box braids, and feed-in patterns for a complex, dimensional look.
- Try shape repetition: Mirror hearts or triangles on each side or scatter shapes unpredictably for custom flair.
- Switch up braid ends: Transition braids into twists, curls, or Bantu knots for extra texture play.
- Consult a professional: For intricate patterns or your first freestyle attempt, consider booking a skilled stylist for best results.
Common Mistakes to Avoid
- Skipping hair prep: Unwashed or tangled hair can compromise both aesthetics and scalp health.
- Overusing product: Too much mousse or edge control can cause buildup and dull shine.
- Neglecting tension: Tight braids may look neat initially but can lead to breakage and discomfort.
- Leaving styles in too long: Braids left beyond 8 weeks risk matting, especially at the roots.
Inspiration: Let Your Personality Shine
Freestyle feed-in braids aren’t just a hairstyle—they’re a form of personal expression. Whether you prefer minimalist, symmetrical lines or funkier shapes and splashes of color, this style gives you the freedom to showcase your mood, taste, and creativity. Don’t be afraid to personalize your look with favorite colors, bold parts, or unique accessories.
Quick Reference: Freestyle Feed-In Braids FAQs
Q: Are freestyle feed-in braids damaging to natural hair?
A: Not when installed with the feed-in method, which reduces tension, especially on edges. Proper care and timely removal are key.
Q: How do you remove feed-in braids without breakage?
A: Start from the ends and gently unravel each braid after applying detangling spray or conditioner. Never rush, and always detangle with care.
Q: What’s the best nighttime routine for braids?
A: Apply mousse as needed, then wrap with a silk or satin scarf or sleep on a satin pillowcase to minimize frizz and moisture loss.
Q: Can I add beads or other accessories at home?
A: Absolutely! Slide beads, cuffs, or ribbons onto braid ends and secure with small rubber bands. Choose lightweight accessories to prevent pulling.
Conclusion: Your Next Great Look Begins Here
Freestyle feed-in braids open up a world of possibility—where protection, creativity, and self-expression meet. With the right prep, patience, and a dash of inspiration, you’ll be ready to rock your own masterpiece with confidence. Bookmark this guide as your go-to reference for every braided look yet to come!
References
- https://www.cosmopolitan.com/style-beauty/beauty/a34642847/freestyle-feed-in-braids-tutorial/
- https://www.youtube.com/watch?v=hjnQy4o26DY
- https://kreyolessence.com/en-ca/blogs/press/cosmopolitan-the-braid-up-how-to-create-these-feed-in-stitch-braids
- https://www.cosmopolitan.com/style-beauty/beauty/a42404379/multicolor-feed-in-braids-how-to/
- https://www.youtube.com/watch?v=_3aGS_z5RH4
- https://www.youtube.com/watch?v=lgj-nomcACM
- https://www.youtube.com/watch?v=Aa8cUNlAXXA
- https://www.youtube.com/playlist?list=PLUgchMD0OL6JqoHBu-TGEKvgjM-74ZTPu
- https://www.youtube.com/playlist?list=PLrx4fxhgMUObLCxt_QbtT-1Qqx0oN2-EN
- https://www.youtube.com/watch?v=4QINiNN4Q00
Read full bio of Sneha Tete

